


![]()
I recently received a message from a service touting online storage of one's music files and streaming of those files to almost any device. I took a look at the service, its apps, and its pricing and thought about whether the CA Community would be interested in the offering. Most of it looked good, but when I considered the monthly charge to store files online for streaming, I started to think about what's already available to many CA readers without adding another monthly charge to their bills. I also thought about the sizable number of readers who don't subscribe to music streaming services such as Tidal, Qobuz, Deezer, Spotify, or Apple Music. Then I thought about those of us who have subscriptions to one or more services, but are still unable to stream our favorite remaster of Kind of Blue, Dark Side of the Moon, or any number of Mobile Fidelity albums that will never hit streaming services. I was pretty sure JRiver Media Center had a solution for this problem, but I didn't know how great it was because I honestly had never given it a spin. While testing this JRMC solution, I stumbled on an absolute gem involving JRMC and Chromecast Audio devices. Needless to say, I'm thrilled to write about streaming our music collections around the globe to almost any device for no additional cost to many readers, and sending audio around our homes to $35 endpoints all from the convenience of the JRemote iOS/Android app. Come along and be prepared to spend little-to-no money while increasing your enjoyment of this wonderful hobby. It's not often I get to say that around here, but it's so satisfying.
Streaming Around The Globe
Problem:
I want to listen to my vast collection of music, in full quality, when I'm away from home using an iPhone, Android device, laptop, or desktop. This music collection contains out of print titles, special remasters (MFSL, Analogue Productions, etc...), vinyl rips, and high resolution material unavailable from paid streaming services. I don't want another monthly payment just to access the music I've already purchased. As a bonus, I want the user interface to be equivalent to what I'm used to at home.
Solution:
JRiver Media Center can stream my music, in full quality, from my home to a mobile device running JRemote or Gizmo, and to a laptop or desktop running JRiver Media Center or a web browser*.
* Web browser playback, via Web Gizmo, is less than stellar due to the interface, inability to browse one's collection while listening, lack of controls, sample rate issues, etc... But, it's a way to remotely play one's files on a system when one doesn't have the ability to install the full JRiver Media Center application. In other words, it will suffice in a pinch.
Requirements:
1. JRiver Media Center
2. Internet access
3. Remote device (i.e. phone, laptop, desktop) running JRemote or Gizmo or JRiver Media Center or a web browser
Overview:
At a high level, here is what the end game looks like.
Mobile Device Scenario - I have JRiver Media Center running at home to play and organize my library of roughly 60,000 tracks. I also have an iPhone running JRemote to control playback while I'm at home. Using my iPhone and JRemote when I'm away from home, I stream my entire music collection from my house to my phone (AT&T LTE signal), in full resolution, for playback in my car.
Desktop/Laptop Scenario - I have JRiver Media Center running at home to play and organize my library of roughly 60,000 tracks. I also have JRiver Media Center installed on my laptop, but don't have the disk space to store my several terabyte library on this laptop. When I'm away from home, I stream my entire music collection from my house to my laptop using the same JRiver Media Center interface as when I'm home.
Details:
Setup for either of the aforementioned streaming scenarios is seriously simple. Here are step-by-step instructions for getting your music to your device anywhere on the globe.
Mobile Scenario Setup
-
Configure JRiver Media Center, installed on your home-based computer or NAS, to serve up your music.
[*]Forward / map a port on your Router. This isn't rocket science, but can be confusing to some people who haven't done it yet. Many routers are different, but the concept is the same. You want to "tell" your router to let JRemote communicate with the computer in your home running JRiver Media Center. Without this, JRemote will attempt to communicate with your JRiver Media Center computer, but the router will stop this communication. Here are two examples for configuring this option. Letter "a" is for configuring a CenturyLink provided ZyXEL C1100Z router/modem. Letter "b" is for configuring an Apple AirPort Extreme or AirPort Express.
Note: If you need assistance find the IP address of your local JRiver Media Center computer, here's a link for Windows and OS X (LINK).
[*]Configure JRemote on your mobile device to access your music from anywhere. Do this step while at home on your local network to make troubleshooting simpler if necessary.
Desktop/Laptop Scenario Setup
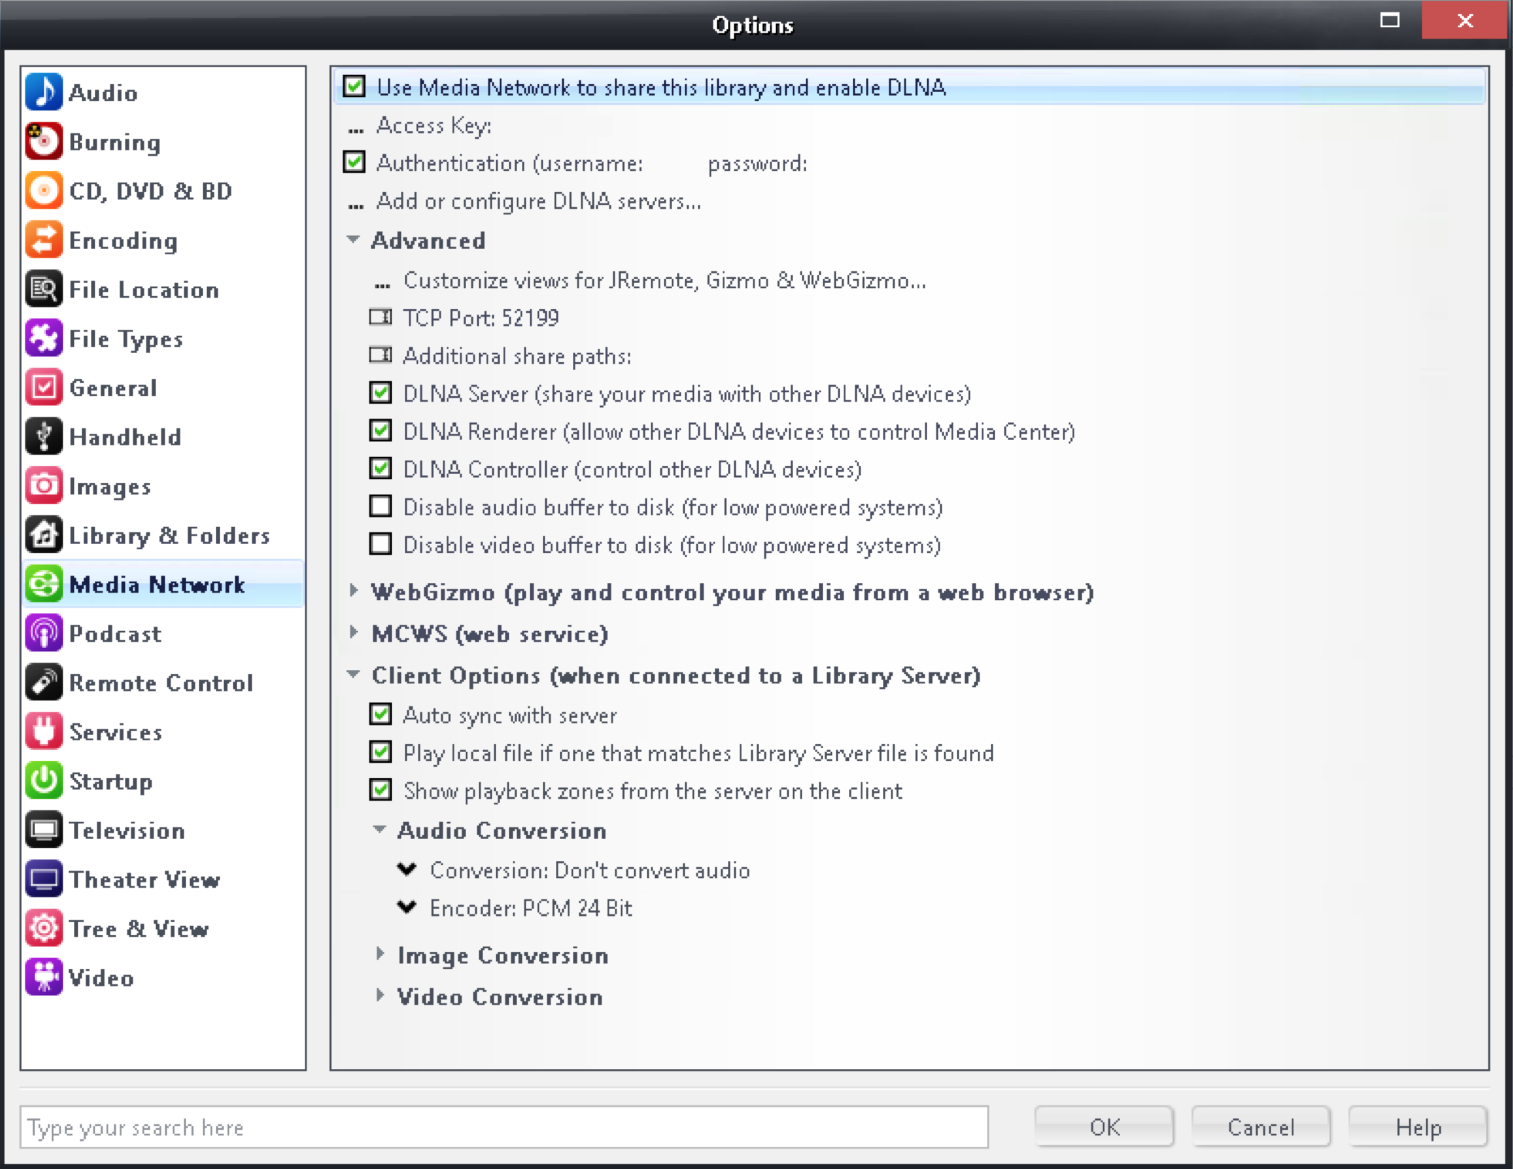
- Go to TOOLS > OPTIONS > MEDIA NETWORK. (image)
- Enable "Use Media Network to share this library and enable DLNA"
-
Enable "Authentication" and enter a username and password.
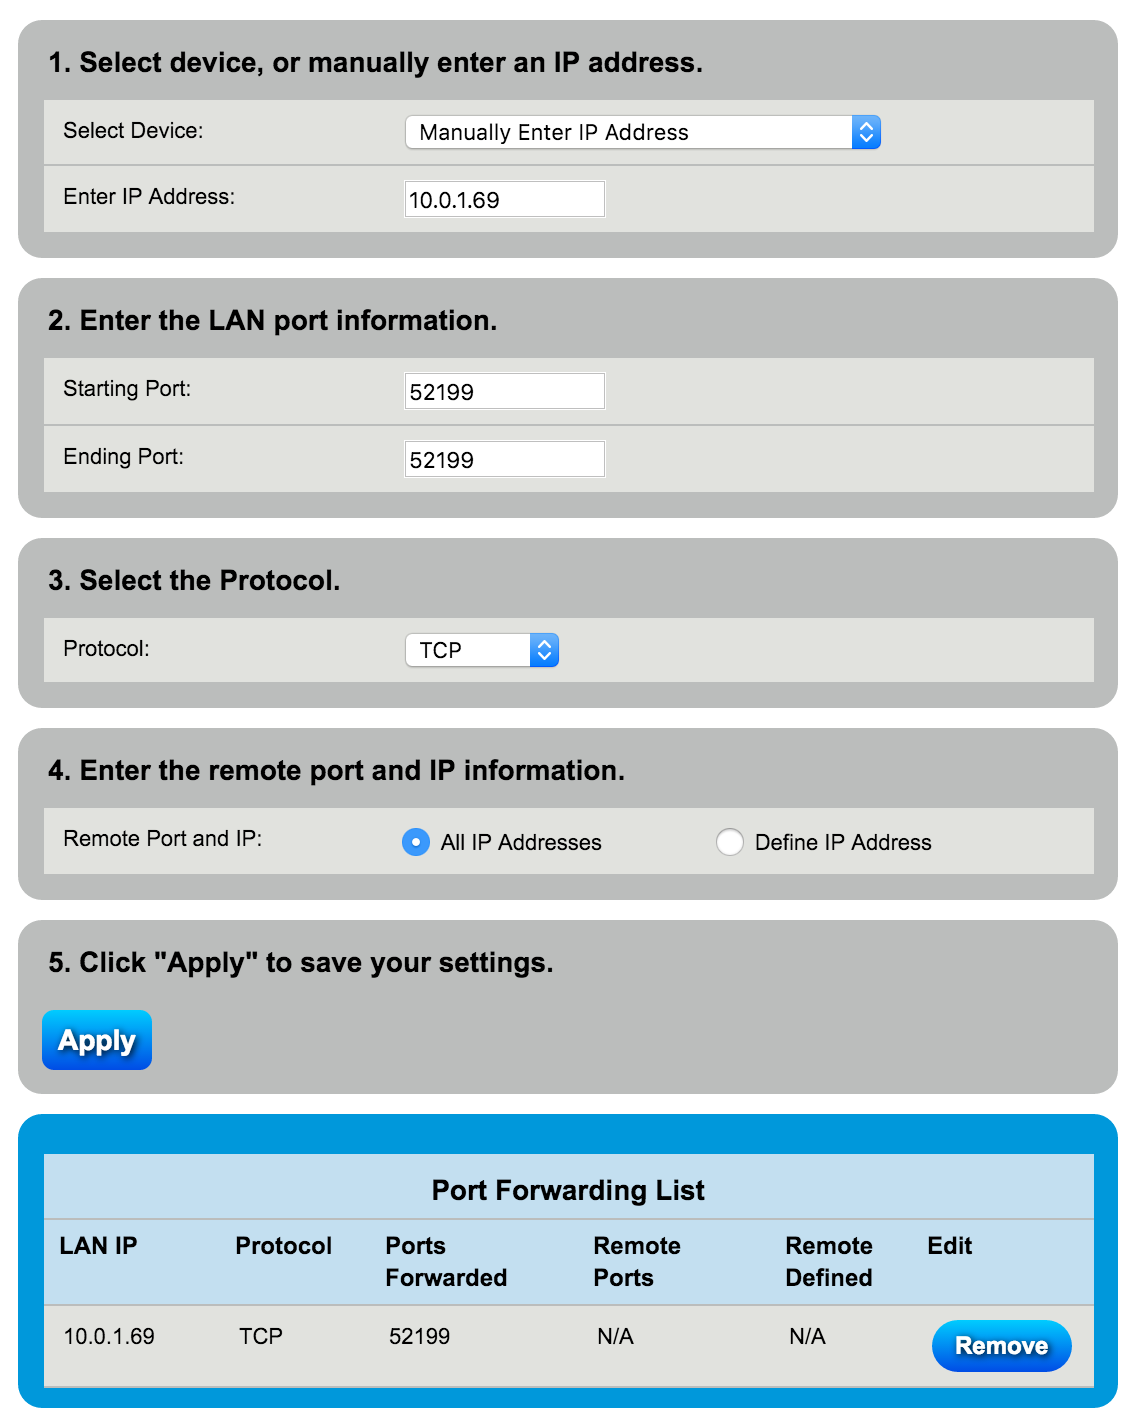
- Within the Advanced Setup / Security section of the web interface of this router, there is a Port Forwarding page. To forward JRemote communication from the Internet to the JRiver Media Center computer, enter the IP address of the JRMC computer, enter port number 52199 for starting and ending port, select TCP as the protocol, and All IP Addresses, click Apply. (image)
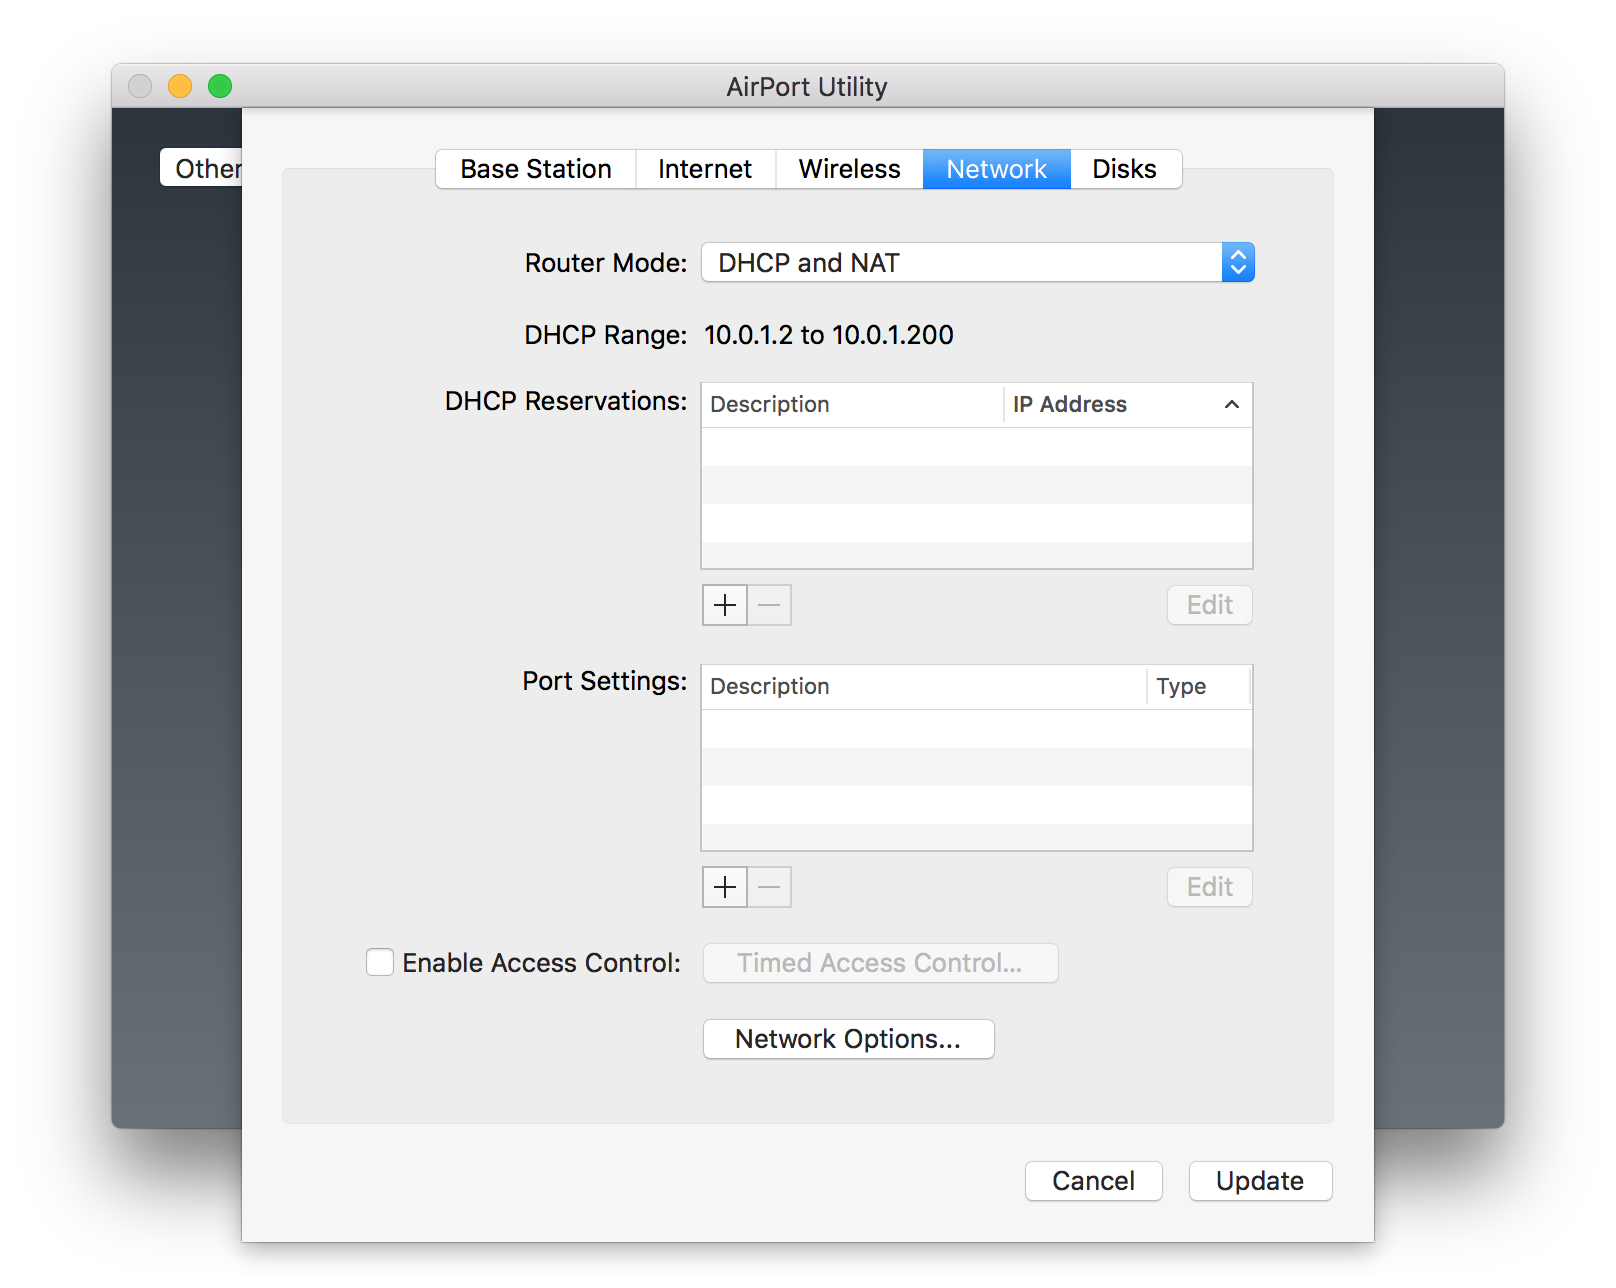
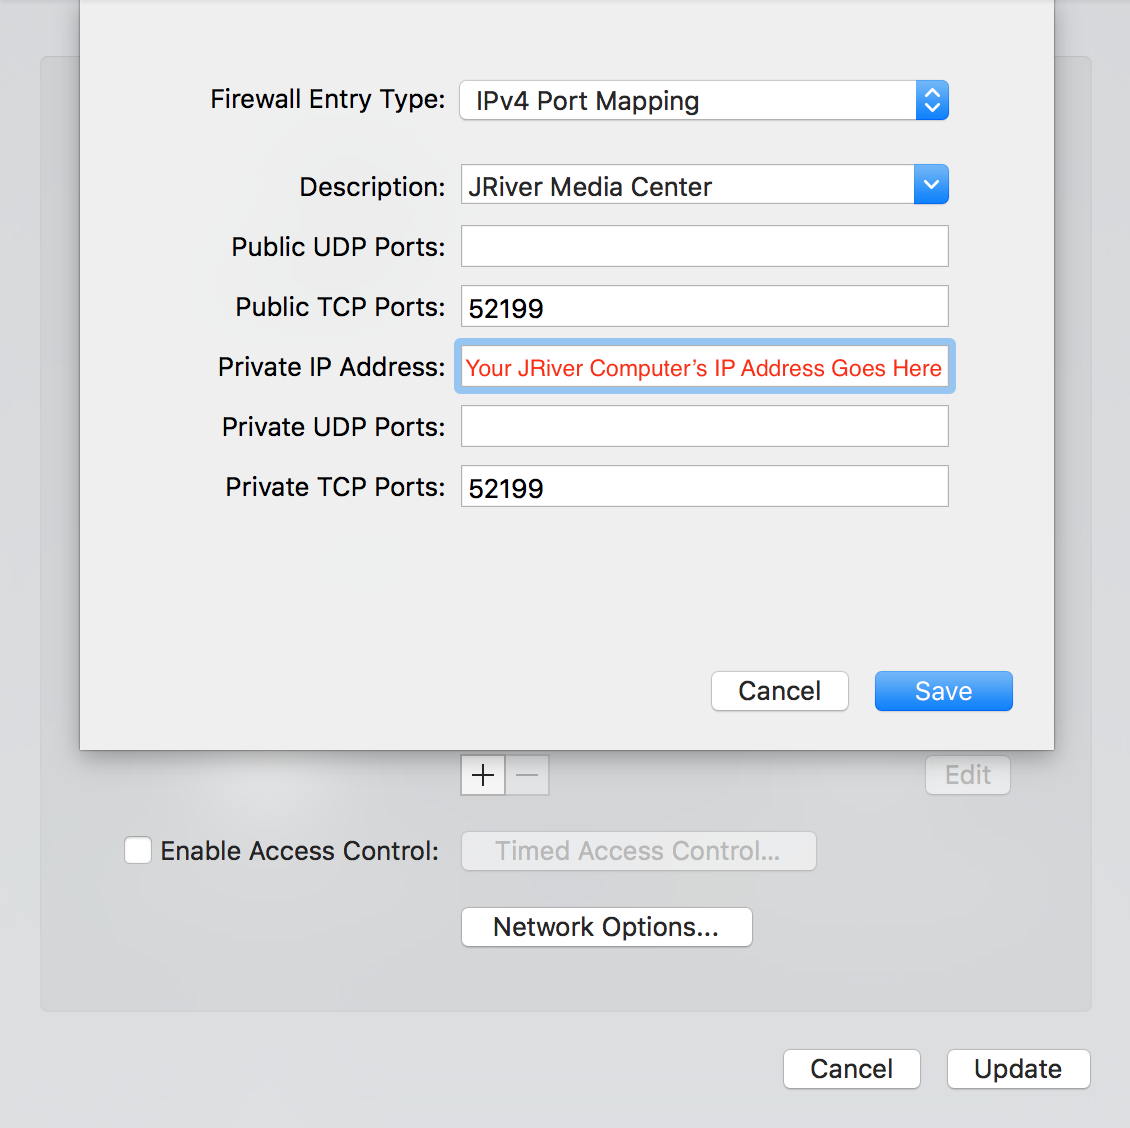
- Open the AirPort Utility and Edit your AirPort Extreme or AirPort Express. Select the Network tab (image). Select the Plus sign near the Port Settings box. The Firewall Entry Type should be IPv4 Port Mapping. Enter a description such as JRiver Media Center. Enter the Public TCP Port 52199. Enter the Private IP Address, this is the IP address of your JRiver Media Center computer at home. Enter Private TCP Port 52199. Click Save then click Update. (image)
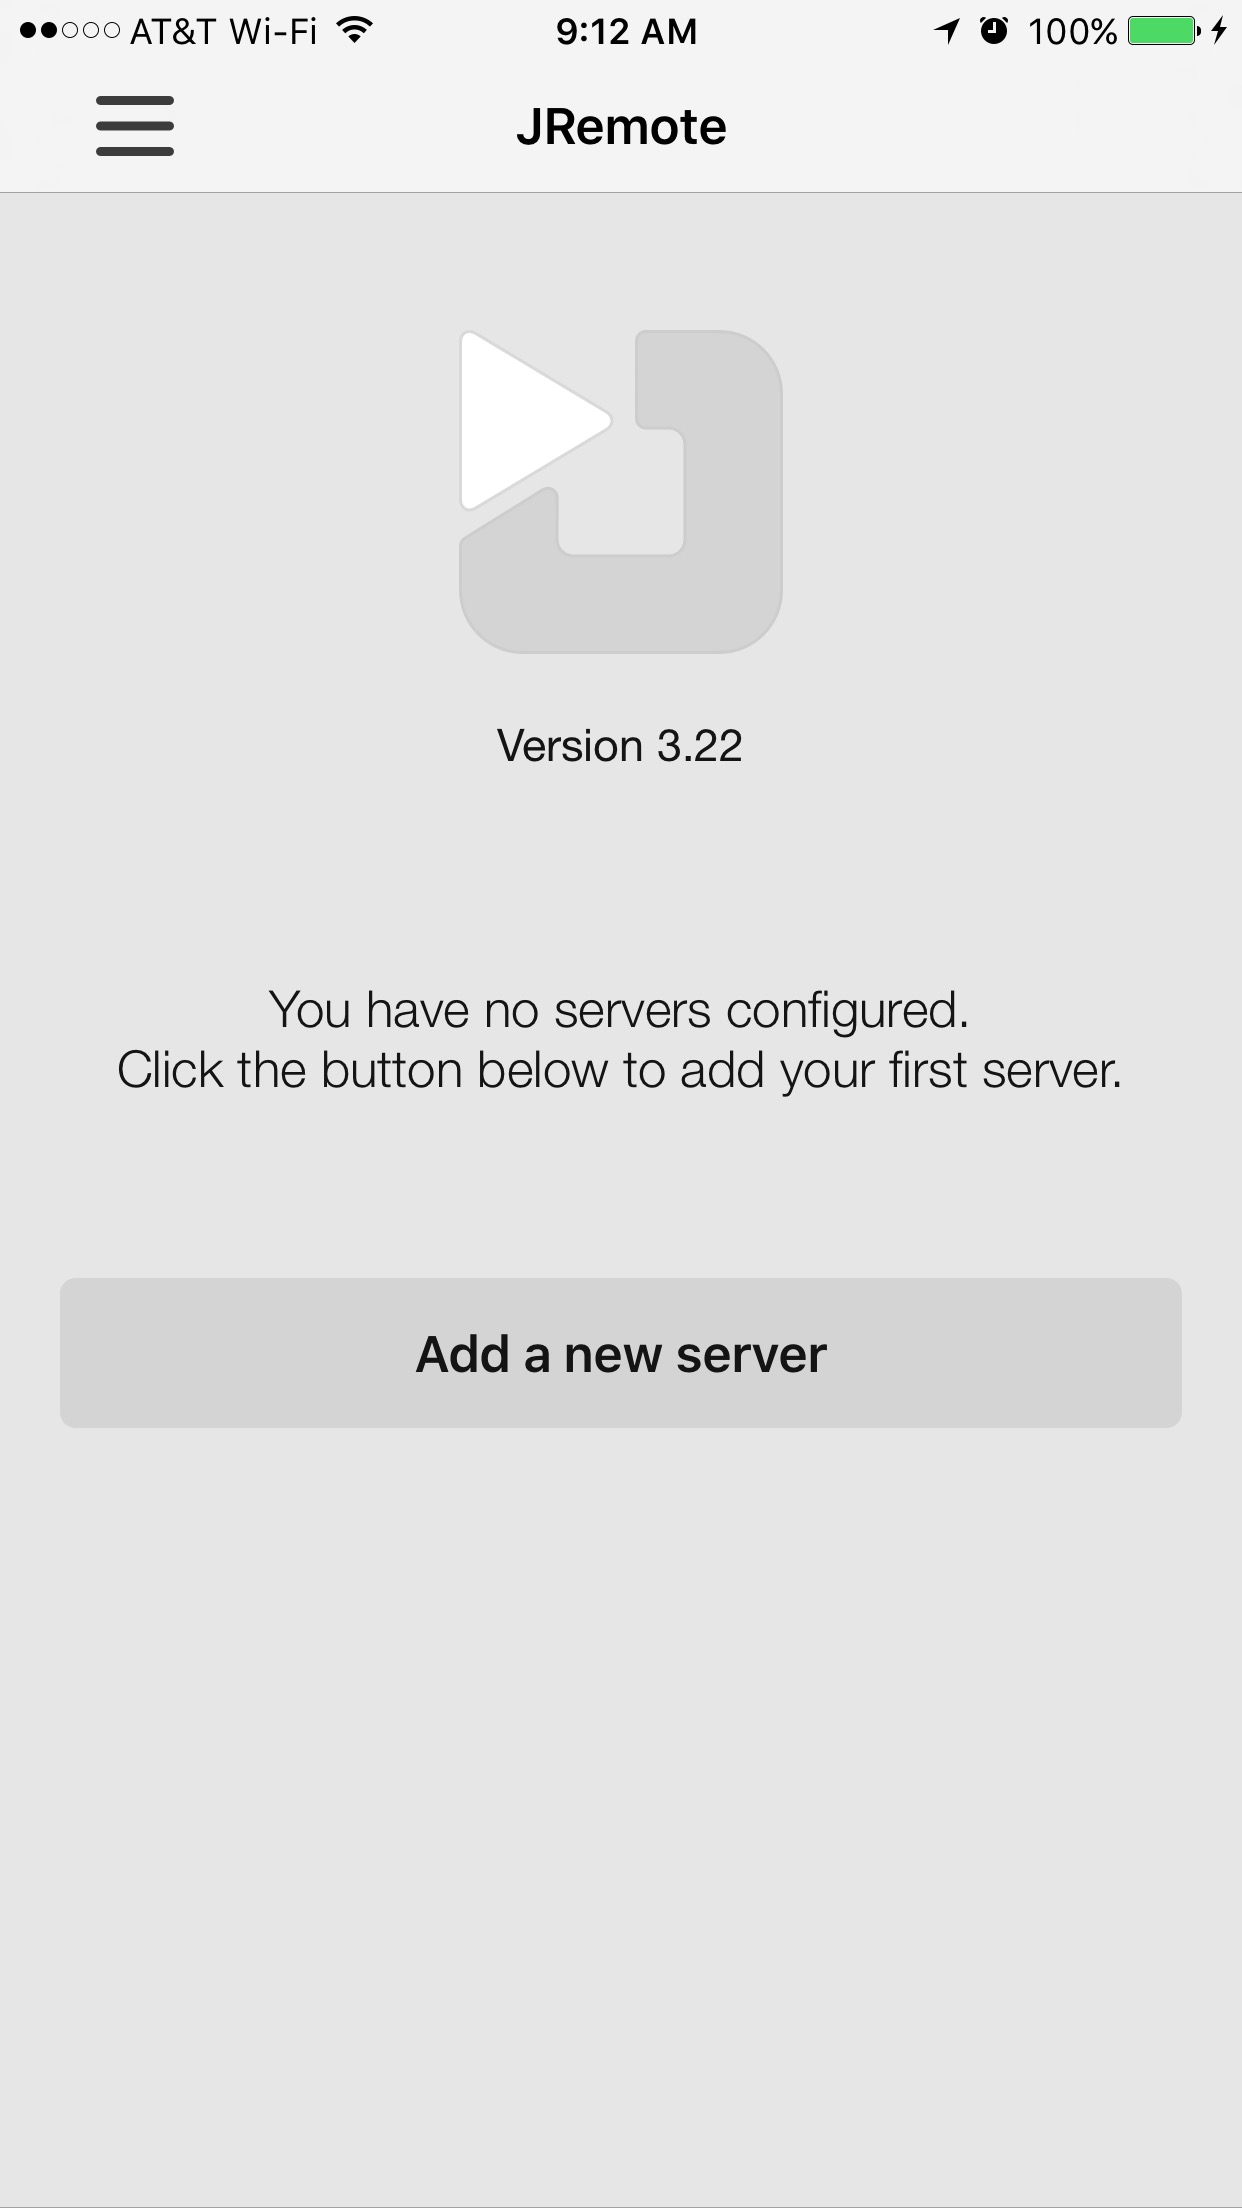
- If you've never used or setup JRemote, open the app and select "Add a new server" from the main screen (image). If you already have your JRiver Media Center server setup within JRemote skip ahead to letter "g"
- Select "Add a new server" again on the subsequent screen.
- Select "Connect with access key."
- Enter the access key listed in TOOLS > OPTIONS > MEDIA NETWORK from step 1 above. (I've removed my access key from the screenshot to keep honest people honest).
- Enter your username and password created in step 1c above.
- Select "Add and connect"
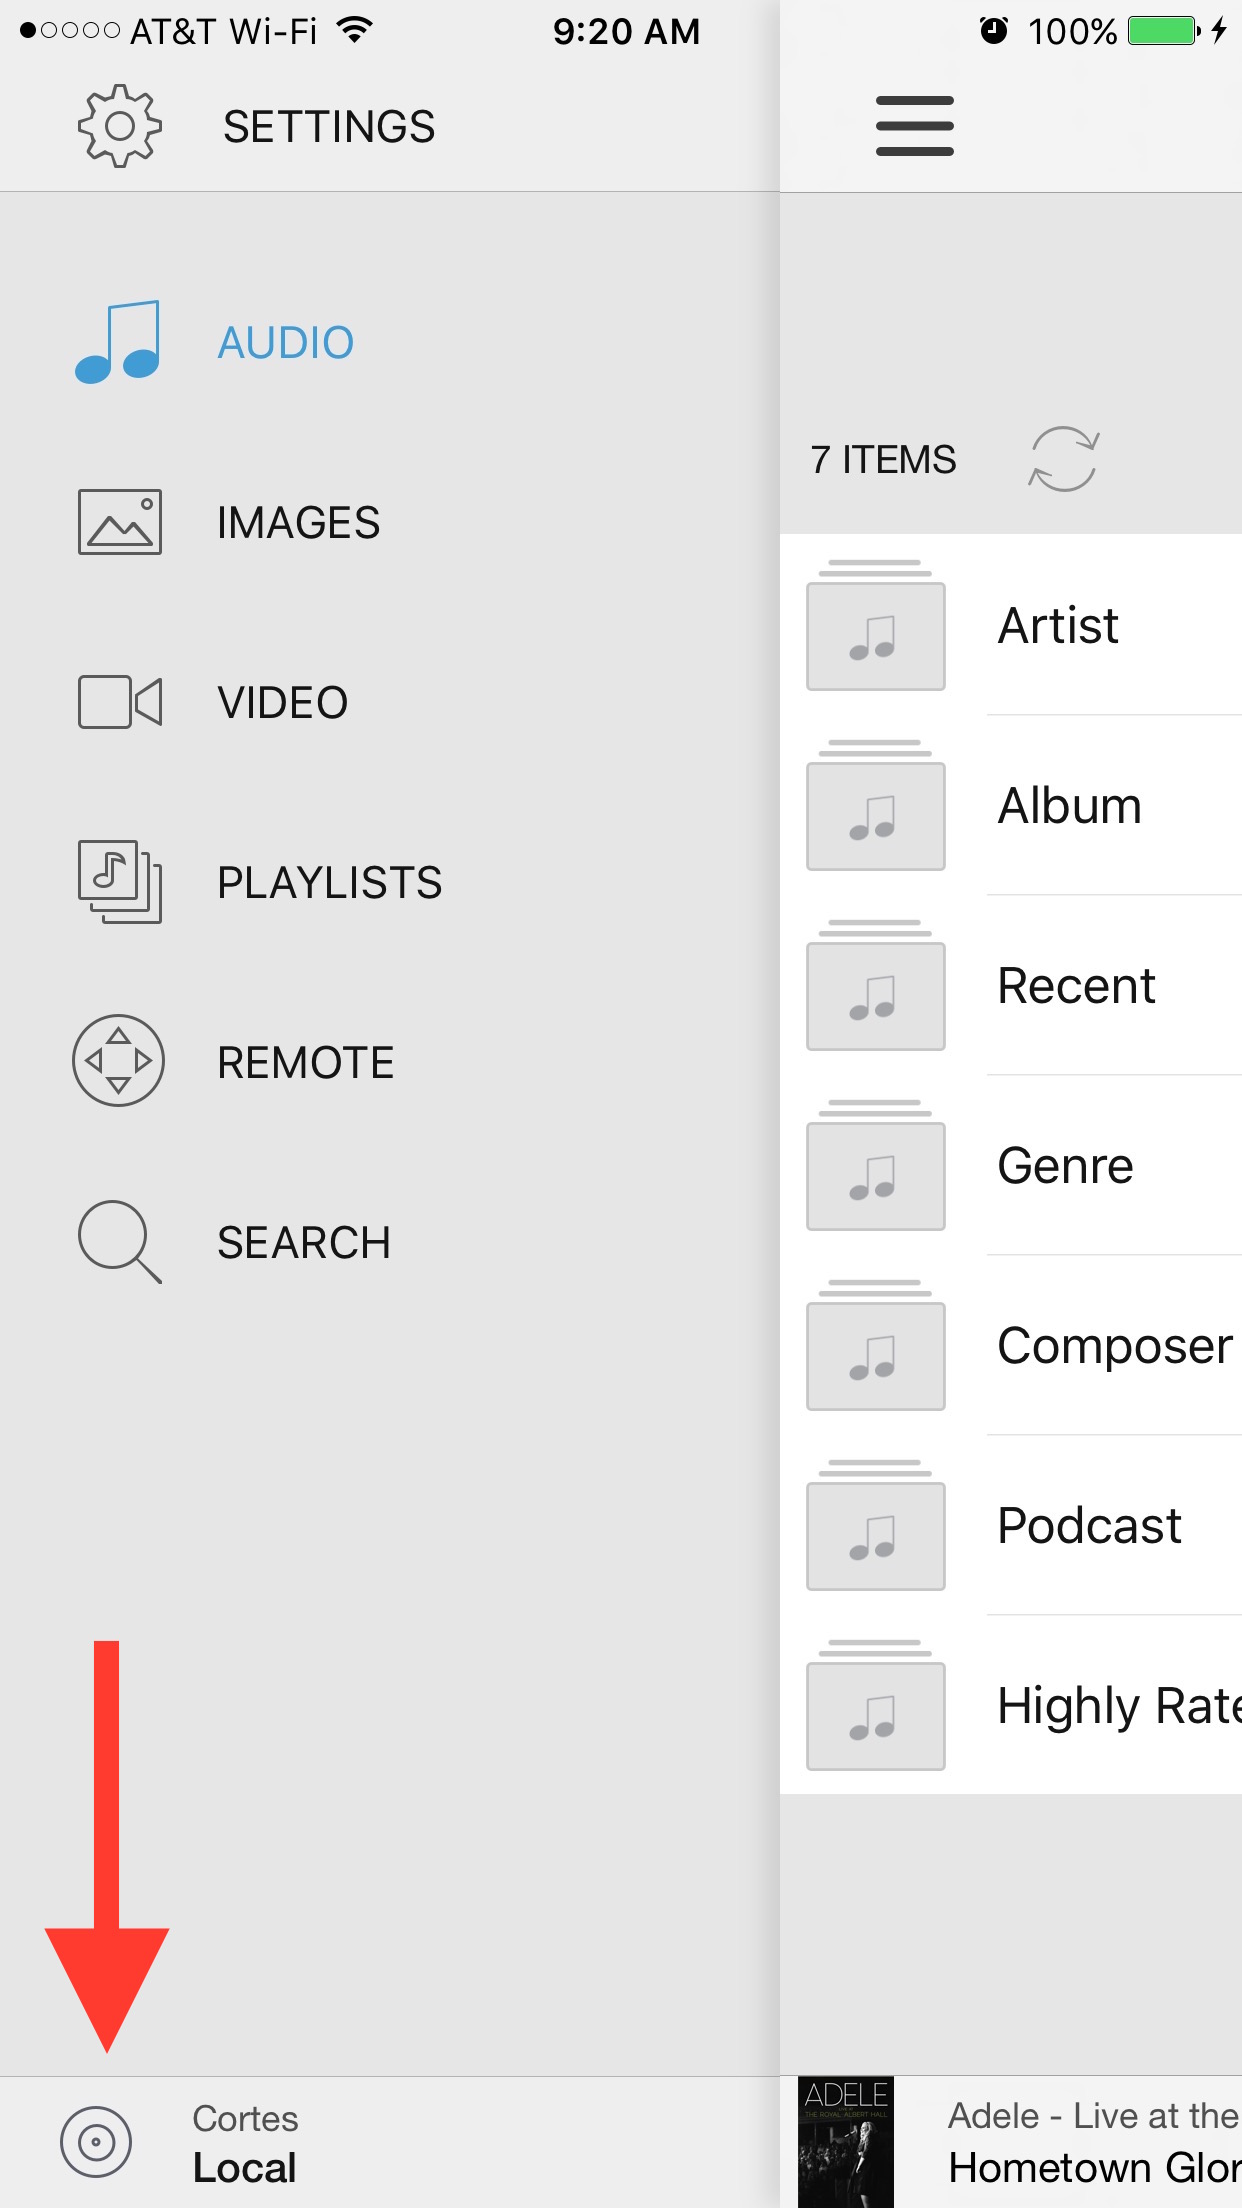
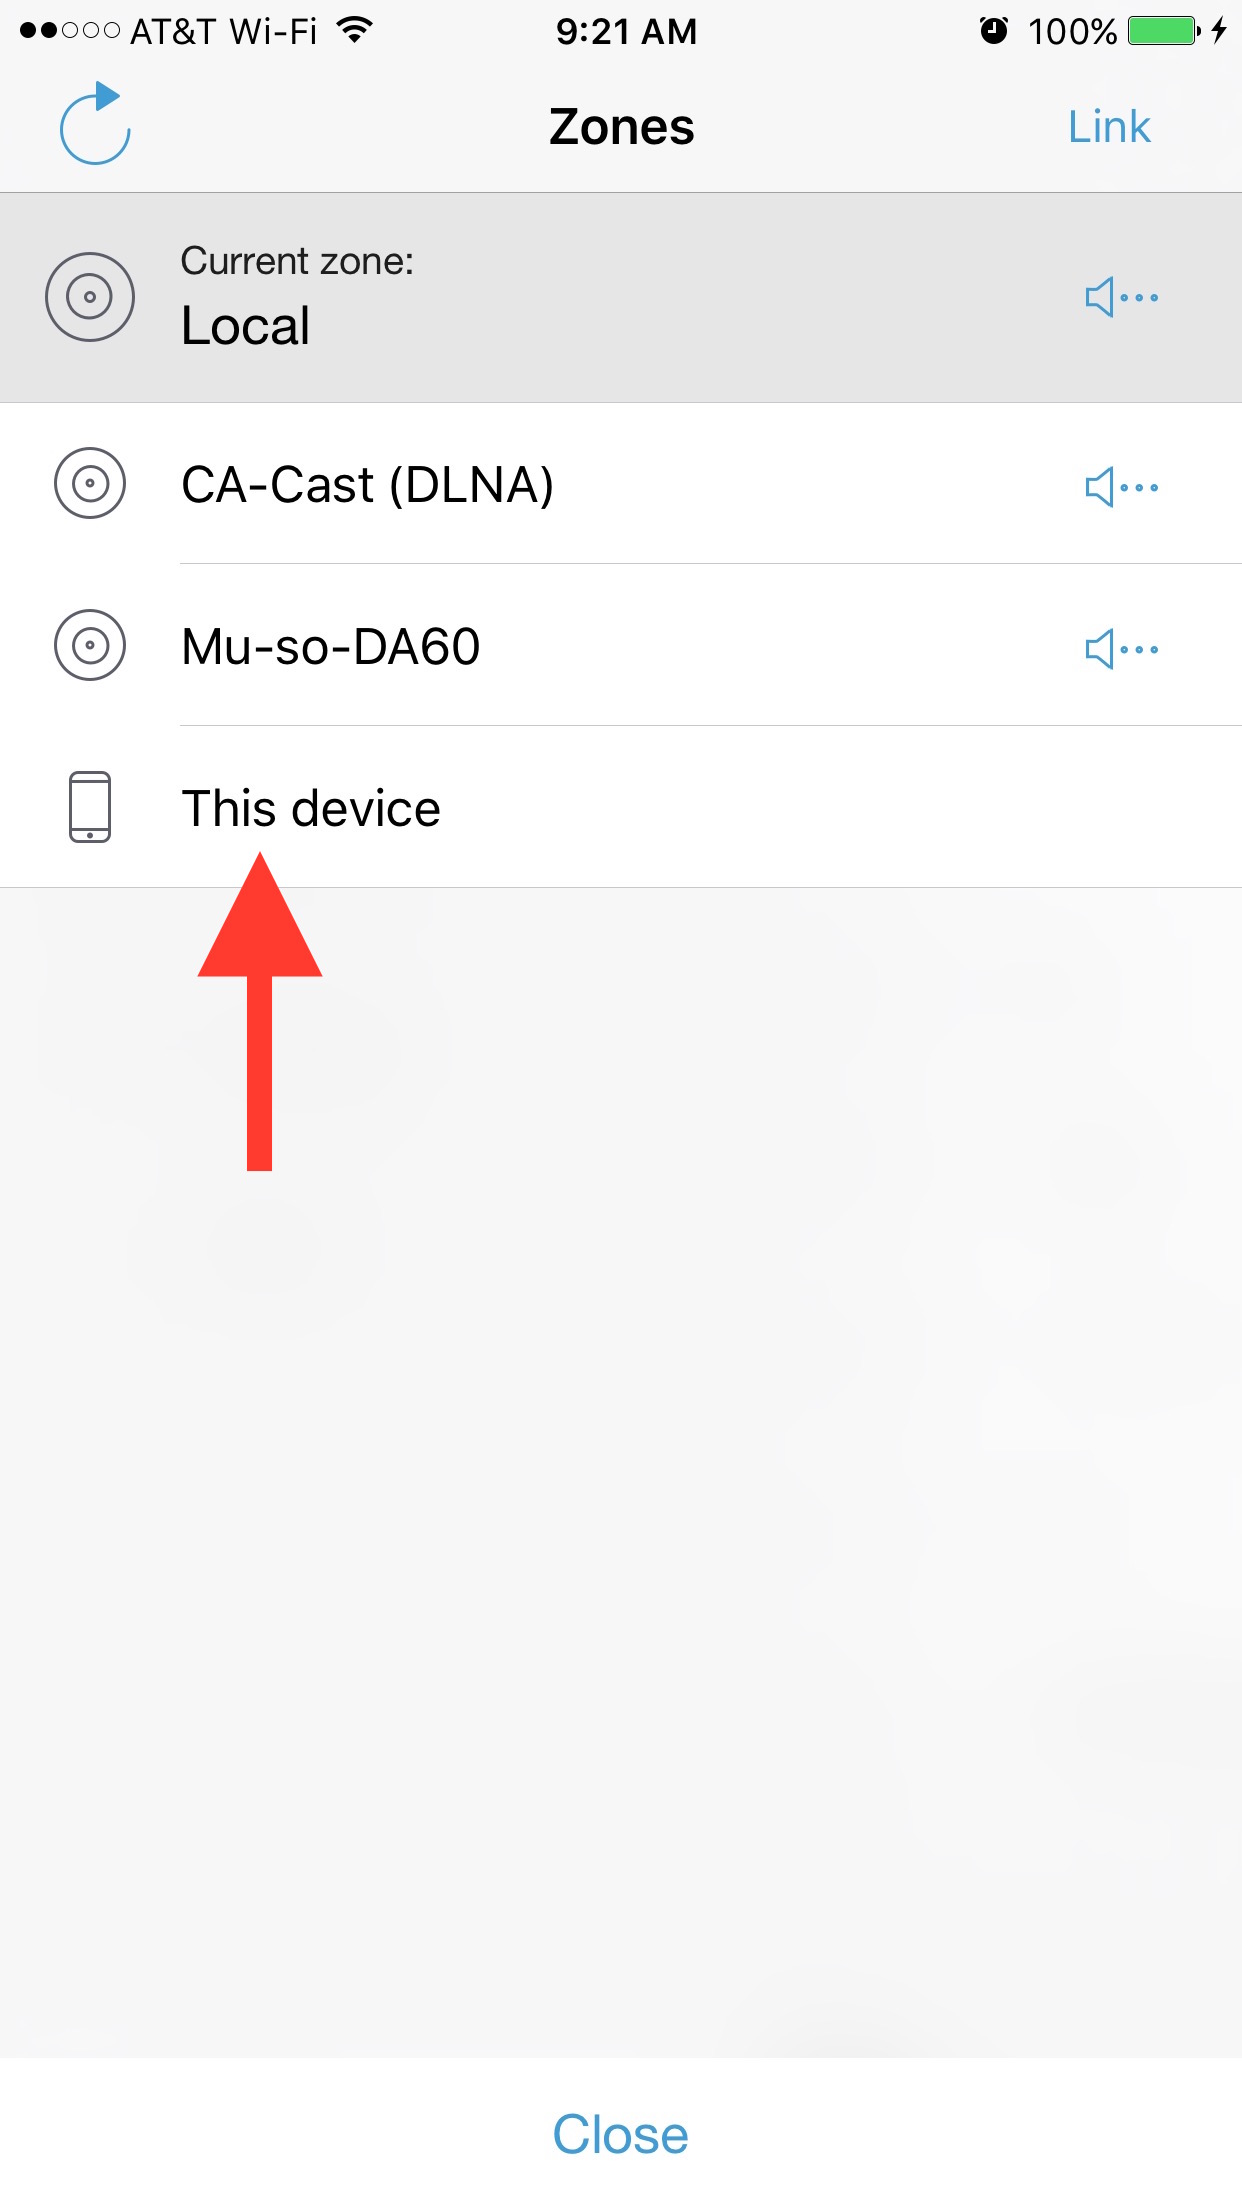
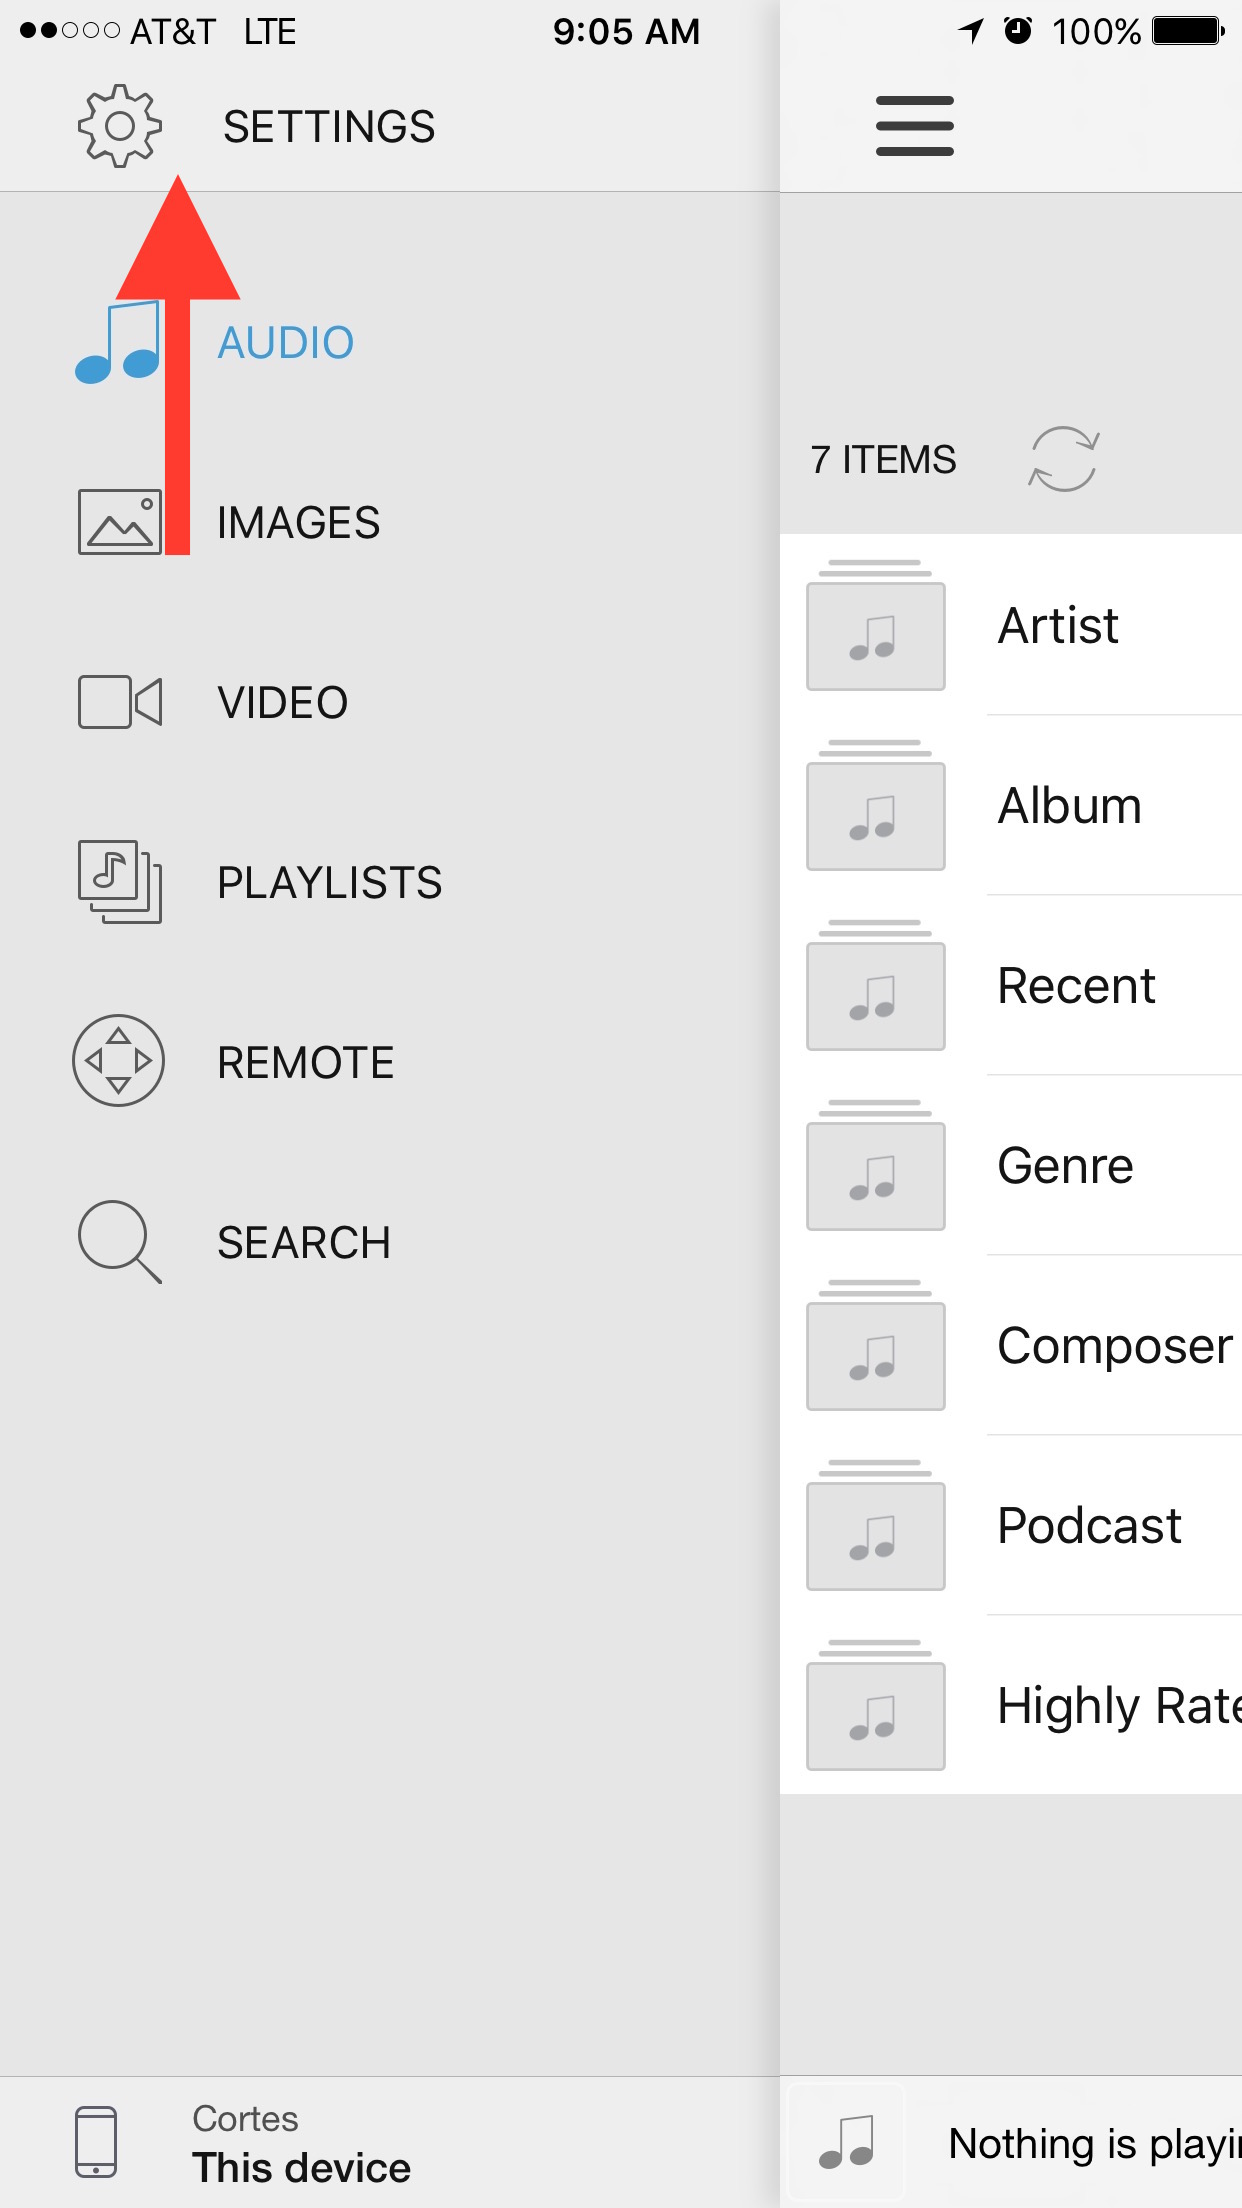
- Configure JRemote to stream the music to your mobile device by selecting the circular pattern/server name (image) to bring up the zones. Select "This device" form the list (image).
- Configure audio quality by selecting "Settings" (image) and scrolling to the "Playback and Streaming" section. I've disabled the option to transcode audio. This negates the setting below it for audio transcoding quality. If you would like to lower the quality due to network performance or bandwidth limitations, this is the place to do so.
- Test streaming to you mobile device while connected to WiFi.
- Disable WiFi, close and reopen JRemote, and test streaming to your mobile device via your service carrier. If JRemote doesn't connect to your server automatically, simply select the server name and it will connect without the need to enter an IP address.
- Enjoy streaming your music from home to your locations around the globe.
-
Configure JRiver Media Center, installed on your home-based computer or NAS, to serve up your music.
[*]Forward / map a port on your Router. This isn't rocket science, but can be confusing to some people who haven't done it yet. Many routers are different, but the concept is the same. You want to "tell" your router to let JRemote communicate with the computer in your home running JRiver Media Center. Without this, JRemote will attempt to communicate with your JRiver Media Center computer, but the router will stop this communication. Here are two examples for configuring this option. Letter "a" is for configuring a CenturyLink provided ZyXEL C1100Z router/modem. Letter "b" is for configuring an Apple AirPort Extreme or AirPort Express.
Note: If you need assistance find the IP address of your local JRiver Media Center computer, here's a link for Windows and OS X (LINK).
[*]Configure JRiver Media Center on your laptop to access your music from anywhere. Do this step while at home on your local network to make troubleshooting simpler if necessary.
Notes: Streaming from home to another place isn't new. In fact JRiver has been doing it of many many years as have several other companies such as NAS manufacturers QNAP and Synology. This article isn't here to say "look what I discovered" rather it's here to say "here's how to get it working." I think the CA Community will absolutely love this capability once people die it a spin. In fact, accessing your music with JRemote provides the full JRemote experience, including editing metadata, that many CA readers love. What's not to like about expanding the capability what many of you already have, for zero dollars and a little of your time?
Streaming Around the Home

Problem:
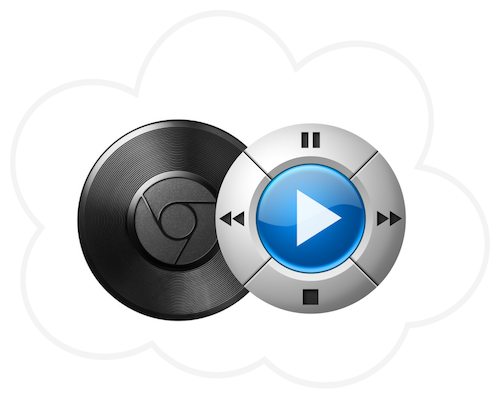
I want to stream from JRiver Media Center to my $35 Chromecast Audio devices, up to 24 bit / 96 kHz as supported by the devices, with bit perfect digital output to my DAC via the mini-TosLink Chromecast Audio output, and use the JRemote iOS/Android app. Ideally the Chromecast Audio devices would appear as Zones within JRMC, the same way as UPnP/DLNA zones appear automatically. Transcoding my lossless library of FLAC, AIFF, an WAV files is unacceptable.
Solution:
JRiver Media Center supports UPnP/DLNA endpoints, but not Chromecast endpoints. Thus, it's impossible for my Chromecast Audio endpoints to appear as a zone in JRMC and receive audio without a little help. By installing and configuring the tiny, but very powerful, BubbleUPnP Server on my JRiver Media Center computer, my Chromecast Audio devices appear as UPnP/DLNA zones in JRMC. Once these devices appear as zones in JRMC, everything else falls in line. The JRemote app can select the Chromecast Audio devices and stream music to them as if they are true UPnP/DLNA endpoints. BuubleUPnP Server enables the full power of JRMC and JRemote to work with Chromecast Audio devices.
Requirements:
1. JRiver Media Center
2. BubbleUPnP Server
3. Chromecast
Overview:
I have JRiver Media Center with BubbleUPnP Server running on a computer (could also be running on a NAS) and JRemote on my iPhone. I select the Chromecast Audio devices in my home from within JRemote and select the music I want to stream to the devices. It's really that simple. I can even link/group several Chromecast Audio devices together, all from within JRemote.
Details:
Setting up JRiver Media Center to stream to CHromecast Audio devices is beyond simple. Here's a step-by-step guide to getting it up and running right now.
-
- Within the Advanced Setup / Security section of the web interface of this router, there is a Port Forwarding page. To forward JRemote communication from the Internet to the JRiver Media Center computer, enter the IP address of the JRMC computer, enter port number 52199 for starting and ending port, select TCP as the protocol, and All IP Addresses, click Apply. (image)
- Open the AirPort Utility and Edit your AirPort Extreme or AirPort Express. Select the Network tab (image). Select the Plus sign near the Port Settings box. The Firewall Entry Type should be IPv4 Port Mapping. Enter a description such as JRiver Media Center. Enter the Public TCP Port 52199. Enter the Private IP Address, this is the IP address of your JRiver Media Center computer at home. Enter Private TCP Port 52199. Click Save then click Update. (image)
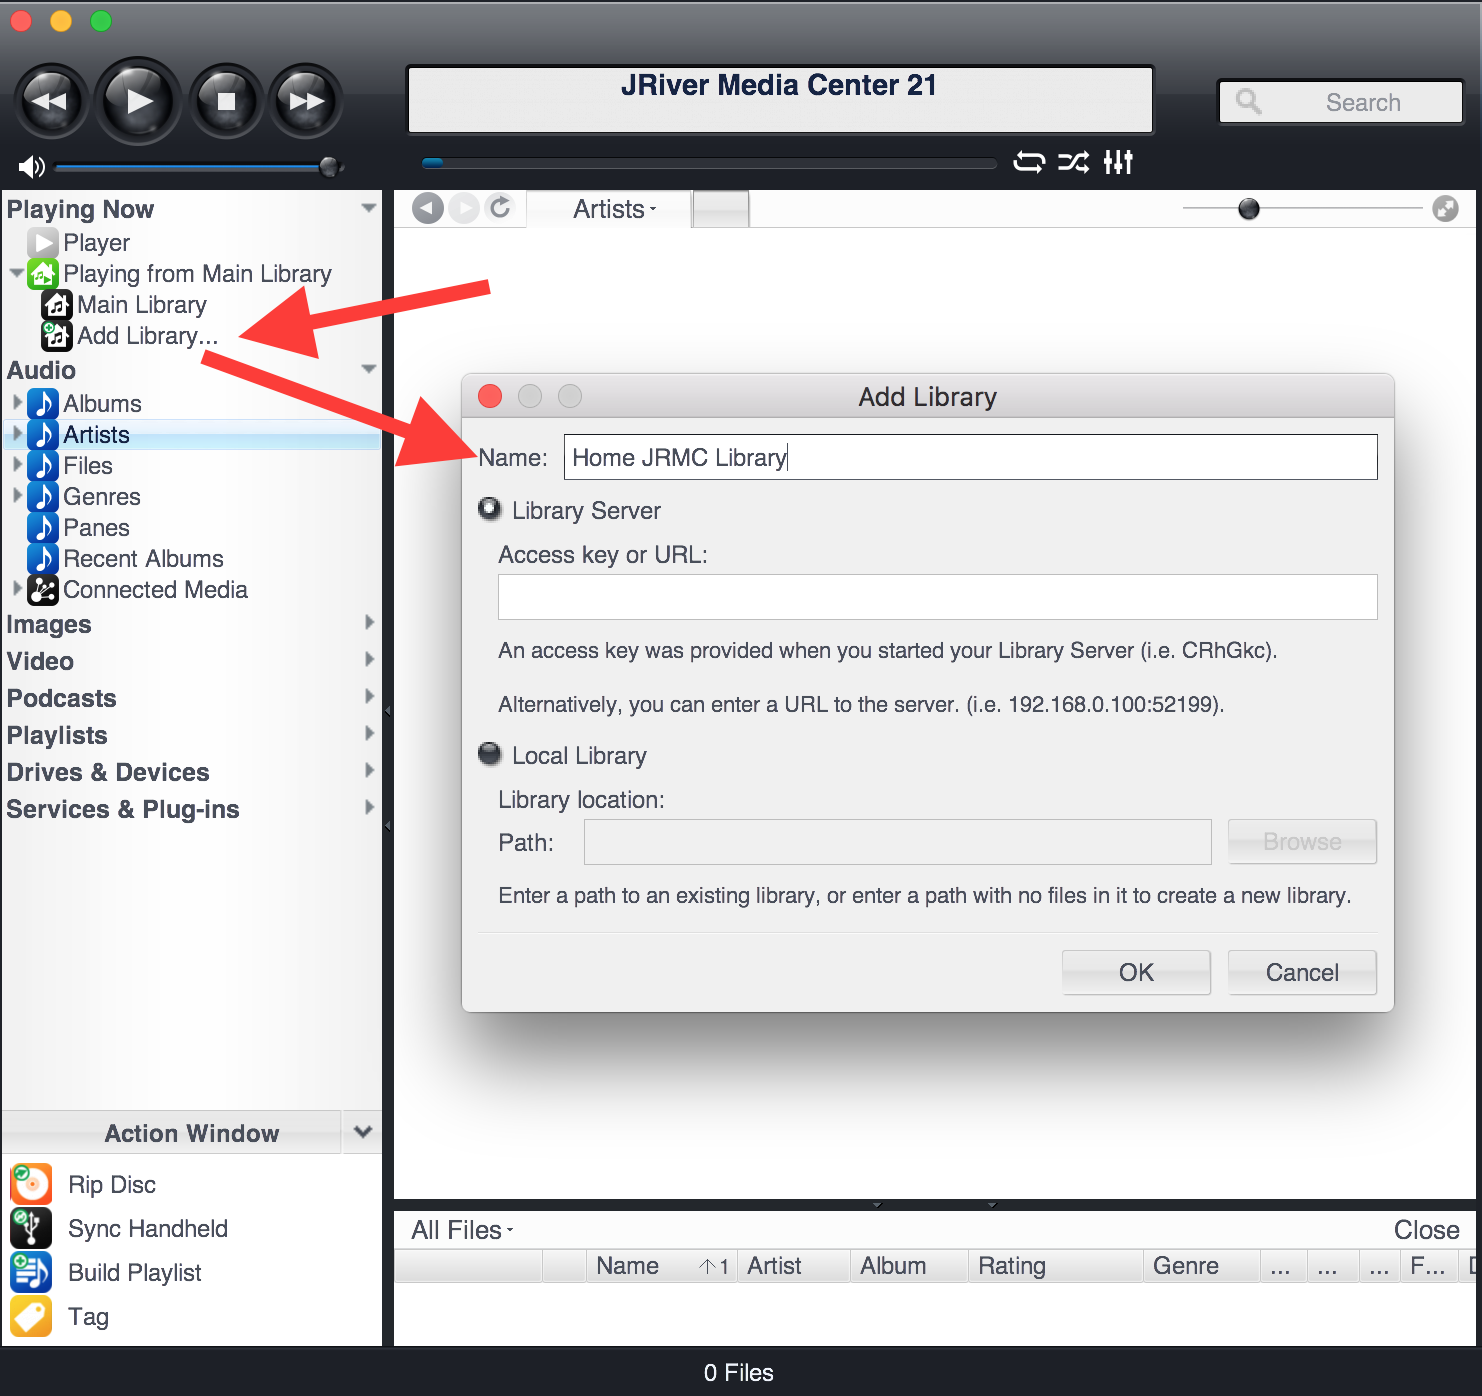
- Open JRiver Media Center on your laptop, select "Playing Now" from the left-side pane, select "Playing from Main Library" below "Playing Now" and select "Add Library..."
- In the Add Library popup box enter a name such as Home JRMC Library and click OK. Enter your username and password from step 1c above. (image)
- The remote library will load and you'll be able to browse, select and play music the same way as usual through JRiver Media Center. Enjoy.
-
Install and configure JRiver Media Center (if you haven't already) and enable DLNA.
[*]Setup a Chromecast Audio device on your wireless network. Instructions are included with the device. When using the optical output there is no need for special configuration such as enabling high dynamic range.
[*]Install and configure BubbleUPnP Server
Notes: For more information about what formats the Chromecast Audio devices support and how to work around some issues, please see the CA article titled Bit Perfect Testing of the $35 Chromecast Audio
JRiver recently enabled streaming from JRemote to Chromecast endpoints without the need for additional software such as BubbleUPnP Server. However, there are some caveats. Currently is transcodes all audio to MP3, and it's only available for the Android version of JRemote. JRiver's Gizmo and another app named EOS also enable streaming to Chromecast devices but they also transcode all audio to MP3.
-
- Download BubbleUPnP Server and run through the installation process. There's no need to enable Internet access (when access the question during installation) for Chromecast Audio streaming to function.
- After installation the BubbleUPnP Server configuration page should appear, if not just launch the app from your desktop. Select the Media Renderers tab.
- Select the Chromecast Audio device you want to configure, from the left side of the window.
- Select the box to enable "Create a DLNA renderer" and don't enable the OpenHome renderer.
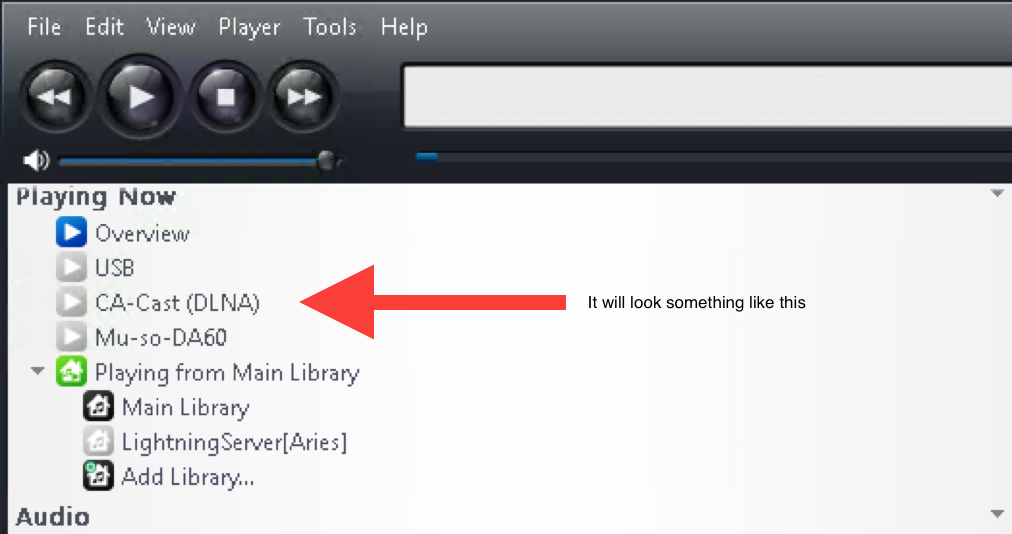
- Close the configuration page and open JRiver Media Center. The Chromecast Audio device will appear under the "Playing Now" section just like a DLNA renderer (image). Select the Chromecast Audio device, then start playing music. Or, open JRemote and select the Chromecast Audio DLNA zone (by selecting the circular pattern/server name to bring up the zones (image).
- Enjoy streaming music to your $35 audio endpoints.
-
- Go to TOOLS > OPTIONS > MEDIA NETWORK.
- Enable "Use Media Network to share this library and enable DLNA" (image)
-
- Go to TOOLS > OPTIONS > MEDIA NETWORK. (image)
- Enable "Use Media Network to share this library and enable DLNA"
- Enable "Authentication" and enter a username and password.
- Within the "Client Options (when connected to a Library Server)" (image) is the areas to set the audio conversion rules. I set this to "Don't convert audio" but if bandwidth restraints are present this can be set to varying MP3 quality levels.


Recommended Comments
Create an account or sign in to comment
You need to be a member in order to leave a comment
Create an account
Sign up for a new account in our community. It's easy!
Register a new accountSign in
Already have an account? Sign in here.
Sign In Now