


 It has been nearly two years to the day since I wrote about JRiver Media Center [<a href="http://www.computeraudiophile.com/content/Windows-7-Audio-J-River-Media-Center-14-Configuration">Link</a><a href="http://www.computeraudiophile.com/content/Windows-7-Audio-J-River-Media-Center-14-Configuration"><img src="http://images.computeraudiophile.com/ca/icons/ex.png" style="padding: 0pt 0pt 0pt 3pt;" alt="link"></img></a>]. At the time JRiver was on version 14 and Windows 7 was somewhat new to audiophiles. Now JRiver has progressed to version 17 and most computer audiophiles have moved from previous versions of Windows to Windows 7. Much of the meat in that first article still holds true today. Using Exclusive Mode and WASAPI output remain great methods of outputting bit perfect audio from one's computer. Nevertheless it's time for an updated article that computer audiophiles can use as an unbiased reference for JRiver configuration and information.
[PRBREAK][/PRBREAK]
<b>Introduction</b>
JRiver Media Center version 17 is no doubt my favorite playback application for the Windows operating system. JRMC's plethora of playback options, output modes, user interface, format support, and customization capabilities are a few reasons why it's my go-to playback application on Windows 7. As a company JRiver Inc. has been around for over 30 years. Granted the Media Center application hasn't been around that long but the longevity of the company suggests the people at JRiver Inc. are doing some things right. A cursory look at the JRiver Interact forum shows evidence the company is very responsive to its customers and leading the way when it comes to full featured playback applications. Compare JRiver Inc.'s responsiveness to that of Microsoft (Windows Media Player) or Apple (iTunes) when a customer requests a new feature or posts a possible issue on the user forums of the respective companies. Receiving a personal response from a company representative from Microsoft or Apple would be an extremely rare occurrence. Not so with JRiver. It's very common to see forum posts from both the CEO Jim Hillegass and CTO Matt Ashland on a daily basis.
<b>JRiver Media Center 17</b>
When using JRiver Media Center 17 my playback goal is to output bit perfect audio unless otherwise noted. JRMC is capable of Digital Signal Processing that includes sample rate conversion and room correction, but DSP that alters the original audio signal is not the main focus of this article. In addition to outputting bit perfect audio I like to customize the look of JRMC to display information that's important to me such as sample rate, bit depth, and file format.
<b>Graphical User Interface</b>
JRiver Media Center's graphical user interface (GUI) works great immediately after installation. The default view doesn't require any changes to play music and navigate one's music collection easily. In fact I used the default view without any changes for quite awhile after I first began using JRMC years ago. Computer audiophiles seeking to get the most out of JRMC will likely want to customize the user interface just a bit to suit their needs better than the average user. Plus, most audiophiles don't realize they can disable or hide features such as Video and Image support. Here are some features and user interface customizations I consider important.
<img src="http://images.computeraudiophile.com/graphics/2012/0217/default-tree.png" style="padding: 5pt 10pt 5pt 0pt;" align="left">Disabling or hiding unused features of JRiver Media Center is a very common topic among computer audiophiles. Many people I meet at Music Matters events around the country ask if there is an audio only version of JRMC. These users have no idea specific features can be disabled or hidden from view. After installation the left side of the JRMC window displays nine items in the "Tree" that allow browsing of Audio, Images, Video, Podcasts, and more. I prefer to hide all but the essential audio related items. Removing some of these items can be done with a simple right-click & delete command, but that alters the default view schema in a way that requires the user to recreate aspects of the view that have been deleted. The best way to remove items from the JRMC Tree is via the Tools > Options > General > Features area. This area controls much more than the Tree items, but I'll cover the other features in different sections of this article. Expanding the Features list from within the JRMC General settings displays 22 different features. Removing support for Images, Video, and Podcasts is accomplished by de-selecting, or un-ticking as our UK readers call it, the corresponding boxes for each feature. Once these features are de-selected and the OK button is clicked they will disappear from the Tree view. That alone is a nice step for the music aficionado who only uses JRMC for audio playback.
<center><img src="http://images.computeraudiophile.com/graphics/2012/0217/general-settings-features.png"></img></center>
The Performer Store item listed in the Tree by default is a bit different from the other items that allow users to browse their own media. The Performer Store, as the name suggests, allows users to browse media online and purchase tracks or albums as MP3s or a physical format. I prefer to remove this item from JRMC because I don't purchase music through this portal and would rather simplify the user interface. Removing the Performer Store from the Tree is accomplished by selecting Tools > Plug-in Manager > Store > Performer Media Center > Hide. There is also an option to uninstall the plug-in if desired but I prefer to leave the option to use the store available just in case.
<center><img src="http://images.computeraudiophile.com/graphics/2012/0217/plig-in-manager-performer-store.png"></img></center>
<img src="http://images.computeraudiophile.com/graphics/2012/0217/slimmed-down-tree.png" style="padding: 5pt 10pt 5pt 0pt;" align="left">Removing the headings "Drives & Devices" and "Services & Plug-ins" from the Tree is not possible. It is possible to remove some of the child items within the headings themselves. I prefer not to browse my computer's drives through JRMC and I don't have a television tuner connected to my computer. As such I remove these items from view in the same General > Features area as discussed previously. De-selecting Explorer removes the ability to browse one's computer through JRMC and de-selecting TV removes Television from the display as well. My main JRiver Media Center computer is a C.A.P.S. v2.0 server without a CD/DVD/Blu-ray drive. Thus, I have no Drives or Devices listed beneath this item in the Tree. Removing or hiding Services & Plug-ins is accomplished in the aforementioned Plug-in Manager. Selecting Tools > Plug-in Manager > Interface > TiVo Server > Hide removes this feature from view. Amazon, Audible, and CD Baby can be hidden via the Store icon three selections below the Interface icon.
Sliding one's eyes up and over to the right readers will see the main Media Center display where information about the currently playing track is viewed.
<center><img src="http://images.computeraudiophile.com/graphics/2012/0217/media-center-display-default.png"></img></center>
<img src="http://images.computeraudiophile.com/graphics/2012/0217/media-center-display-right-click-options.png" style="padding: 5pt 10pt 5pt 0pt;" align="left">My preference is to customize this display to show the information important to me. Right-clicking anywhere within the long rectangular display shows options to Show Spectrum Analyzer, Show Ratings, Show Alternate Display Text, and Customize Display. The menu is self explanatory. Selecting Customize Display enables users to pick and chose any of the JRiver Media Center variables. I like to display the album artist, track title, and album title on the top line or what JRiver calls the Title line. On the Status line I like to cram many items including elapsed time of the track, total time of the track, remaining time of the track, bit depth, sample rate, bit rate, number of channels, and the currently selected playback zone. Customizing the display to show these items can be accomplished by copying and pasting the following text into the Title (excluding the italicized headings) and Status lines of the <a href="http://images.computeraudiophile.com/graphics/2012/0217/customize-display-options.png">Customize Display window</a><a href="http://images.computeraudiophile.com/graphics/2012/0217/customize-display-options.png"><img src="http://images.computeraudiophile.com/ca/icons/ex.png" style="padding: 0pt 0pt 0pt 3pt;" alt="link"></img></a>.
<i>Title:</i> [Album Artist (auto)] - [Name] ([Album])
<i>Status:</i> [Elapsed Time] // [Total Time] // [Remaining Time] [bit Depth]-bit//[sample Rate] kHz [bitrate (labeled)] [Channels] Channel [Zone]
<center><img src="http://images.computeraudiophile.com/graphics/2012/0217/media-center-display-customized.png"></img></center>
<img src="http://images.computeraudiophile.com/graphics/2012/0217/volume-control-options.png" style="padding: 5pt 10pt 5pt 0pt;" align="left">JRiver Media Center 17 has a highly refined 64-bit software volume control and several different options for using or disabling volume control in the application and the computer in general. A few years ago many playback applications used 16-bit volume software controls. Whenever the volume was set to anything less than 100% / maximum the application would have to cut off bits of the outgoing audio, starting with the 16th bit, reducing dynamic range and quality of the audio. When playing 16-bit recordings this could become a problem quickly as more attenuation was used. Playing 24-bit recordings and using a 16-bit volume control was a disaster as the last 8 bits were automatically chopped off the top with any level attenuation. Then came 24-bit volume controls like that currently used in Apple's iTunes. Attenuating the level of a 16-bit recording with such a volume control is not that bad because there are 8 bits worth of zeros the listener can afford to lose without cutting into the actual audio. The maximum bits used by 24-bit recordings is around 20, thus providing a little breathing room for a 24-bit volume control. A little attenuation and no important bits are cut off. Although the HDCD flag in HDCD recordings is on the Least Significant Bit (LSB) or 24th bit and will be lost with any attenuation by a 24-bit volume control. JRMC v17 uses a 64-bit volume control that provides at least 40 bits of breathing room for all 24-bit high resolution music. In theory a 64-bit volume control allows the listener to attenuate the level by over 240dB before cutting into the 24th bit of recording. However, in practice any volume attenuation cuts into a 24-bit track when the DAC in use only accepts 24-bits on the input. Converting a 24-bit file to 64-bits as JRMC does internally and attenuating the volume still reduces the number of bits starting with the 24th bit when output to the DAC simply because the hardware doesn't accept 64-bit audio. This is simply a hardware limitation. Nonetheless a 64-bit volume control offers real precision improvements when processing items such as upsampling, room correction, and bass management.
There are several volume modes and options available in JRMC 17 including Application Volume, Internal Volume, System Volume, Disabled Volume, and Volume Protection. Even if a user doesn't employ any volume attenuation it's nice to understand what each volume mode accomplishes.
<ul><li>System Volume - Controls the volume of every sound coming from the computer. Similar to a master volume. Doesn't work when outputting via modes such as WASAPI - Event Style that send audio directly to the audio card or DAC.</li>
<li>Application Volume - Controls only the volume of JRiver Media center as long as it's running on Windows Vista or a newer version of the operating system. JRiver doesn't recommend this volume mode for users seeking the best sound quality. Doesn't work when outputting via modes such as WASAPI - Event Style that send audio directly to the audio card or DAC.</li>
<li>Internal Volume - This is the higher quality 64-bit volume control used by the JRiver audio engine. It's less important for listeners outputting bit perfect audio and very important for listeners using DSP options like upsampling, room correction, or bass management. </li>
<li>Disabled Volume - As the name suggests this disables all volume controls. I use this mode when sending bit perfect audio to an external DAC.</li>
<li>Volume Protection - This feature saves listener's ears and tweeters by not allowing volume increases over 5% at a time or 20% per second, and resets the volume to 10%, unless already lower, if playback has been stopped for 30 minutes.</li>
<li>Startup Volume - There are two options for startup volume. 1. Optimize volume for best sound quality: is only applicable to Windows XP and earlier operating systems. The feature sets the Wave Out volume to 100% on JRMC startup. 2. Set volume: simply sets the JRMC volume to the the specified level when launching the application. Both options are available in Tools > Options > Startup.</li></ul>
<center><img src="http://images.computeraudiophile.com/graphics/2012/0217/audio-path-button.png"></img></center>
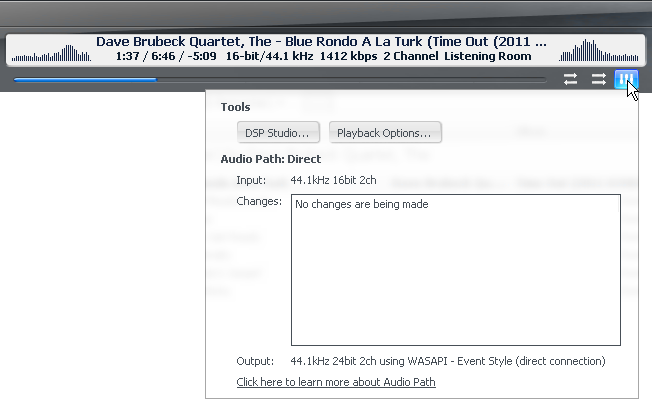
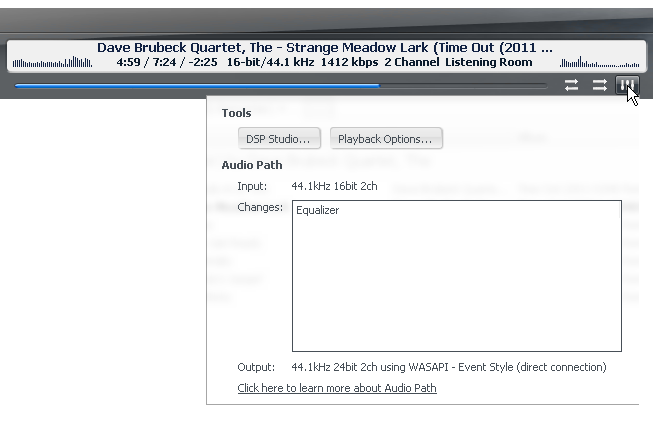
A new feature in JRiver Media Center version 17 is the Audio Path button. This button is a little image of an equalizer located below the rectangular currently playing display. According to JRiver's Matt Ashland, "The DSP button on the Noire skin lights up blue when doing direct (bit-perfect) output.*Mousing over the DSP button will show the complete audio path (input, any effects, and output)." I really like this new feature and the fact that it's prominently displayed. Awareness of the audio path is critical to achieving the best sound quality. For example, if the equalizer is enabled the Audio Path button will not illuminate blue and will display the word Equalizer when hovering over the button. Whether someone forgot to turn it off, accidentally enabled it, or is using the EQ purposely it's nice to know what's happening with a quick glance at this button. One item of note, the Audio Path button will illuminate blue even when the output is no longer bit perfect due to volume attenuation. JRiver's position is that the software volume control is of such high quality it's a legitimate option for high end audio installations.
<center>Click To Enlarge</center>
<center><a href="http://images.computeraudiophile.com/graphics/2012/0217/audio-path-button-hover-display-perfect.png" class="thickbox" rel="Audio-Path"><img src="http://images.computeraudiophile.com/graphics/2012/0217/audio-path-button-hover-display-perfect-300.png"></a> <a href="http://images.computeraudiophile.com/graphics/2012/0217/audio-path-button-hover-display-eq.png" class="thickbox" rel="Audio-Path"><img src="http://images.computeraudiophile.com/graphics/2012/0217/audio-path-button-hover-display-eq-300.png"></a></center>
JRiver Media Center 17 is great for creating Smartlists. This is also known as a Smart Playlist in other applications. Smartlists filter media based on criteria set by the user and remain up to date as new content is added to the library. For example I frequently use Smartlists based on the bit depth and sample rate of my music. Quickly browsing through my 24-bit / 96 kHz content is an easy way for me to test new equipment for functionality at this resolution. Smartlists can filter content based on nearly any identifier in JRMC. A quick look through the list of filters shows items such as artist, album artist, channels, conductor, genre, mood, replay gain, and on and on. Smartlists are created by selecting Playlists in the JRiver Tree on the left followed by Add Smartlist in the main window. Filtering content is done by creating rules such as the default Media Type is Audio. Here is a video showing the creation of a Smartlist containing only 24-bit / 96 kHz music.
<center><iframe width="640" height="480" src="http://www.youtube.com/embed/hko4x_Ep4pM?rel=0" frameborder="0" allowfullscreen></iframe></center>
Editing metadata isn't the way most of us like to spend our time. There are a couple decent applications that specialize in metadata but do nothing more. JRiver Media Center is not only great for music playback it's also a pretty good tool for editing one's metadata as well. A critical part of JRMC's metadata editing capabilities is its ability to embed the information in each file as long as the file format supports embedded tags. Once embedded the music can be transferred to any computer in one's house or recovered from a backup copy while retaining all of the special metadata edits that are so time consuming.
Editing metadata in JRMC is done by selecting a track or album then selecting Edit > Tag from the main menu. By default only the most basic information is editable in the small window that appears in the lower left corner. I prefer to see every possible tag in a larger editing area. First I select the small up arrow in the tag editing box. This maximizes the box. Second I right click the empty space in the tag editing box to view the options Show Default Tags, Show Tags With Values, Show Tags In Current View, and Show All Tags. I select Show All Tags. This option displays 103 tags. Way too much information for some readers no doubt, but it's perfect for me. Not all tags are editable such as Bit Depth and Sample Rate or even applicable such as Series and Situation. After editing a tag JRMC displays a status message such as Saving Changes or Done Saving Tag Changes. These changes are what's embedded into each file along with the information already displayed in the tag editing window.
<center><img src="http://images.computeraudiophile.com/graphics/2012/0217/edit-tags-right-click-menu.png"></img> <img src="http://images.computeraudiophile.com/graphics/2012/0217/edit-tags-show-all.png"></img></center>
Shortly before this article went to press (only kidding, but it was literally days ago) two new features were introduced by JRiver.
1. NEW: Version 17.0.88 added full support for DSF tagging (uses ID3v2 tags at the end of the file).
Support for DSF file tagging is great for users with DSD files either downloaded or ripped from SACD in this format. I have the Blue Coast Collections volume 1 and 2 downloaded from Blue Coast Records in DFF file format. DFF files have a very limited tagging scheme that's not covered by JRiver's new DSF tagging support.
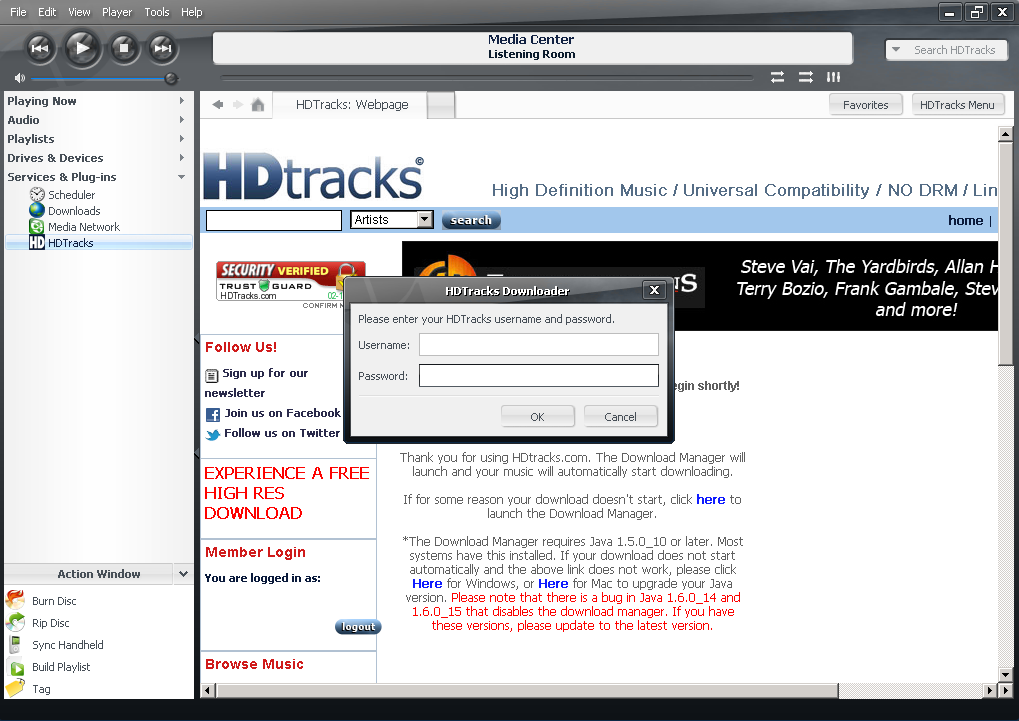
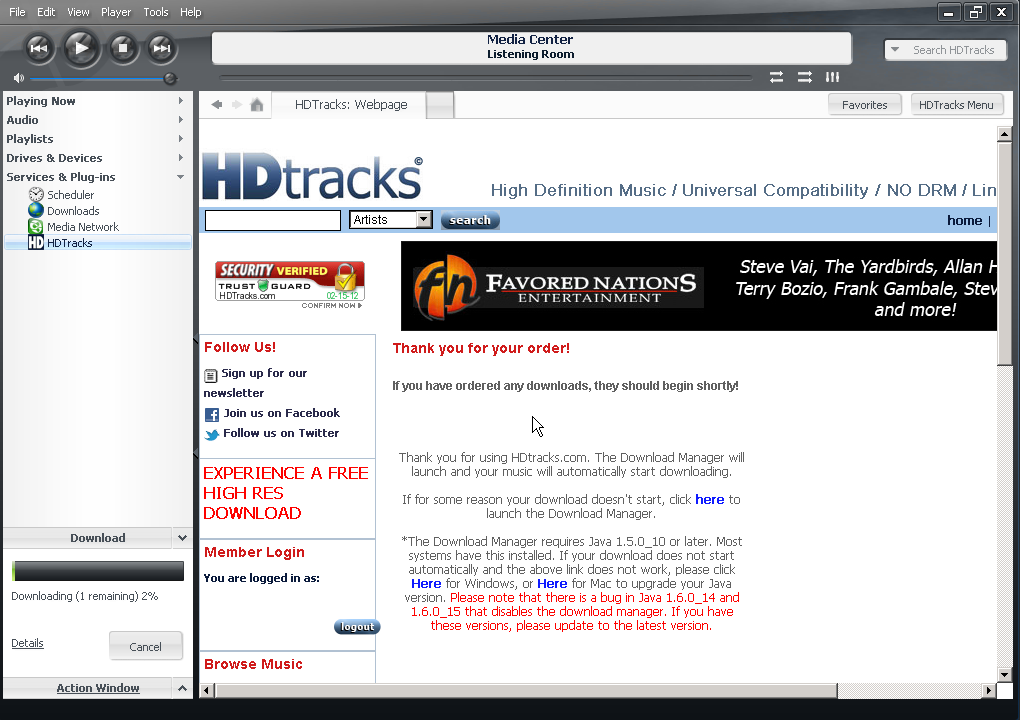
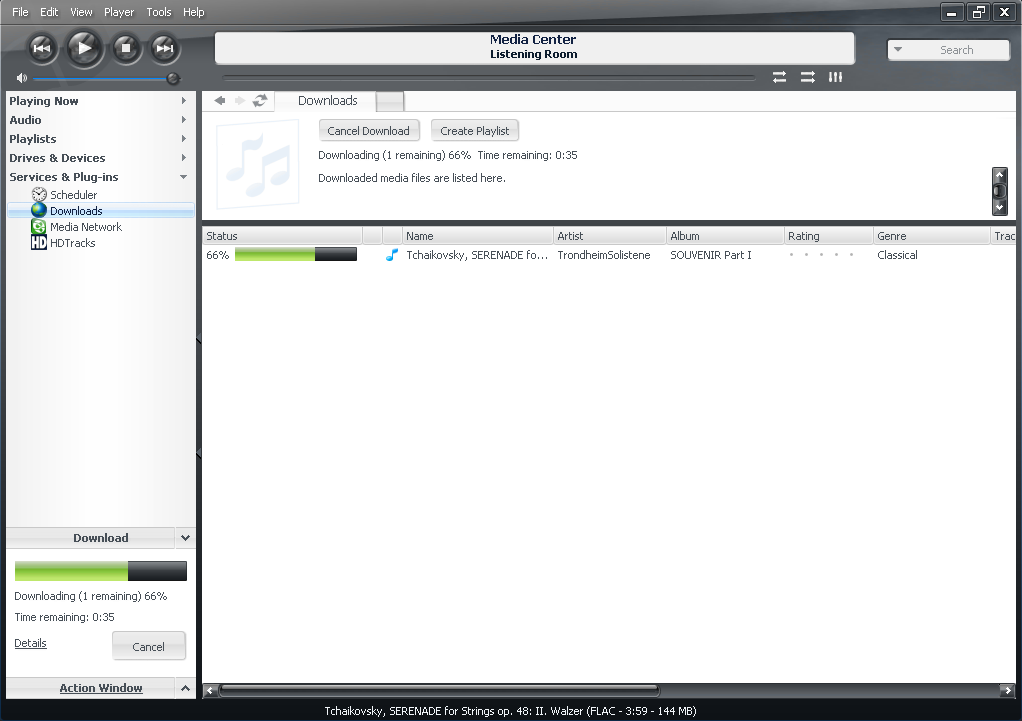
2. NEW: Version 17.0.89 added the HDTracks store including download and search (Services & Plug-ins in the tree).
It's now possible to browse and search the HDTracks store from within the JRiver Media Center interface. Even better is the fact that purchases made through JRMC are downloaded and automatically added to the JRMC library and placed in the appropriate Artist folder on the user's hard drive. The need for a Java downloading application and moving tracks to the library is now gone for users with JRMC 17. If the HDTracks store isn't visible in the Services & Plug-ins part of the JRMC Tree it can be enabled by navigating to Tools > Plug-in Manager > Store > HDTracks > Show. I downloaded a 24/192 track by TrondheimSolistene through the JRMC to test the new interface. After the purchase JRMC displayed the download status in both the small Action Window and in a main Downloads section visible above the HDTracks store icon in the Tree. The whole process was seamless. Readers should also note the 24/192 track I purchased was automatically added to my 24-bit / 192 kHz Smartlist.
<center>Click To Enlarge</center>
<center><a href="http://images.computeraudiophile.com/graphics/2012/0217/hd-tracks-store-login.png" class="thickbox" rel="JRMC-HDTracks"><img src="http://images.computeraudiophile.com/graphics/2012/0217/hd-tracks-store-login-thumb.png"></a> <a href="http://images.computeraudiophile.com/graphics/2012/0217/hd-tracks-downloading-01.png" class="thickbox" rel="JRMC-HDTracks"><img src="http://images.computeraudiophile.com/graphics/2012/0217/hd-tracks-downloading-01-thumb.png"></a> <a href="http://images.computeraudiophile.com/graphics/2012/0217/hd-tracks-downloading-02.png" class="thickbox" rel="JRMC-HDTracks"><img src="http://images.computeraudiophile.com/graphics/2012/0217/hd-tracks-downloading-02-thumb.png"></a> <a href="http://images.computeraudiophile.com/graphics/2012/0217/hd-tracks-downloaded-complete.png" class="thickbox" rel="JRMC-HDTracks"><img src="http://images.computeraudiophile.com/graphics/2012/0217/hd-tracks-downloaded-complete-thumb.png"></a></center>
<b>Playback Options and Settings</b>
Most of the aforementioned JRiver Media Center features were about aesthetics. The next set of features and options have much more to do with audio playback and getting the best sound quality possible from one's computer. Before I dig deeper into JRMC's playback features and options readers should understand my position about how to achieve the best sound quality from the application. First, the phrase best sound quality means the most accurate to the original source. The original source is the file being played through JRiver Media Center. Second, the most accurate playback is accomplished by outputting a bit perfect audio stream to one's Digital to Analog Converter (DAC). There are many other views as to how to obtain the best sound quality including the use of upsampling and room correction. None of these views, including mine, is correct for everyone in all situations. Currently the best sound I've heard has come from music servers sending untouched bit perfect audio to an external DAC. Therefore I will go into detail about how to obtain such results.
What is bit perfect or bit transparent output? Both terms are used to describe digital audio output from a computer to an external DAC or interface converter, such as USB to S/PDIF or AES/EBU, that hasn't been altered in any way by upsampling, volume control, room correction, etc. There are several ways to achieve bit perfect output. The most common ways use a combination of Windows Audio Exclusive Mode and either Kernel Streaming, WASAPI, WASAPI - Event Style, or ASIO audio output modes.
Note: Some of the following text was also included in the original JRiver 14 article. Windows 7 has not changed these options thus a complete rewrite was not necessary. The Windows operating system uses what's called Exclusive Mode and Shared Mode when handling digital audio. These two Modes affect how Windows and audio applications communicate with audio devices like USB DACs and D to D converters. Exclusive Mode is somewhat analogous to connecting a DAC directly to an amplifier. Exclusive Mode enables an audio stream to go directly to an audio device bypassing intermediate processing. There is no mixing of audio streams from other applications including Windows sounds. The obsolete KMixer from Windows XP gathers all digital audio streams converting them into one sample rate before outputting the homogenized stream to an audio device. This is similar to how other output methods handle audio with layers upon layers of operating system processing and possible manipulation. Exclusive Mode enables direct access to the audio device but does not guarantee anything more than than this. It is one critical piece of the bit perfect puzzle. Shared Mode can roughly be compared to using a preamplifier between a DAC and amplifier. The preamp is there to handle multiple audio streams (among many other things). When a device operates in Shared Mode audio is sent from the playback application to a global audio engine where any number of effects may be applied before finally reaching the audio device such as a USB DAC or audio card. Shared Mode is not recommended for those seeking the best audio quality.
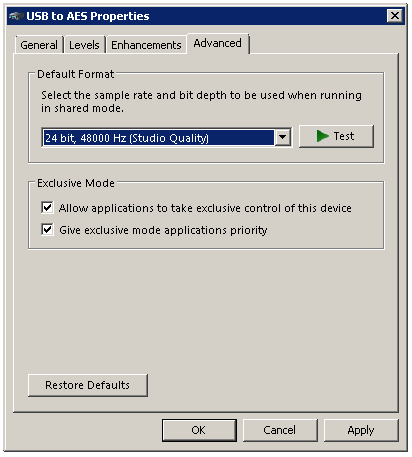
Simple Test:?Users who have a DAC that displays the current sample rate being fed from the music server can run an easy test to determine which Mode is in use. Simply play two tracks with different sample rates. If Exclusive Mode is in use the sample rate on the DAC should change. If Shared Mode is in use the Default Format (sample rate) that is set in the audio device Properties > Advanced tab will be displayed on the DAC. If the Default Format is set to 24 bit, 48000 Hz (Studio Quality), playback of a single 16/44.1 track will provide a quick answer to the Exclusive or Shared Mode question as well.
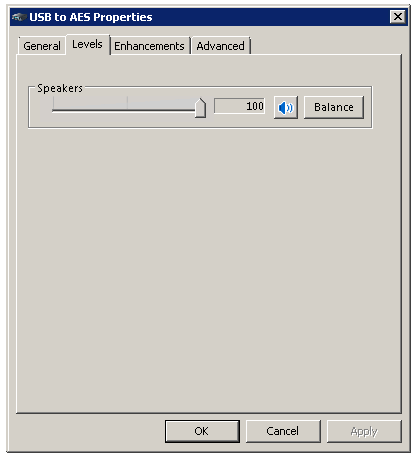
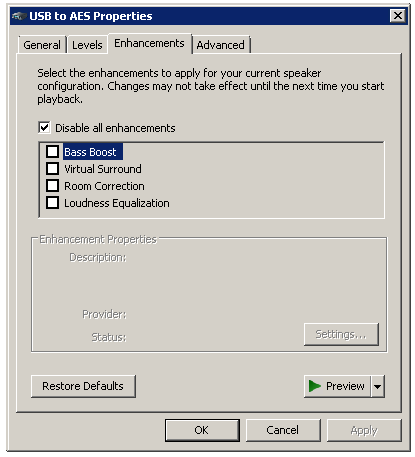
Enabling one's DAC or interface converter to operate in Exclusive Mode is simple an must only be completed one time. On a Windows computer, enter the Control Panel then enter the Sound settings. On the Playback tab the preferred output device, such as the Berkeley Audio Design Alpha USB in this case, should be listed. Enter the properties of the audio device by selecting it and clicking the Properties button. Select the Levels tab and make sure the volume is set to 100. Move over to the Enhancements tab and select Disable All Enhancements. Most important is the Advanced tab. The Default Format can be set to anything, it really doesn't matter as this should never be used if everything is working correctly. Underneath the Default Format is the Exclusive Mode settings. Both Exclusive Mode boxes should be enabled for proper bit perfect playback (using ASIO doesn't require this, but it certainly doesn't hurt to have these options enabled).
<center>Click To Enlarge</center>
<center><a href="http://images.computeraudiophile.com/graphics/2012/0217/sound-playback-tab.png" class="thickbox" rel="Exclusive-Mode"><img src="http://images.computeraudiophile.com/graphics/2012/0217/sound-playback-tab-140.png"></a><a href="http://images.computeraudiophile.com/graphics/2012/0217/sound-playback-properties-general.png" class="thickbox" rel="Exclusive-Mode"><img src="http://images.computeraudiophile.com/graphics/2012/0217/sound-playback-properties-general-140.png"></a><a href="http://images.computeraudiophile.com/graphics/2012/0217/sound-playback-properties-levels.png" class="thickbox" rel="Exclusive-Mode"><img src="http://images.computeraudiophile.com/graphics/2012/0217/sound-playback-properties-levels-140.png"></a><a href="http://images.computeraudiophile.com/graphics/2012/0217/sound-playback-properties-enhancements.png" class="thickbox" rel="Exclusive-Mode"><img src="http://images.computeraudiophile.com/graphics/2012/0217/sound-playback-properties-enhancements-140.png"></a><a href="http://images.computeraudiophile.com/graphics/2012/0217/sound-playback-properties-advanced.png" class="thickbox" rel="Exclusive-Mode"><img src="http://images.computeraudiophile.com/graphics/2012/0217/sound-playback-properties-advanced-140.png"></a></center>
<img src="http://images.computeraudiophile.com/graphics/2012/0217/AUDIO-OUTPUT-MODES.png" style="padding: 5pt 10pt 5pt 0pt;" align="left">Once Exclusive Mode is enabled for the proper audio device users must configure JRiver for bit perfect output. At first blush this may seem like a daunting task, but in reality it's fairly simple and needn't be done more than once. Tools > Options > Audio > Audio Output is where users select what output mode JRiver should use to send audio to their device. ASIO, WASAPI, WASAPI - Event Style, and Kernel Streaming are all what JRver calls hardware direct. These four output modes send audio straight to the audio device and provide an easy method of delivering bit perfect playback. Exactly what output mode is used is highly dependent on the audio device (hardware) and user preference. Some DACs don't support WASAPI or ASIO but most support at least one of these four modes. In my experience with a plethora of DACs and converters WASAPI - Event Style performs better than the other three modes. However, if a hardware manufacturer provides an ASIO driver the chances are high that the ASIO driver will work just as good and maybe better than other output modes. The AURALiC ARK MX+ DAC is one example of this. AURALiC provided an ASIO driver that functioned flawlessly while I experienced problems with other output modes.
Exclusive Mode in combination with any of these four Audio Output modes is critical for bit perfect playback.
WASAPI: Windows Audio Session Application Programming Interface is similar to ASIO in that it enables audio to be sent directly to a sound device. Some refer to WASAPI as Microsoft's answer to ASIO. WASAPI first appeared in Windows Vista and remains part of Windows 7. WASAPI by itself is only a tool that software companies can use to enhance audio playback applications. WASAPI enables applications to take exclusive control over an audio device like a USB DAC or audio card as long as Windows is properly configured to allow Exclusive control of the device. When using WASAPI I use the following settings.
<center><img src="http://images.computeraudiophile.com/graphics/2012/0217/wasapi-settings.png"></img></center>
WASAPI - Event Style: This output mode enables the audio device to pull data from JRiver Media Center. It is my preferred output mode because it not only works more often than not but it has many advantages over standard WASAPI. Event Style allows for lower latency buffers while removing a problematic Microsoft Windows layer. This problematic layer can rear its head because of a WASAPI or Microsoft OS driver bug causing stuttering during playback with standard WASAPI. The stuttering is caused by out of order circular buffers. It can be resolved by stopping and restarting playback or using WSAPI - Event Style. Event Style is simply a more direct path for audio to flow to the audio device. Additional and a bit more geeky advantages, according to JRiver, are "creating, using, and destroying all WASAPI interfaces from a single thread", the fact that the "hardware never sees any pause or flush calls. Instead, on pause or flush, silence is delivered in the pull loop. This removes the need for hacks for cards that circle their buffers on pause, flush, etc.", and the "main 'pull loop' uses a lock-free circle buffer (a system that J. River built for ASIO), so that fulfilling a pull request is as fast as possible." Tweaking the Hardware Buffer Size in milliseconds (default is 100) is recommended. Some settings will absolutely not work while other settings may lead to more stable performance. For example, using the Alpha USB and placing the buffer to Minimum Hardware Size produces an awful distorted sound. When using WASAPI - Event Style I use the following settings.
<center><img src="http://images.computeraudiophile.com/graphics/2012/0217/WASAPI-event-style-settings.png"></img></center>
ASIO: Audio Stream Input/Output protocol was developed by the German hardware and software company named Steinberg Gmbh (Yamaha subsidiary). ASIO is a common method of sending audio from a playback application directly to an audio device such as a Lynx, RME, ASUS audio card or AURALiC USB DAC. ASIO is a protocol for low latency high quality digital audio. Manufacturers use the ASIO protocol to develop drivers enabling applications to output this low latency audio directly to the manufacturers' cards or DACs. ASIO drivers achieve low latency through bypassing layers of the Windows operating system. (ASIO drivers are one method of bypassing the Windows KMixer on XP. Bypassing KMixer enables a bit perfect audio signal to reach the audio card.) When using ASIO I've tried several different buffer settings. The stability of a setting is almost 100% dependent on the connected audio device. Using the default ASIO settings is advised when first using this output mode.
<center><img src="http://images.computeraudiophile.com/graphics/2012/0217/asio-settings.png"></img></center>
Kernel Streaming: This was created as a built-in Windows method of streaming to the audio device without routing through the KMixer. This not only enables easier bit perfect output when using Windows 98 and XP it also allows reduced latency. Kernel Streaming is a legacy output mode that was superseded by WASAPI in Windows Vista and newer versions of the OS, but JRiver still maintains full support this method.
<center><img src="http://images.computeraudiophile.com/graphics/2012/0217/kernel-streaming-settings.png"></img></center>
Recapping what's necessary for bit perfect playback.
<ul><li>Required - Exclusive Mode within Windows Sound Control Panel when using WASAPI or WASAPI - Event Style</li>
<li>Required - An audio output mode within JRiver Media center that communicated directly with the hardware such as WASAPI, WASAPI - Event Style, ASIO, or Kernel Streaming.</li>
<li>Required - Set JRiver volume to Disabled or set the JRiver Internal Volume to 100%.</li></ul>
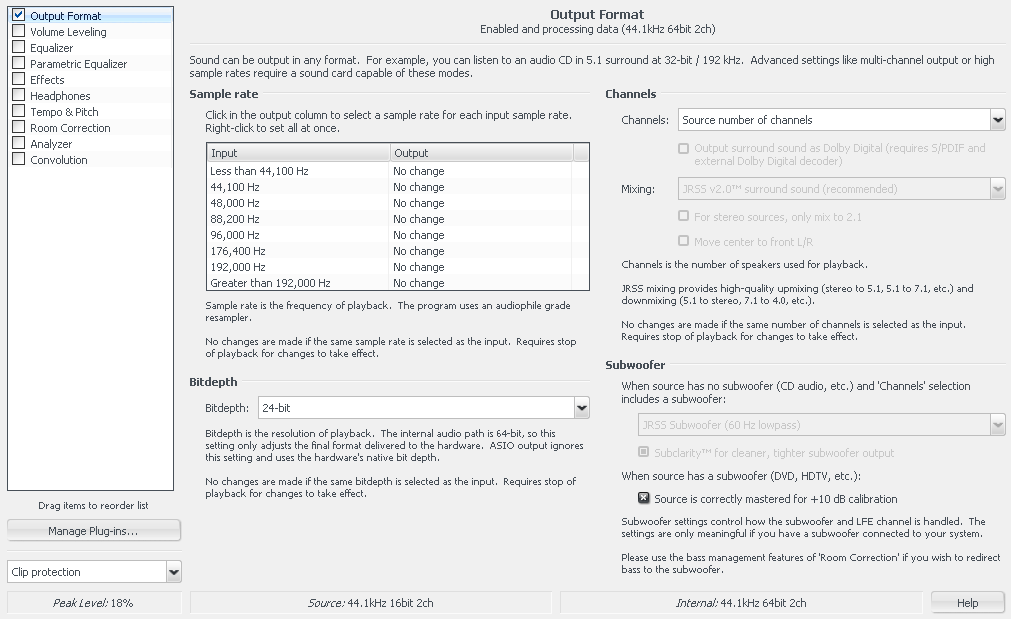
JRiver Media Center 17 also offers several playback adjustments and tweaks in Tools > Options > Audio. Under Settings is the option titled <a href="http://images.computeraudiophile.com/graphics/2012/0217/dsp-output-format.png">DSP & output format</a><a href="http://images.computeraudiophile.com/graphics/2012/0217/dsp-output-format.png"><img src="http://images.computeraudiophile.com/ca/icons/ex.png" style="padding: 0pt 0pt 0pt 3pt;" alt="link"></img></a>. Depending on one's DAC it may be necessary to manually set the bit depth to 24 bit in this area. I try to leave this setting at Source Bitdepth unless required by the hardware to change it to 24 bit.
Note: The DSP settings for Sample Rate allow users to up or downsample their music using JRiver's audio engine. This will not result in bit perfect output but may be a nice option if a DAC does not support a specific sample rate. For example, I've used DACs that cannot downsample 24/176.4 music and refuse to output any audio when this rate is played. This DSP setting allows the mapping of a sample rate like 176.4 to something a DAC can use such as 88.2 or even 96 kHz. Again, not bit perfect but handy.
Prebuffering places the specified number of seconds of music into JRMC's memory buffer before playback. The option to play files from memory instead of disk copies the entire file to memory before playback. When used in combination the entire file is copied then the pre buffer is filled before playback. There is much controversy about the effect, if any, memory playback has on audio quality. I highly recommend each user try the different settings and come to his own conclusion. After all it's free to try.
The option to Play silence at startup for hardware synchronization is indispensable when using a DAC that requires a one or two seconds to change its clock after each sample rate change. Missing the first couple seconds of playback can be an annoying, albeit First World, problem. Although this option is called Play silence at startup it's better explained as a delay in playback after the sample rate is changed.
Do not play silence (leading and trailing) is an option that I had no idea was causing me problems until I disabled it one day. The option is great for long silences during playback such as between the last track and a hidden track. However, as JRver's documentation points out, "This option may not be a good choice for classical music or other genres that contain long, intentional pauses in the middle of songs." I had long forgotten this small but critical piece of documentation when I was troubled by playback issues. I was listening to Reference Recordings' Britten's Orchestra track six titled Passacaglia. This track started playback at 30 seconds into the song. The first 30 seconds of this track are very quiet and mistaken for silence by JRMC, thus it skips this small but important part of the performance. I re-ripped the file, re-converted the file, and did just about everything except disable the option to not play silence. Once disabled playback was flawless.
<center><img src="http://images.computeraudiophile.com/graphics/2012/0217/audio-extras.png"></img></center>
<b>Other Noteworthy Audio Items</b>
JRiver's Media Server option is unique in that it allows audio playback without the full user interface running because the app is running as a service. To the layman JRiver is invisible even though it's still possible to control the application with any number of remote control devices including an iOS or Android device. I run my C.A.P.S. v2.0 server in Media Server mode automatically. I set the option to run Media Server at <a href="http://images.computeraudiophile.com/graphics/2012/0217/startup-media-server-mode.png">Windows startup</a><a href="http://images.computeraudiophile.com/graphics/2012/0217/startup-media-server-mode.png"><img src="http://images.computeraudiophile.com/ca/icons/ex.png" style="padding: 0pt 0pt 0pt 3pt;" alt="link"></img></a>. Another way of enabling Media Server is via Tools > Advanced Tools > Media Server. This places the tiny Media Server icon in the Windows system tray and allows full JRMC audio playback functionality. Once the Media Server is enabled the user can simply close out of the full user interface. I've measured a difference of about 9MB of RAM between running the full user interface (41MB) and just running the service in Media Server mode (32MB).
<img src="http://images.computeraudiophile.com/graphics/2012/0217/enable-media-server.png"></img>
I frequently use JRiver's DLNA capability when listening to audio in other areas of my home. The DLNA features are enabled via Tools > Options > Media Network. Using the PlugPlayer application for my iPhone and iPad I stream music to my devices from the JRiver Media Center library. It's possible to stream to several different devices or zones at one time while playing different music on each device. Placing my iPhone on an NAD VISO 1 I can easily stream music from my several Terabyte collection without anything stored on the local iPhone. I haven't been able to test the real output sample rate when streaming high resolution content via DLNA. This would require an iPhone digital out dock that i could connect to my Alpha DAC. It isn't a rare piece of hardware but I just haven't had one in here to date. One setting within the <a href="http://images.computeraudiophile.com/graphics/2012/0217/dlna-server-adjustments.png">DLNA server configuration</a><a href="http://images.computeraudiophile.com/graphics/2012/0217/dlna-server-adjustments.png"><img src="http://images.computeraudiophile.com/ca/icons/ex.png" style="padding: 0pt 0pt 0pt 3pt;" alt="link"></img></a> that I always change is conversion and compression. I always set the audio to Never Convert and to use uncompressed. I could handle using some sort of FLAC compression here but the only other options are MP3 compression.
<center><img src="http://images.computeraudiophile.com/graphics/2012/0217/dlna.png"></img></center>
The last noteworthy feature is called CA Scrobbles. I admit to being partial to this feature as it directly involves Computer Audiophile. Quoting from my recent CA Scrobbles introductory article, "once CA Scrobbles is configured within JRiver Media Center information about each track a user listens to is automatically published to the CA Scrobbles web page here on Computer Audiophile. The published information is only sent to Computer Audiophile when playback moves to a different track (automatically or manually) or stops and only if playback advances past the half-way point of a track. Thus, readers needn't worry about publishing listening habits when they are simply sampling a bunch of tracks looking for that diamond in the rough. The actual scrobble happens in a background thread within JRiver and has no impact on the user interface or sonic quality." I believe CA Scrobbles is an excellent way to share one's music and discover what other like minded individuals are playing at home. Of course this feature is completely optional and is no different than manually posting here on CA. It's the automatic part that thrills me. Much more information on CA Scrobbles can be found in the <a href="http://www.computeraudiophile.com/content/Introducing-CA-Scrobbles">original article</a><a href="http://www.computeraudiophile.com/content/Introducing-CA-Scrobbles"><img src="http://images.computeraudiophile.com/ca/icons/ex.png" style="padding: 0pt 0pt 0pt 3pt;" alt="link"></img></a> and the actual Scrobbles can be viewed <a href="http://www.computeraudiophile.com/Scrobbles">right here</a><a href="http://www.computeraudiophile.com/Scrobbles"><img src="http://images.computeraudiophile.com/ca/icons/ex.png" style="padding: 0pt 0pt 0pt 3pt;" alt="link"></img></a>.
<b>Remote Control Considerations</b>
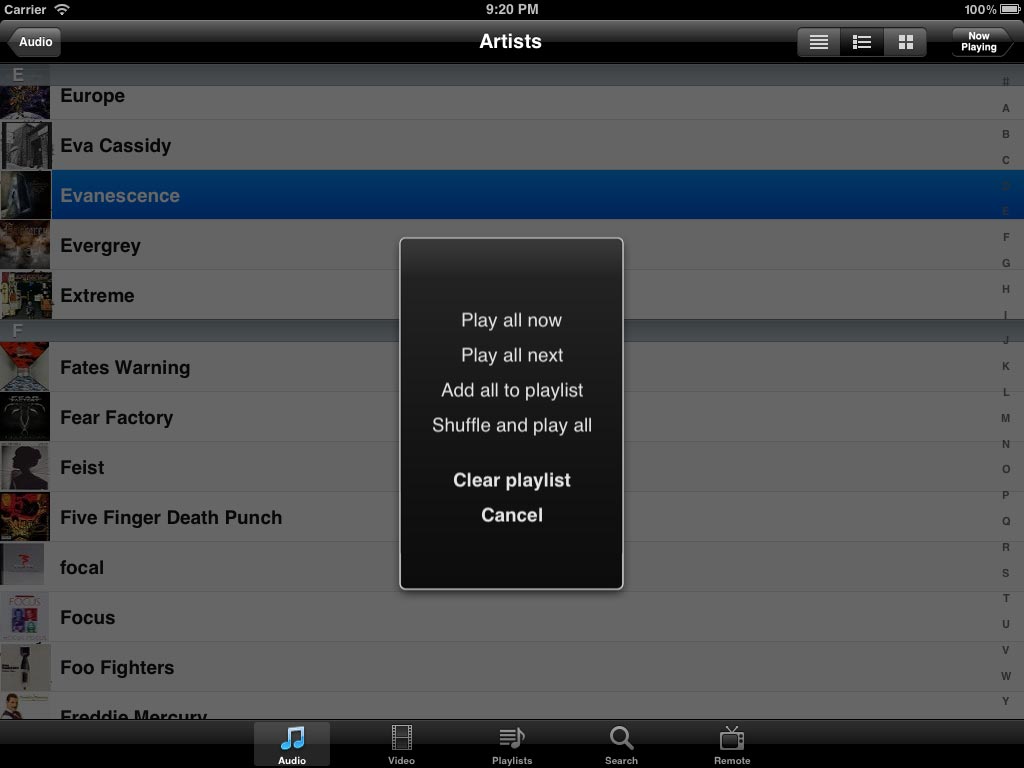
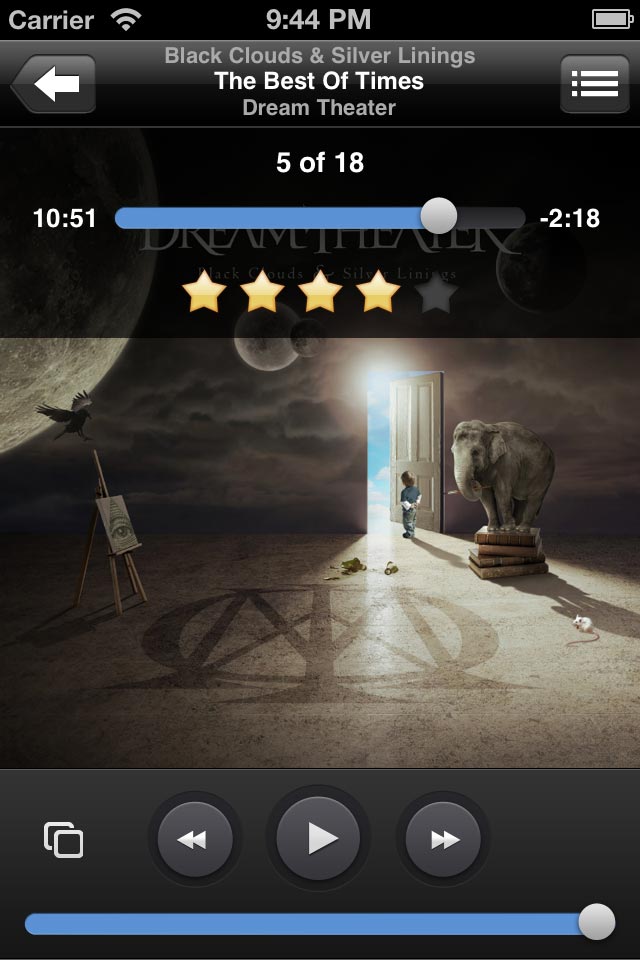
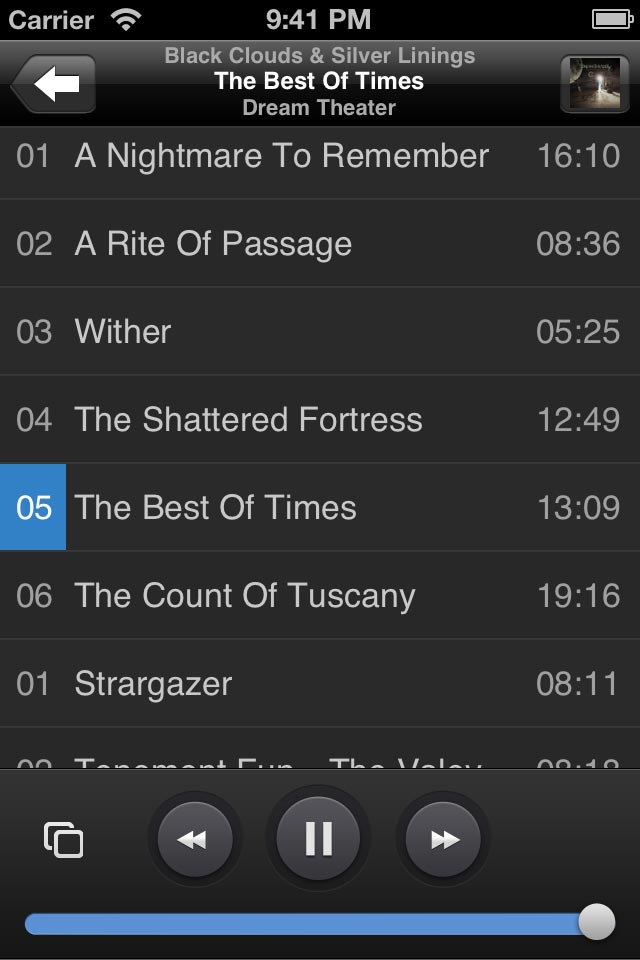
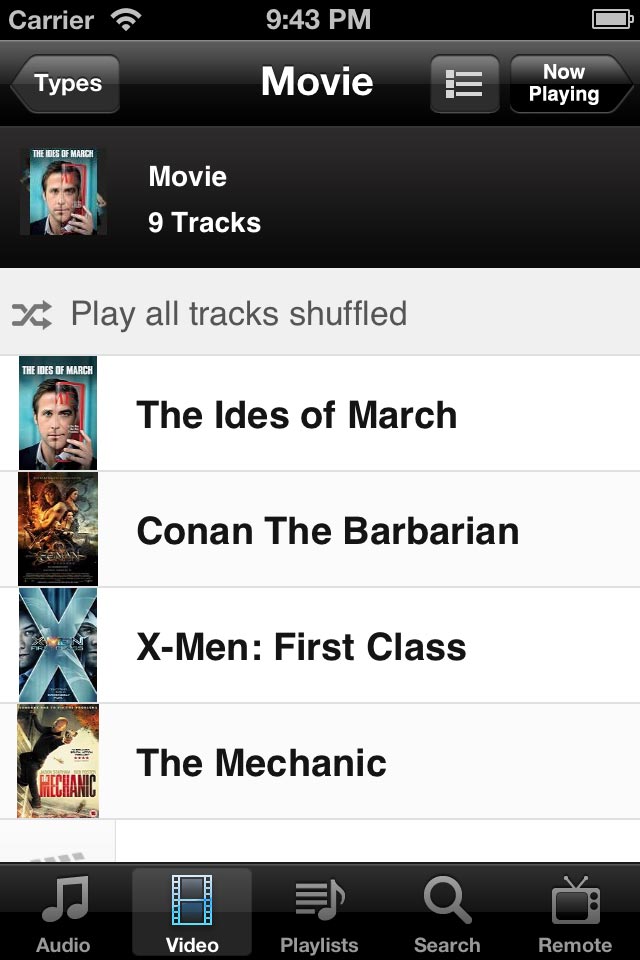
Equally as important as many other aspects of the JRiver Media Center interface is the ability to control the application remotely. Sitting in front of a keyboard and screen isn't the ideal way to enjoy one's music collection. A much better way is to use a handheld Android or iOS device. My favorite applications for these devices are <a href="http://wiki.jriver.com/index.php/Gizmo"> Gizmo</a><a href="http://wiki.jriver.com/index.php/Gizmo"><img src="http://images.computeraudiophile.com/ca/icons/ex.png" style="padding: 0pt 0pt 0pt 3pt;" alt="link"></img></a> and <a href="http://www.jremote.net/"> JRemote</a><a href="http://www.jremote.net/"><img src="http://images.computeraudiophile.com/ca/icons/ex.png" style="padding: 0pt 0pt 0pt 3pt;" alt="link"></img></a> respectively. I have limited experience with Gizmo. What little I've seen of the app is really nice and far better than some of the web based remote options. The best remote app I've used to date for JRMC is JRemote on an iPad and iPhone. JRemote is the fasted remote application I've used for any platform. The interface looks very much like Apple's Remote application and functions similarly. The newest update has brought very nice album cover scrolling somewhat like the Aurender iPad application. The JRemote application will be the subject of a complete review at a later date.
<center>Click To Enlarge</center>
<center><a href="http://images.computeraudiophile.com/graphics/2012/0217/ipad_1.jpeg" class="thickbox" rel="JREMOTE"><img src="http://images.computeraudiophile.com/graphics/2012/0217/ithumbs/ipad_1.jpg"></a> <a href="http://images.computeraudiophile.com/graphics/2012/0217/ipad_4.jpeg" class="thickbox" rel="JREMOTE"><img src="http://images.computeraudiophile.com/graphics/2012/0217/ithumbs/ipad_4.jpg"></a> <a href="http://images.computeraudiophile.com/graphics/2012/0217/ipad_6.jpeg" class="thickbox" rel="JREMOTE"><img src="http://images.computeraudiophile.com/graphics/2012/0217/ithumbs/ipad_6.jpg"></a> <a href="http://images.computeraudiophile.com/graphics/2012/0217/ipad_7.jpeg" class="thickbox" rel="JREMOTE"><img src="http://images.computeraudiophile.com/graphics/2012/0217/ithumbs/ipad_7.jpg"></a></center>
<center><a href="http://images.computeraudiophile.com/graphics/2012/0217/iphone_1.jpeg" class="thickbox" rel="JREMOTE"><img src="http://images.computeraudiophile.com/graphics/2012/0217/ithumbs/iphone_1.jpg"></a> <a href="http://images.computeraudiophile.com/graphics/2012/0217/iphone_2.jpeg" class="thickbox" rel="JREMOTE"><img src="http://images.computeraudiophile.com/graphics/2012/0217/ithumbs/iphone_2.jpg"></a> <a href="http://images.computeraudiophile.com/graphics/2012/0217/iphone_3.jpeg" class="thickbox" rel="JREMOTE"><img src="http://images.computeraudiophile.com/graphics/2012/0217/ithumbs/iphone_3.jpg"></a> <a href="http://images.computeraudiophile.com/graphics/2012/0217/iphone_4.jpeg" class="thickbox" rel="JREMOTE"><img src="http://images.computeraudiophile.com/graphics/2012/0217/ithumbs/iphone_4.jpg"></a></center>
<b>Wrap Up</b>
JRiver Media Center version 17 is the best media playback application I've used to date. Many different modes of audio playback, support for nearly all relevant audio file formats, and seemingly endless customization options offer users an incredible computer audio experience for around $50. New features such as Audio Path support and the HDTracks integrated store are evidence that JRiver Inc. is dedicated to the needs of computer audiophiles. I've yet to see an application that meets all the needs of all users all the time. There's no such thing as a perfect piece of software. JRiver Media Center version 17 may not be perfect but it reigns supreme as the playback application by which all others should be judged.
<b>Product Information</b>:
<ul>
<li>Product - JRiver Media Center 17</li>
<li>Price - $49.98</li>
<li>Product Page - <a href="http://www.jriver.com/">Link</a><a href="http://www.jriver.com/"><img src="http://images.computeraudiophile.com/ca/icons/ex.png" style="padding: 0pt 0pt 0pt 3pt;" alt="link"></img></a></li>
<li>Download - <a href="http://yabb.jriver.com/interact/index.php?topic=70101.0">Newest Version</a><a href="http://yabb.jriver.com/interact/index.php?topic=70101.0"><img src="http://images.computeraudiophile.com/ca/icons/ex.png" style="padding: 0pt 0pt 0pt 3pt;" alt="link"></img></a></li>
</ul>


Recommended Comments