


 The recent release of Neil Young's Archives on Blu-ray Disc piqued my interest in the Blu-ray format. The audio on Neil's <i>Archives</i> is at 24/192 for the Blu-ray box compared to 24/96 for the standard DVD box and 16/44.1 for the CD box. I have no desire to purchase a dedicated Blu-ray player, but I am very excited about the possibility of ripping audio off Blu-ray discs that I legally own. Ripping Blu-ray content is not the easiest task and I was initially unsure if I could actually get the audio from a Blu-ray Disc. Instead of purchasing the whole <i>Archives</i> box for a few hundred dollars, I picked up the Dave Matthews & Tim Reynolds: Live at Radio City Blu-ray Disc. This way I wouldn't have a box full of expensive unplayable discs if my little project went awry.
[PRBREAK][/PRBREAK]
<b>Hardware</b>
<img src="http://images.computeraudiophile.com/graphics/2009/0607/pioneer-br-drive.jpg" style="padding: 5pt 10pt 7pt 5pt;" align="left">I needed a Blu-ray drive and the right combination of software to get started on this journey. I picked up a <a href="http://www.pioneerelectronics.com/PUSA/Shop/DVD-Burners/ci.BDC-2202.Shop">Pioneer BDC-2202</a> internal Blu-ray drive for about $150 at a local computer store. Since Mac OS X does not support Blu-ray, my plan was to use Windows Vista Ultimate 64-Bit running on a Boot Camp partition on my Mac Pro. Unfortunately it took me about 15 hours to realize this plan was not going to work as designed. The Blu-ray drive connects to a computer motherboard via a single SATA connector. Mac Pro computers have two available SATA ports on the motherboard so I thought I was in the clear. After fighting with Widows Vista for hours and hours trying to get it to recognize the Blu-ray drive I was ready to scrap the whole project. After some "Googling" I found out the available SATA ports in a Mac Pro do not function with any operating system other than OS X.
I then started to work my backup plan. I installed the Blu-ray drive into the Dell 530 that I configured for the <a href="http://www.computeraudiophile.com/Audiophile-Reference-Music-Server-For-A-Song"><i>Audiophile Reference Music Server for a Song</i></a> article. The operating system immediately recognized the Pioneer drive and I was on to the software portion of this journey. Note: No special drive software or applications included with the drive are required.
<b>Software</b>
Ripping Blu-ray discs can involve several processes and several software applications. The process for ripping video is a little different from ripping audio. I will concentrate on ripping high resolution audio off Blu-ray discs. Audio seems easier than ripping the whole shebang.
Software Required:
1. <a href="http://www.slysoft.com/en/anydvdhd.html">AnyDVD HD</a> from SlySoft. Currently Windows only and $55 after 21 day trial.
2. <a href="http://www.smlabs.net/tsmuxer_en.html">tsMuxeR</a> from SmartLabs. Freeware for Windows, Linux, and OS X.
Additional Windows Based Software May Be Required in some instances:
1. <a href="https://www.microsoft.com/downloads/details.aspx?FamilyID=0856EACB-4362-4B0D-8EDD-AAB15C5E04F5&displaylang=en">Microsoft .NET Framework Version 2.0</a>
2. <a href="http://sourceforge.net/project/showfiles.php?group_id=57023">Avisynth</a>
3. <a href="http://www.ffdshow.info/">ffdshow</a>
4. <a href="http://haali.cs.msu.ru/mkv/">Haali Media Splitter</a>
<b>Blu-ray Disc</b>
<img src="http://images.computeraudiophile.com/graphics/2009/0607/blur-ray-logo-33.png" style="padding: 5pt 10pt 7pt 5pt;" align="left">As previously stated, I used the Dave Matthews & Tim Reynolds: Live at Radio City Blu-ray Disc. I selected this disc in part because the back cover clearly displayed the details about the disc that I wanted to know. if only all Blu-ray discs were this detailed.
<img src="http://images.computeraudiophile.com/graphics/2009/0607/dm-tr-rcmh-br-45.jpg" style="padding: 5pt 10pt 7pt 5pt;" align="left">
Video/Audio?
- 9-camera, HiDef shoot?
- Full 1080P24 HD resolution?
- 16:9 Wide screen format?
- PCM Stereo Sound (48kHz/24bit)?
- Dolby TrueHD 5.1 Surround Sound (96kHz/24bit)?
- Dolby Digital 5.1 Surround Sound (640 kbps)
<b>The Ripping Process</b>
This process will be limited in part by the speed of your Blu-ray drive. I recommend you purchase the fastest drive you can find otherwise you'll need to set it and forget it until the next day.
1. Install AnyDVD HD
2. Start AnyDVD HD
3. Right click the AnyDVD HD icon in the Windows system tray and select Rip Video DVD to Harddisk.
Once the ripping is complete the unencrypted files will have a directory structure similar to that pictured below.
<center> <a href="http://images.computeraudiophile.com/graphics/2009/0607/file-structure-full.png"><img src="http://images.computeraudiophile.com/graphics/2009/0607/file-structure-30.png" alt="Rip Blu-ray File Structure"></a> </center><center>click to enlarge</center>
4. Open tsMuxeR
5. Click the Add button on the upper-right side and browse to the largest m2ts file located in the newly created STREAM directory.
6. Under the Tracks section of tsMuxeR select the audio version desired. In my case it's the LPCM two channel 24/48 version.
7. Under the Output section select Demux
8. Select the Start Demuxing button on the bottom of the tsMuxeR window and wait.
<center> <a href="http://images.computeraudiophile.com/graphics/2009/0607/tsmuxer-1-full.png"><img src="http://images.computeraudiophile.com/graphics/2009/0607/tsmuxer-1-33.png" alt="Rip Blu-ray File tsMuxeR"></a> </center><center>click to enlarge</center>
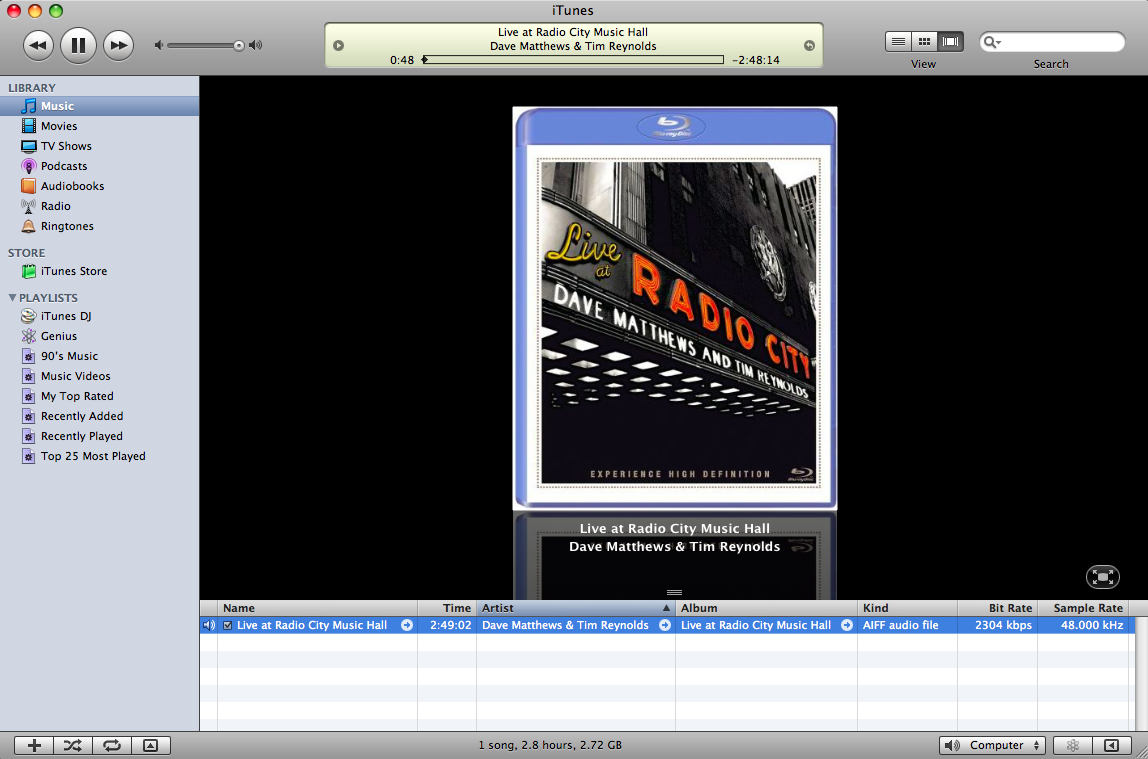
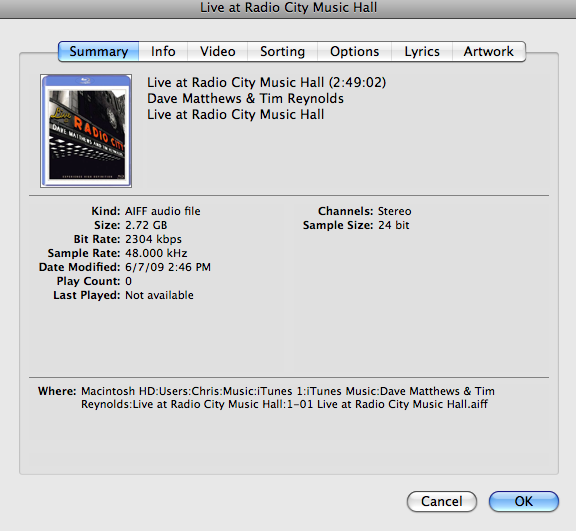
The output will be a single large WAV Audio file that can be imported into any playback application or converted to another format. I have yet to break up this single file into individual files for each track, but since it's a live concert I kind of like the continuity of a single file and I actually listen to the whole concert in a single sitting. I chose to convert to AIFF and add album art in iTunes. Once added to the iTunes library it's possible to look at the track information and see the Sample Size and Sample Rate to make sure the audio has not been downsampled. In an effort to save disk space downsampling can occur automatically by some applications designed to rip Blu-ray. tsMuxeR did not downsample the audio track in any of my tests.
<center> <a href="http://images.computeraudiophile.com/graphics/2009/0607/itunes-screenshot-full.png"><img src="http://images.computeraudiophile.com/graphics/2009/0607/itunes-screenshot-33.png" alt="Rip Blu-ray File Audio 01"></a> </center><center>click to enlarge</center>
<center> <a href="http://images.computeraudiophile.com/graphics/2009/0607/itunes-get-info%3Dscreenshot-full.png"><img src="http://images.computeraudiophile.com/graphics/2009/0607/itunes-get-info%3Dscreenshot-50.png" alt="Rip Blu-ray File Audio 02"></a> </center><center>click to enlarge</center>
<b>Conclusion</b>
Since I spent a couple days on this journey I'm pretty sure I can complete the whole process blindfolded. The tough part was figuring all of this stuff out and exactly what was the minimum required to rip Blu-ray audio. This is a huge plus for all the Computer Audiophile readers. I waste my time so you don't have to :~) (That kind of sounds like one of those slimy personal injury lawyer commercials). The whole process is really two steps. 1. Rip the Blu-ry disc to your hard drive, and 2. Demux the m2ts file to a WAV. Now that I've successfully completed a Blu-ray audio rip, I think it's time to purchase the Neil Young Archives!


Recommended Comments