

This guide provides a step by step walkthrough of ripping audiophile vinyl to 24/192 digital audio. Included in the guide are details on how to use state of the art digital audio restoration software to remove clicks, pops, and crackles, while minimizing the impact on sound quality.
The guide is designed to be as accessible as possible so that people with varying degrees of skill and experience can successfully transfer vinyl to digital with minimum effort and is repeatable.[PRBREAK][/PRBREAK]
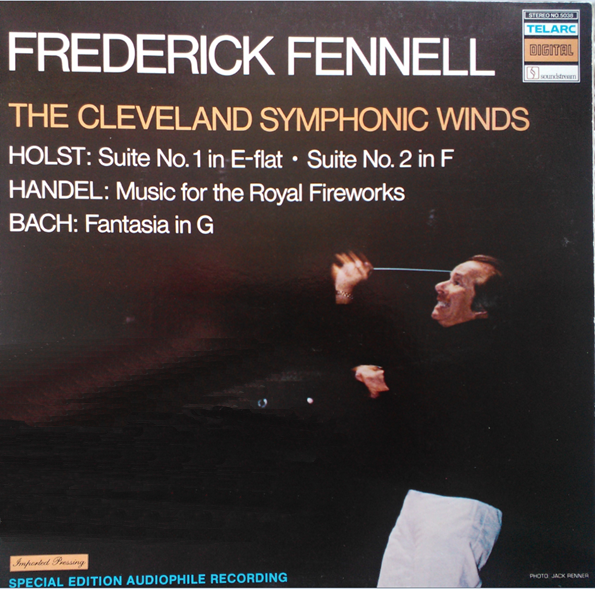
The audiophile import pressing pictured below has good dynamic range and a large quantity of clicks, pops, and crackles, as the record has been played many times. This will provide a real world challenge to properly transfer and restore.
Introduction
Let’s take a quick trip down audiophile vinyl memory lane. Telarc ![]() , was one of the first audiophile record labels in the late 70’s to use a new digital audio recording system called Soundstream
, was one of the first audiophile record labels in the late 70’s to use a new digital audio recording system called Soundstream ![]() to record this performance:
to record this performance:

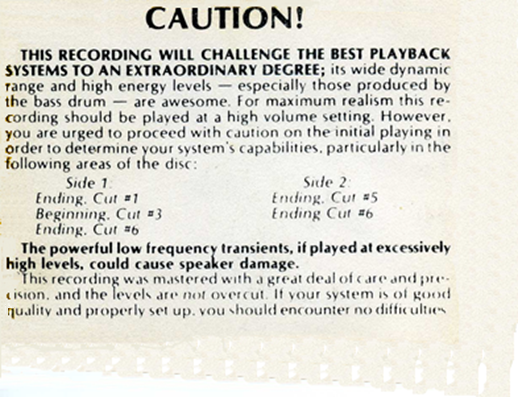
“Soundstream Inc., was the world’s first audiophile digital audio recording company, providing commercial services for recording and computer-based editing.” Telarc’s half-speed mastering process and import pressing, preserves a great deal of the dynamic range captured by the Soundstream digital recorder. This performance and recording became known as the bass drum heard around the world ![]() . This caution label came with the record in addition to these technical specifications published on the inside cover. The only item left out was the Threshold 400A that powered the ADS monitors. It really was state of the art for 1978 and still sounds impressive today. Keep an ear on woofer excursions during the bass drum transients.
. This caution label came with the record in addition to these technical specifications published on the inside cover. The only item left out was the Threshold 400A that powered the ADS monitors. It really was state of the art for 1978 and still sounds impressive today. Keep an ear on woofer excursions during the bass drum transients.
Click to enlarge.


Requirements
What’s Required:
A turntable, tonearm, cartridge, and phono preamplifier. The phono preamp is used to amplify the low level cartridge signal to line level and apply the RIAA equalization curve. RIAA equalization ![]() is a specification. The purposes of the equalization are to permit greater recording times, improve sound quality, and to reduce the groove damage that would otherwise arise during playback. When this record was cut, the reverse of the curve below was applied (pre-emphasis), and when played back, the equalization curve below (de-emphasis) is applied.
is a specification. The purposes of the equalization are to permit greater recording times, improve sound quality, and to reduce the groove damage that would otherwise arise during playback. When this record was cut, the reverse of the curve below was applied (pre-emphasis), and when played back, the equalization curve below (de-emphasis) is applied.

The point is that RIAA equalization must be applied at playback, but can be implemented in different ways. For example, a preamplifier, integrated amp, receiver, etc., may have phono inputs built in, as is the RIAA equalization. Another approach, typically used by audiophiles, is to use a separate, dedicated phono preamp. For DIY, there are several circuits ![]() , designs
, designs ![]() , and modules
, and modules ![]() to choose from.
to choose from.
The RIAA equalization curve can also be implemented in software. This allows for the greatest flexibility as there are hundreds of variations of the RIAA equalization curve over decades of record production. Vinyl enthusiasts restoring records from the 1940’s, for example, would benefit from such flexibility.
Most digital audio recording and editing software will have software plugins for RIAA equalization curves. For example, Audacity has several RIAA equalization variations to choose from:

I was going to write in-depth about RIAA equalization in software, but after some investigation, this would require an article onto itself. If interested, a good place to start is: HERE ![]() . For the purpose of this article, the separate component route was chosen. The Pro-Ject Tube Box S
. For the purpose of this article, the separate component route was chosen. The Pro-Ject Tube Box S ![]() is an entry-level tube phono preamp with a pair of graded ECC83 (12AX7A) tubes.
is an entry-level tube phono preamp with a pair of graded ECC83 (12AX7A) tubes.

Turntable, tonearm, and cartridge:
During my research, I was surprised at how many turntable choices there were. From “all in one ![]() ” solutions, to ultra-high end
” solutions, to ultra-high end ![]() separates, to home built hi-fi
separates, to home built hi-fi ![]() . I was recently downtown Toronto at Bay Bloor Radio checking out their extensive line of turntables and accessories
. I was recently downtown Toronto at Bay Bloor Radio checking out their extensive line of turntables and accessories ![]() on the floor. This all in one
on the floor. This all in one ![]() solution has both a built-in moving magnet phono preamplifier, with line level analog outs, and A/D converter to USB, at a reasonable price point. I am using Pro-Ject Audio’s Expression Classic
solution has both a built-in moving magnet phono preamplifier, with line level analog outs, and A/D converter to USB, at a reasonable price point. I am using Pro-Ject Audio’s Expression Classic ![]() , with a Pro-Ject carbon fiber tonearm, and factory fitted Sumiko Blue Point No. 2 cartridge
, with a Pro-Ject carbon fiber tonearm, and factory fitted Sumiko Blue Point No. 2 cartridge ![]() .
.

Pre-flight Hardware Check
The Pro-Ject Tubebox S amplifies the cartridge signal to line level and applies the RIAA equalization, (and depending on the circuit design, not necessarily in that order) , which then feeds the analog inputs of a Lynx Hilo A/D D/A converter ![]() .
.
Before I record, I run through a checklist:
- Check cartridge Vertical Tracking Angle (VTA), overhang, azimuth, tracking force, and any other adjustments. Calibrate to spec as required.
- Check phono preamp to see if impedance load and capacitance values are matched to the cartridge.
- With all cables plugged in, check for hum or buzz. Ensure ground leads on table and phono preamp are secure.
-
Wash records. VPI
 makes effective cleaning machines.
Software
What about digital audio recording software? There is no shortage of recording software for the PC, some are open source like Audacity ![]() , to commercial Digital Audio Workstations
, to commercial Digital Audio Workstations ![]() (DAW’s). In my case, I use Audacity to record at 24/192 to get the best transfer possible. Once I have the conversion, then I will try vinyl restoration software in an attempt to restore this audiophile recording to an enjoyable state.
(DAW’s). In my case, I use Audacity to record at 24/192 to get the best transfer possible. Once I have the conversion, then I will try vinyl restoration software in an attempt to restore this audiophile recording to an enjoyable state.
Audio Device Configuration and Audacity Setup:
I recommend using the ASIO ![]() driver if the sound card or outboard A/D D/A supplies one. ASIO bypasses everything Windows and the application (e.g. Audacity) communicates through the ASIO driver directly to the hardware. ASIO is the standard in the Pro Audio world because of this and its inherent low latency design.
driver if the sound card or outboard A/D D/A supplies one. ASIO bypasses everything Windows and the application (e.g. Audacity) communicates through the ASIO driver directly to the hardware. ASIO is the standard in the Pro Audio world because of this and its inherent low latency design.
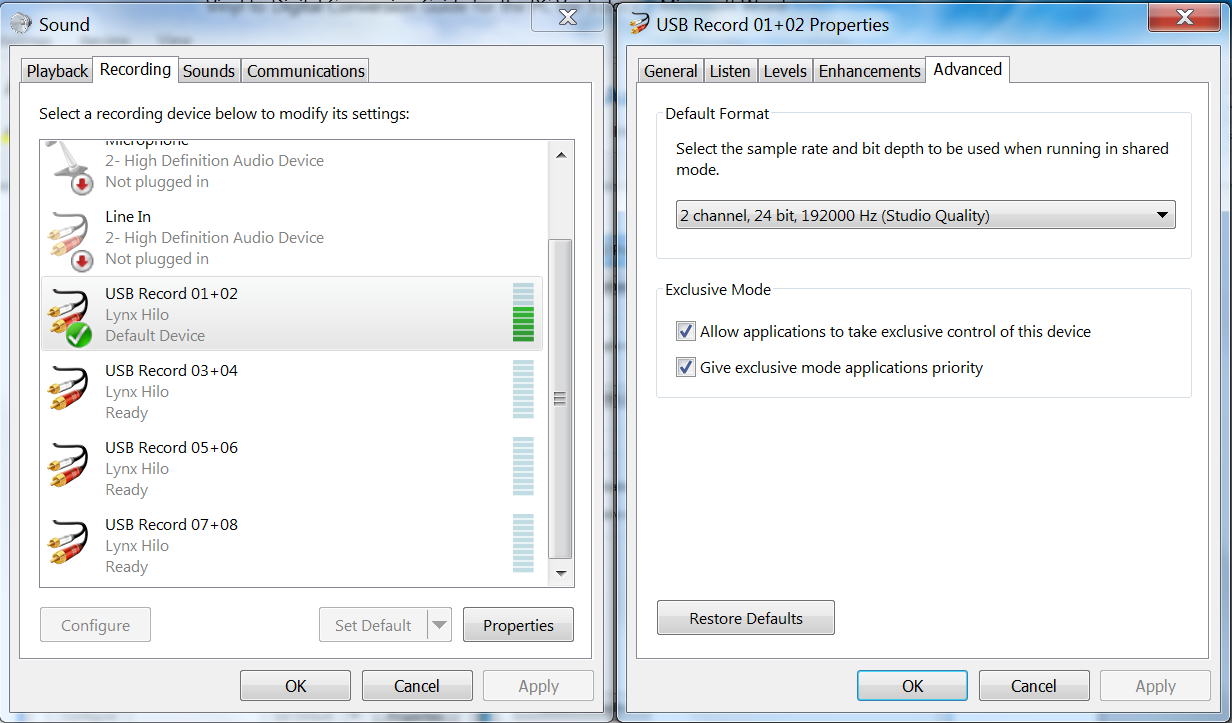
In case of Windows 7 (and Windows 8) audio system, from the Start menu->Control Panel-> Sound:

Above I have set USB Play 01+02 as the Default Playback Device. Click on Properties for the Default Device. Ensure that the level on the Levels tab is set 100%. Check that “Disable all enhancements” on the Enhancement tab is checked on. Finally, match the sample rate and bit depth to the desired rate and depth of the A/D D/A converter. In my case, everything is configured for 24/192.
It is the same procedure for the Recording tab below:
Software Tips
Now that everything is setup, configured, and warmed up, I am ready to start the transfer process. A couple of tips based on my experiments. Monitor the recording using headphones and not speakers to prevent any acoustic signal or vibration from getting into the recording. With nothing playing and headphones on, slowly turn up the volume to check for any excessive hiss or hum from the setup. Because I am using Lynx Hilo’s supplied ASIO USB driver, I am using the ASIO version of Audacity:

Label 1 is where to select the audio device used for recording and playback based on the little speaker and microphone icons to the left of the drop down lists. Turning to Label 3, note the drop down arrow to the right of the microphone icon. Clicking on it drops down a list of items, one of which allows the selection of turning monitoring on. With it on, I now have meters and headphone monitoring. Back to Label 1, clicking on the recording drop down list produces the following list of sound devices from my computer audio setup:

I have selected the ASIO device. The same settings can be referenced from the Audacity Edit menu->preferences->Devices:

Label 2 is the project’s sample rate. In addition to selecting in the drop down, this and other parameters can be set by clicking on File menu->Edit->Preferences->Quality:

Label 3 is the peak recording meter that I need to keep an eye on. More on that shortly, but now I am ready to record.
Recording:

Spin The Black Circle
Step 1 is to locate the loudest passage on the vinyl, whether capturing a single cut or the entire side. This is required to properly set the maximum digital audio record level. In order to do this, I need to monitor the input level, not only with headphones, but the peak level meters as well.
The idea is to set the recording level close to the end of the meter, but no clipping during the loudest passage. In the case of Audacity, a clipped level will leave a red marker at the end of the meter while monitoring. Just like in the screen shot below:

I use the A/D converter on my Lynx Hilo for different audio tasks, location binaural recording, acoustic measurements, and now ripping vinyl. That was one criteria I used for the selection of this device. The Hilo has an onboard 32 x 32 channel mixer that is controlled by a touch screen. I use it for patch bay routing, analog and digital loopback, and in this case routing the A/D line input to Audacity digital input channels 1 + 2. I set Audacity’s input level at 0 dBFS and use the Hilo’s faders and metering to control the digital input level to Audacity.
Alternate Sources for Analog to Digital Converters (ADC). Depending on the computer or laptop make and model, it may have a 1/8” mini jack line input to an onboard A/D converter. The issue is whether the jack is stereo or mono. If it is stereo, then it is an existing way to gain access to an A/D converter. If not, and again depending on the computer make and model, one can acquire an internal/external sound card/interface that has an A/D converter on it. As mentioned earlier in the guide, some turntable “all in one units” have an onboard A/D converter and USB connection to stream the digital audio to Audacity, for example. There are many choices.
During the loudest passage on the record, a good peak level is between -6dBFS and -3dBFS. It is worthwhile to experiment with setting the maximum level and go over the loudest passage on the record a few times to get the level just right. Make sure no clipping occurs like in the picture below:

Getting the right level is the most important step during the recording process and may take a few iterations to get it just right. It is worth taking the time. Now that the level is set, I press record in Audacity and drop the needle. I monitor the recording on headphones and watch the meters. In this case, I am recording the first cut on the record. Once the song ends, I press stop and then immediately listen back to the recording over headphones to see if it sounds the same as my memory imprint. Be sure to turn on Show Clipping from the Audacity View menu to catch any recorded clipping. This will mark the waveform in red if there is clipping.
Here is the finished recording in the waveform display in Audacity.

As mentioned on the albums Caution label, cut 1, near the end, has a build up with the bass drum, followed by 3 transient hits of the bass drum heard around the world. It is easy to spot near the end on the waveform display. Using TTD Dynamic Range Meter (or Foobar plugin) from DR Database ![]() , the result is a DR of 14. Correlating that to the legend on the DR Database site, this 1978 vinyl import pressing has good dynamic range:
, the result is a DR of 14. Correlating that to the legend on the DR Database site, this 1978 vinyl import pressing has good dynamic range:


Dynamic range - check. I was lucky to get away with -0.5dBFS peak level. No clipping, but cutting it pretty close. Looking at the waveform again below, I have zoomed in on the time scale, so I am viewing the first 60 seconds of the waveform. Note the numerous vertical “spikes”, those are vinyl clicks.

How does it sound? Careful with the volume. The needle drop is loud. Gapless playback may have to be turned off in the software music player in order to hear the silence and transition to the needle drop.
24/441 Clicks and Crackles ![]() (1 minute 16MB WAV)
(1 minute 16MB WAV)
The needle drop is loud! There are a lot of clicks, pops, and crackles. One can correlate the visuals with the sound. Download and open the WAV file in Audacity or other digital audio editing software. Watch the play cursor go over the needle drop and clicks in real-time in the waveform display and correlate by listening to the sound. Now that I have a good transfer to digital audio, what’s next? This is where state of the art Digital Signal Processing (DSP) software designed for digital audio restoration can help out.
Digital Audio Restoration Software
There are several digital audio restoration software packages/plugin modules available. This category of DSP software has capabilities to automatically and/or manually remove vinyl clicks, crackles, and pops. Audacity has this capability, as does an oldie but goody, Wave Repair ![]() . Audacity also has a Sample workflow for LP digitization
. Audacity also has a Sample workflow for LP digitization ![]() with a section on click and crackle removal. However, I wanted to try state of the art commercial software to see what the latest in DSP software algorithms can offer. One such software is iZotope’s RXII Audio Repair Software
with a section on click and crackle removal. However, I wanted to try state of the art commercial software to see what the latest in DSP software algorithms can offer. One such software is iZotope’s RXII Audio Repair Software ![]() . It has a wide range of digital audio restoration capabilities, but for this article, I focused on click and crackle removal. I feel that the Help manual has done an excellent job outlining the restoration procedure:
. It has a wide range of digital audio restoration capabilities, but for this article, I focused on click and crackle removal. I feel that the Help manual has done an excellent job outlining the restoration procedure:


I am impressed with the user manual as it is clear to me what I have to do and in what order, plus a couple of tips. Below is what the track I recorded in Audacity looks like in iZotope RXII software waveform display and spectrum analyzer:

Here is a zoom in on the time scale showing the first 60 seconds or so.

Wow, look at the spectrum of the amount of clicks! The high resolution spectrum display clearly shows the detail of the clicks. I will be impressed if the clicks are reduced without audibly degrading the SQ. I am going to take the advice of the manual and listen to the output of the clicks only. What an awesome feature. I am going to start with the default vinyl preset, give a listen, and fine tune the Strength as recommended.
56,835 clicks repaired! That was using the default/preset Strength of 5. With “Output clicks only”, I tried a variety of Strength settings, but ended back at the default setting.
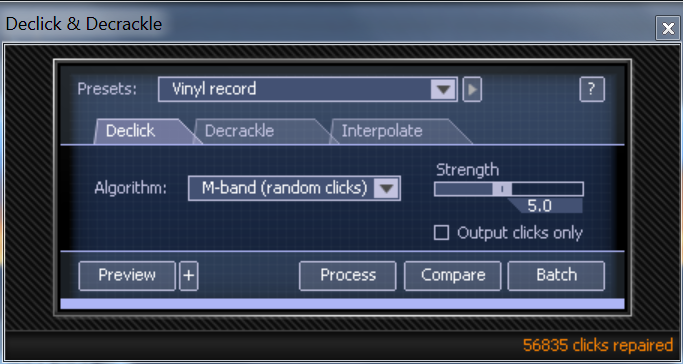
I am processing 2 tracks, 32 bit float at 192KHz which uses a fair amount of processing power on my i5 – 2500 quad core CPU running at 3.30 GHz, with 8 gigs of RAM installed. It also takes some time to process (11 minutes) one track. But for over 56,000 clicks being removed…

Let’s have another look at the first 60 seconds, now with click removal applied:

Remarkable compared to the previous picture above with all of those clicks. Where’s the needle drop?
Here is what it sounds like. Again careful with the monitoring level as the needle drop is still there, but greatly reduced in level.
24/441 Declick ![]() (1 minute 16MB WAV)
(1 minute 16MB WAV)
Wow, no clicks and still sounds good. As recommended by the manual, run decrackle after declick. I stuck with the defaults:

Here is the first 60 seconds with declick and decrackle.
24/441 Declick and Decrackle ![]() (1 minute 17MB WAV)
(1 minute 17MB WAV)
Notice how the crackle of the surface noise is reduced compared to just declick. I am impressed with this software’s capability to significantly reduce the number of clicks and crackles without having an adverse impact on the SQ. A quick check in the TT Dynamic Range meter still shows a DR of 14, so the dynamic range has not been affected.
These are using the default settings of the vinyl preset. The recommendation is to run the declick and decrackle in multiple passes, but this is just with one pass of each. I suppose I could have experimented more with different settings. But the default setting exceeds my expectations as is.
Here is the full track so you can hear for yourself how quiet the disc sounds and the dynamic range of the bass drum heard around the world. This vinyl rip and restoration has turned from, “I would never play this disc again”, to “an enjoyable sound that I can listen to over and over again.”
24/192 Declick Decrackle ![]() (333MB WAV)
(333MB WAV)
24/441 Declick Decrackle ![]() (77MB WAV)
(77MB WAV)
Conclusion
I am impressed with the effectiveness of the transfer of dynamic range to digital audio and how advanced DSP software has become over the recent years. The declick and decrackle algorithms in iZotope’s Digital Audio Restoration Software are nothing short of miracles. I never thought I would be able to play this record again. Now I can enjoy “that sound” anytime I want. I could not ask for anything more.
While I did not cover every aspect of converting vinyl to digital audio, I highlighted the essential aspects, getting a clean recording of the vinyl and how to remove clicks and crackles. Hopefully it is enough to consider dusting off those LP records and giving them another lease on life.
I am developing Part 2 of this guide for the Macintosh. This will allow me to run software like Amarra Vinyl ![]() and Pure Vinyl
and Pure Vinyl ![]() software that has more feature automation around splitting tracks, and compare their declick and decrackle algorithms and SQ to Audacity and iZotope RXII. Stay tuned.
software that has more feature automation around splitting tracks, and compare their declick and decrackle algorithms and SQ to Audacity and iZotope RXII. Stay tuned.
Post Script: Final But Very Important Notes
Comparing Vinyl Rip to CDROM Rip:
For every article I write, I intend to include a section that promotes critical listening skills. In this case, I am going to compare the newly minted vinyl rip to the same recording, but ripped from CDROM:
CD Cover:

Inside CD jacket:
I love it that there is no question of provenance, for either the LP record or the CDROM.

Loading the digital track from the CD in the dynamic range meter reports a DR of 17. The dynamic range is greater than the LP record. I am still impressed with a 1978 vinyl pressing can report a DR of 14, especially given the number of plays.

Let’s have some fun.
Do you feel you can hear the difference between the LP and CD rips? Do you think you can pick which one is which? I have to stack the deck a little, as starting out from dead silence would be too easy. But once the music masks the noise floor, who knows…
I picked the last 60 seconds of the recording starting with the bass drum ramp up and finale of the three transient hits of the bass drum. I lined up the tracks timing and matched the levels as best as possible. The vinyl rip and CDROM version alternate every 15 seconds. Meaning for the first 15 seconds, you are listening to either the vinyl or CD rip, then it switches to the other rip, every 15 seconds, swap. In fact, you will hear the digital edits for the first couple of 15 second transitions. You have a 50/50 chance on getting whether I started with the vinyl rip or the CDROM rip. You could open the file in a Digital Audio editor, but that is no guarantee to figure out which is which either. There are a few telltale signs, but the point of the exercise is to use your ears Luke and have some fun.
24/441 Which is which ![]() (18MB WAV)
(18MB WAV)
Does the recording start with the vinyl rip or CDROM rip?
Happy Listening!
![]()
![]()
About the author
 Mitch “Mitchco” Barnett
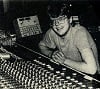
I love music and audio. I grew up with music around me as my Mom was a piano player (swing) and my Dad was an audiophile (jazz). At that time Heathkit was big and my Dad and I built several of their audio kits. Electronics was my first career and my hobby was building speakers, amps, preamps, etc., and I still DIY today ![]() . I also mixed live sound for a variety of bands, which led to an opportunity to work full-time in a 24 track recording studio. Over 10 years, I recorded, mixed, and sometimes produced
. I also mixed live sound for a variety of bands, which led to an opportunity to work full-time in a 24 track recording studio. Over 10 years, I recorded, mixed, and sometimes produced ![]() over 30 albums, 100 jingles, and several audio for video post productions in a number of recording studios in Western Canada. This was during a time when analog was going digital and I worked in the first 48 track all digital studio in Canada. Along the way, I partnered with some like-minded audiophile friends, and opened up an acoustic consulting and manufacturing company. I purchased a TEF acoustics analysis computer
over 30 albums, 100 jingles, and several audio for video post productions in a number of recording studios in Western Canada. This was during a time when analog was going digital and I worked in the first 48 track all digital studio in Canada. Along the way, I partnered with some like-minded audiophile friends, and opened up an acoustic consulting and manufacturing company. I purchased a TEF acoustics analysis computer ![]() which was a revolution in acoustic measuring as it was the first time sound could be measured in 3 dimensions. My interest in software development drove me back to University and I have been designing and developing software
which was a revolution in acoustic measuring as it was the first time sound could be measured in 3 dimensions. My interest in software development drove me back to University and I have been designing and developing software ![]() ever since.
ever since.
![]()
![]()
![]()
![]()


Recommended Comments
Create an account or sign in to comment
You need to be a member in order to leave a comment
Create an account
Sign up for a new account in our community. It's easy!
Register a new accountSign in
Already have an account? Sign in here.
Sign In Now