


 Warning the following article contains some geeky stuff. What follows is a step by step guide to building a tiny 2.4" x 0.82" x 3.54" Linux music server. It's not rocket science and the instructions make the process fairly easy, but the article isn't for everybody. Thanks to CA readers K-man and Richard Dale for additional information and tweaks for setting up the BeagleBone Black so it runs great. Please note there are many ways to setup and configure the BBB. This is just one way using either Mac OS X or Windows. Readers are encouraged to leave comments with additional tips, tricks, and tweaks. I will update this article accordingly.[PRBREAK][/PRBREAK]
![]()
![]()
![]()
Introduction
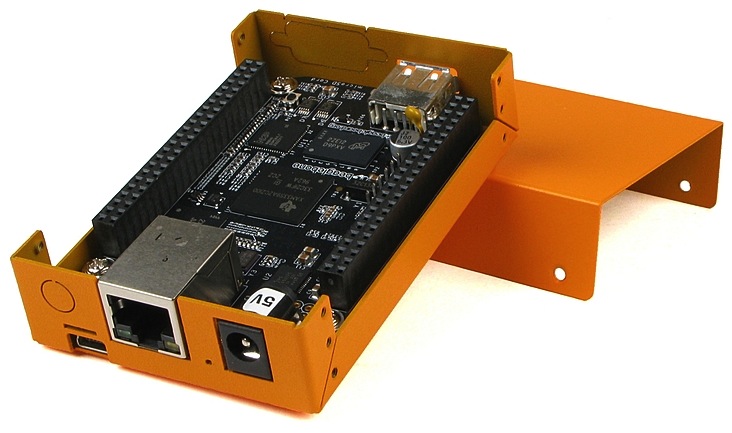
The new $45 BeagleBone Black motherboard has excited many computer audio entusiasts. This tiny board has enough power and ports to run a Linux based MPD music server. In addition, Logic Supply has released a new BeagleBone Black case in a very cool orange color as well as a more traditional black. The case is made specifically for the BBB. All the ports line up perfectly and the finished product with BBB inside looks really neat. I attached the four rubber feet to the bottom of my Logic Supply case and the BBB sits nicely on any of my audio components without scratching itself or the other device. The case is made of sturdy metal, unlike the plastic options available heretofore. If you have a BBB or are going to pick one up I'd pick up the Logic Supply case as well.

![]()
Here is a list of requirements and step by step instructions for the BBB-MPD server running Linux from the built-in eMMC flash drive.
Requirements:
-
BeagleBone Black board ($45)

-
BeagleBone Black case ($15)
-
Power Adapter (5 volts, 2 Amps, 10 Watts ($9)
- Ethernet cable and Internet connection
-
MicroSD Card with Adapter(~$6)
- NAS Drive for music storage
-
SD Card Reader (~$9) (Optional)
-
The Unarchiver ($0) (Mac users)
-
LanScan ($0) (Mac users)
-
Win32 Disk Image ($0) (Windows users)
-
7-Zip ($0) (Windows users)
-
PuTTY ($0) (Windows users)
-
Advanced IP Scanner ($0) (Windows users)
![]()
Step By Step Mac
- Connect the MicroSD card using an adapter to a Mac or PC.
- Open Disk Utility (Applications > Utilities > Disk Utility), select select all volumes under the MicroSD card, then select Unmount. In my example the volume is named 8GB. (Image Link 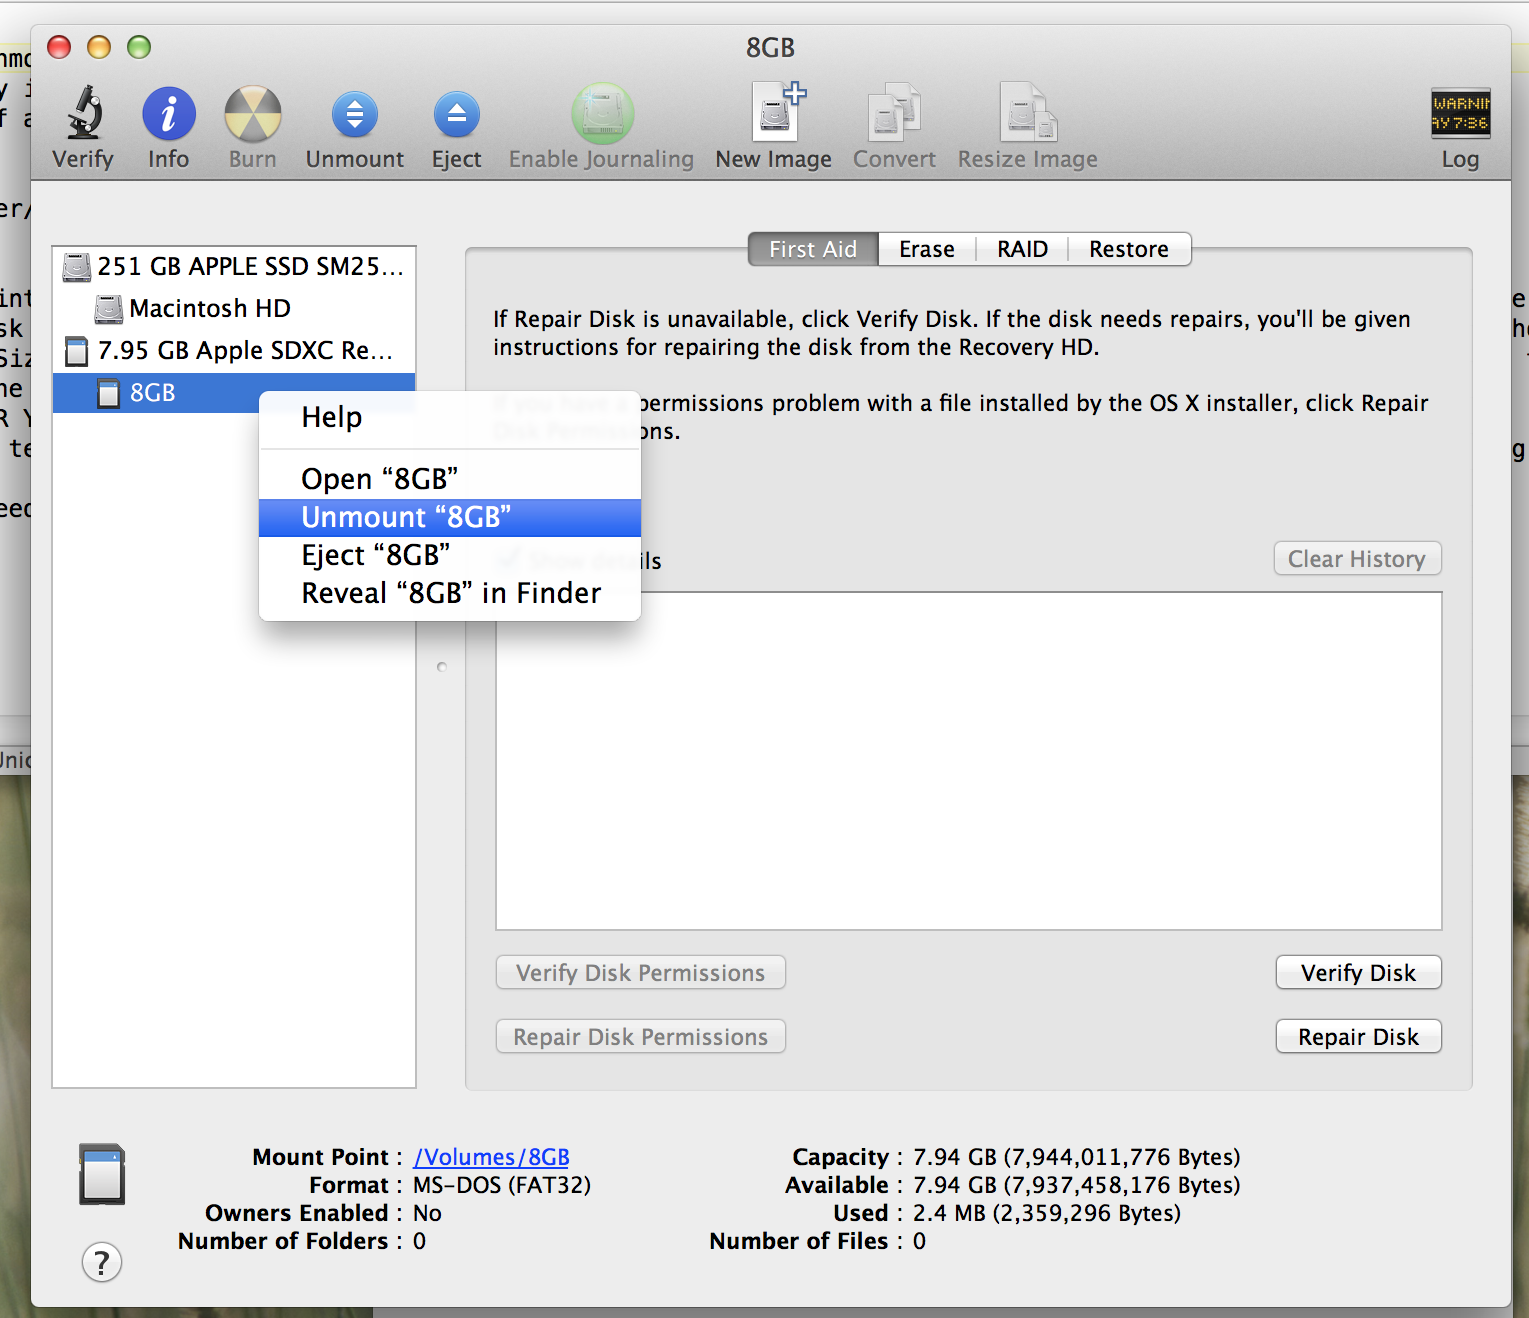 )
)
- Install The Unarchiver (App Link ![]() )
)
- Download the Debian Wheezy image (Direct Link ![]() ). During the download if asked a question about the file extension .img or .xz, click "Use .xz" (Image Link
). During the download if asked a question about the file extension .img or .xz, click "Use .xz" (Image Link 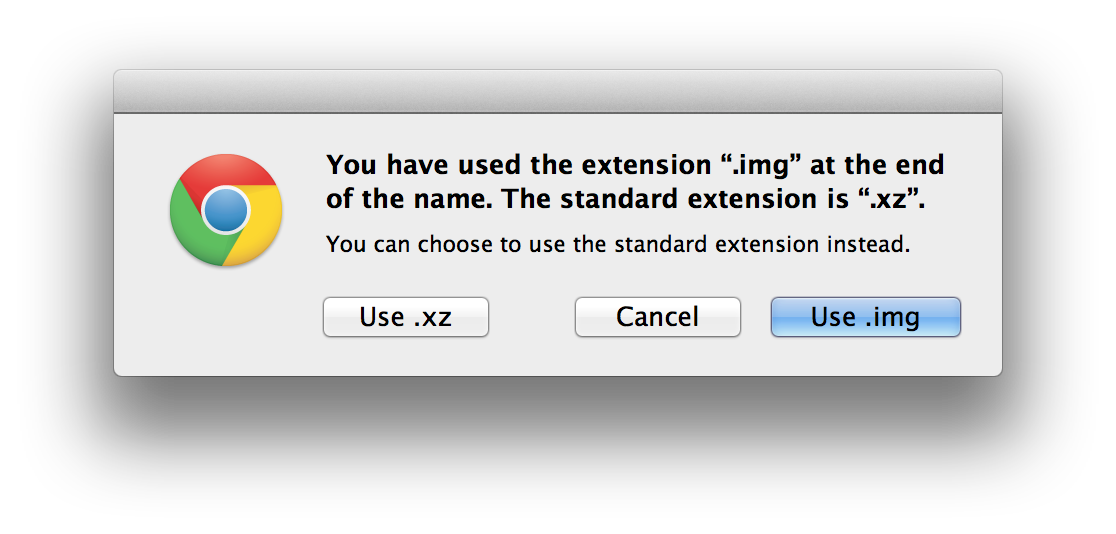 )
)
- Double-click the downloaded Debian Wheezy image. This will open The Unarchiver and automatically extract the needed image file (BBB-eMMC-flasher-debian-7.4-2014-03-27.img)
- Open the Terminal app (Applications > Utilities > Terminal)
- Type -> sudo su (without the arrow ->)
- Enter your password if asked.
- Type -> diskutil list
- Take note of the disk number of the MicroSD card connected to your computer. My MicroSD card is listed as /dev/disk1. The MicroSD card should be easily identifiable by its small size. My MicroSD card is listed as 7.9 GB (Image Link 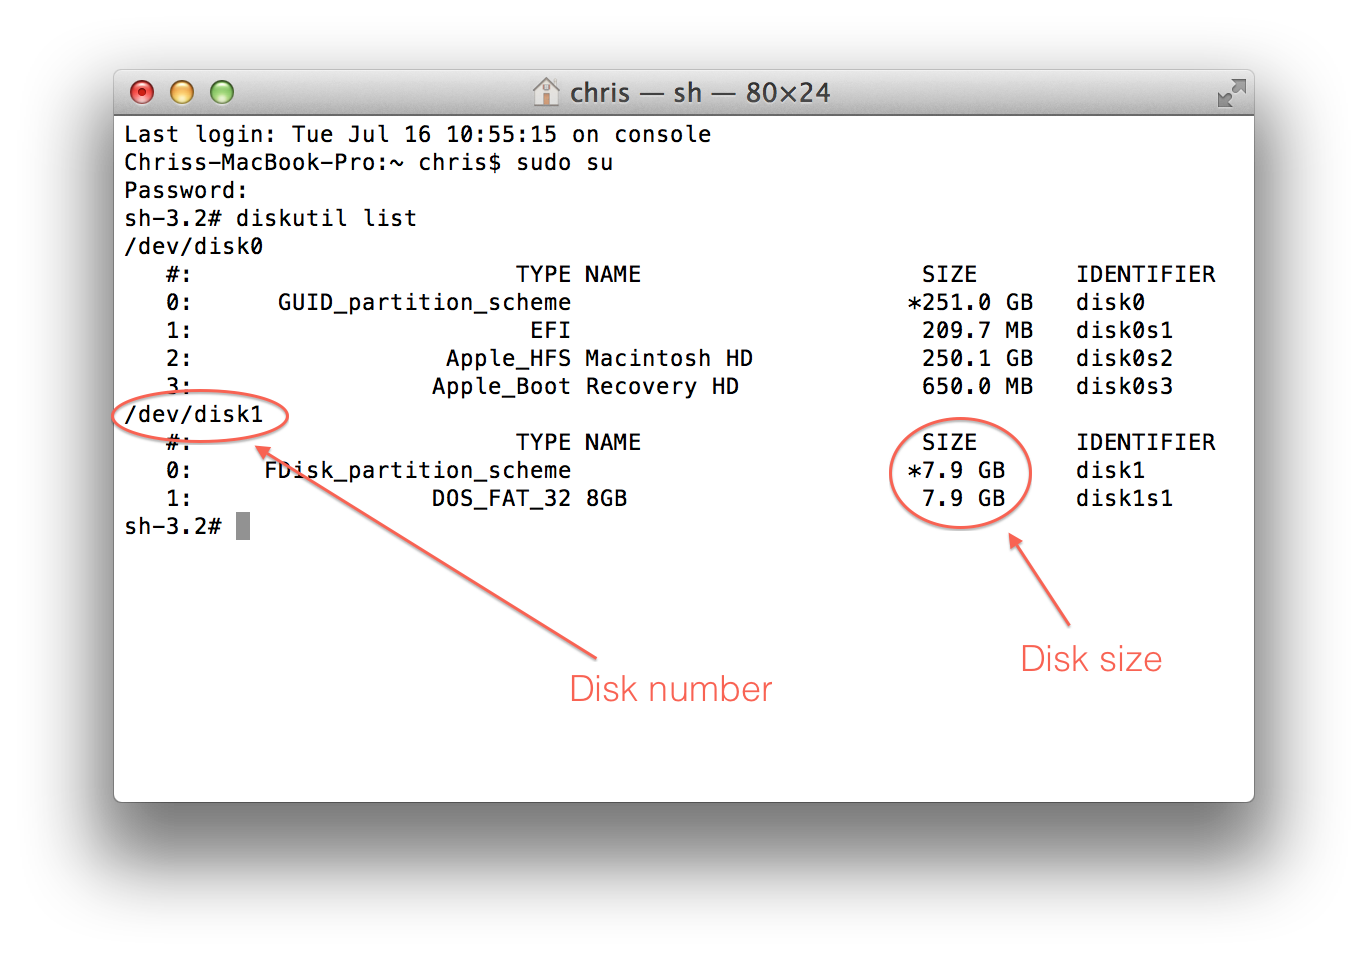 )
)
- Type -> sudo dd if=
- Drag the Debian Wheezy image file on to the Terminal window to automatically fill in the path to the file (Image Link 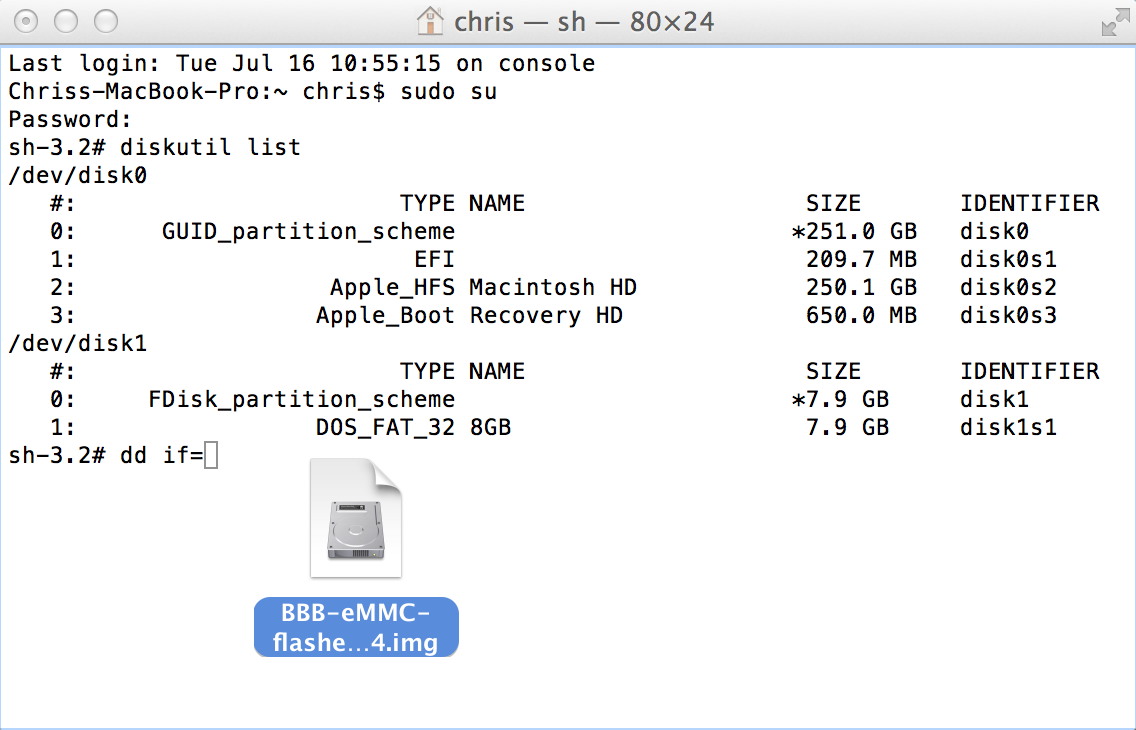 ) You can also type this in manually if desired.
- After dropping the image file on to the Terminal window the command line should read something like this >> dd if=/Users/chris/Desktop/BBB-eMMC-flasher-debian-7.4-2014-03-27.img (Image Link 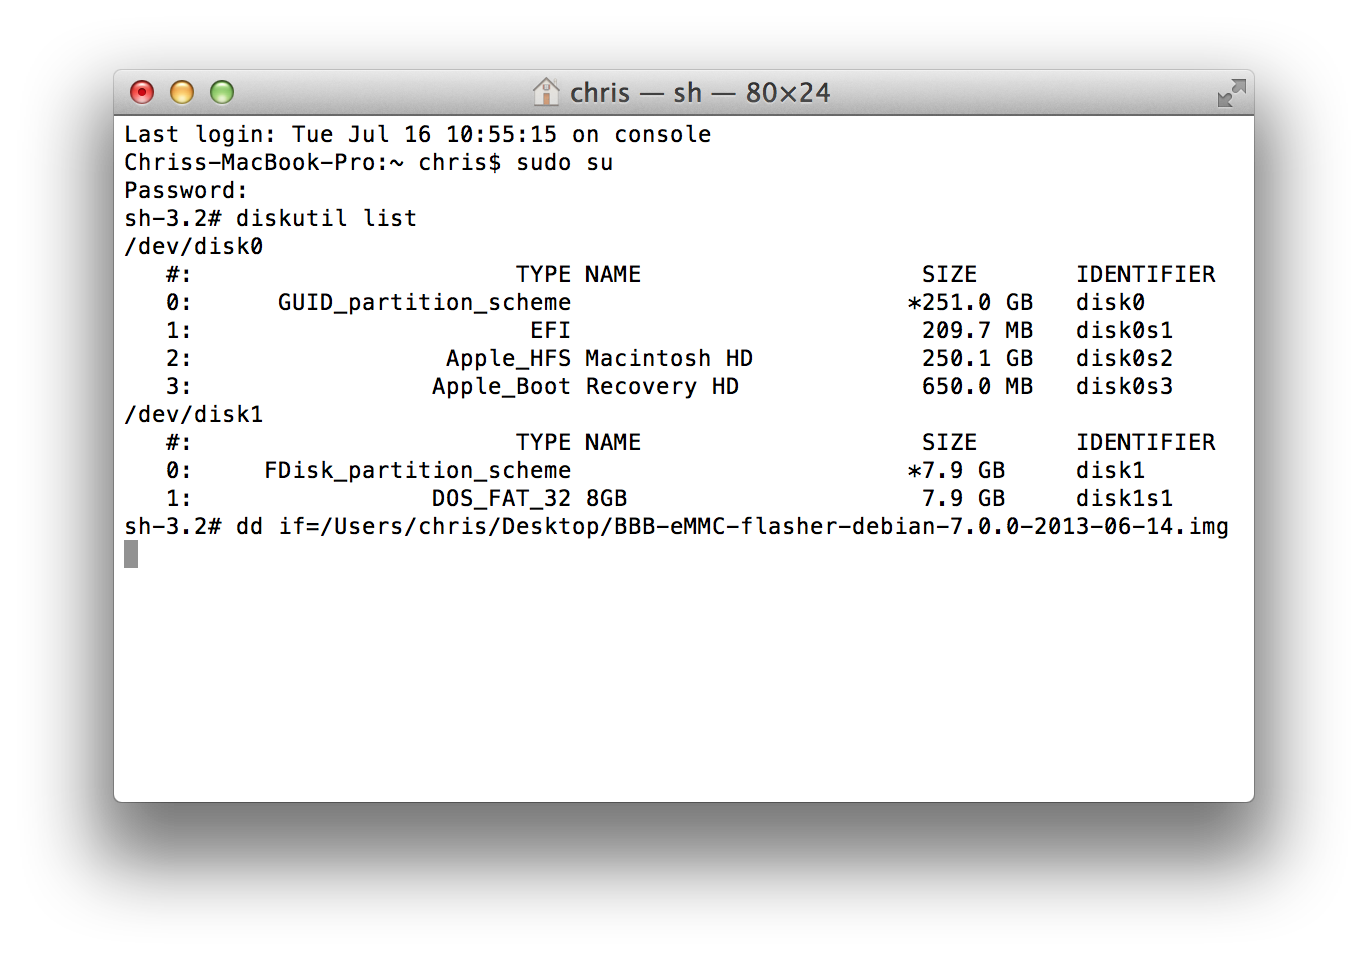 ).
).
- Make sure there is a single space after the path to the Debian Wheezy image file entered in the previous steps.
- Type -> of=
- Then enter the disk number of your MicroSD card. In my case this is /dev/disk1
- The text should look something like this of=/dev/disk1 (Image Link 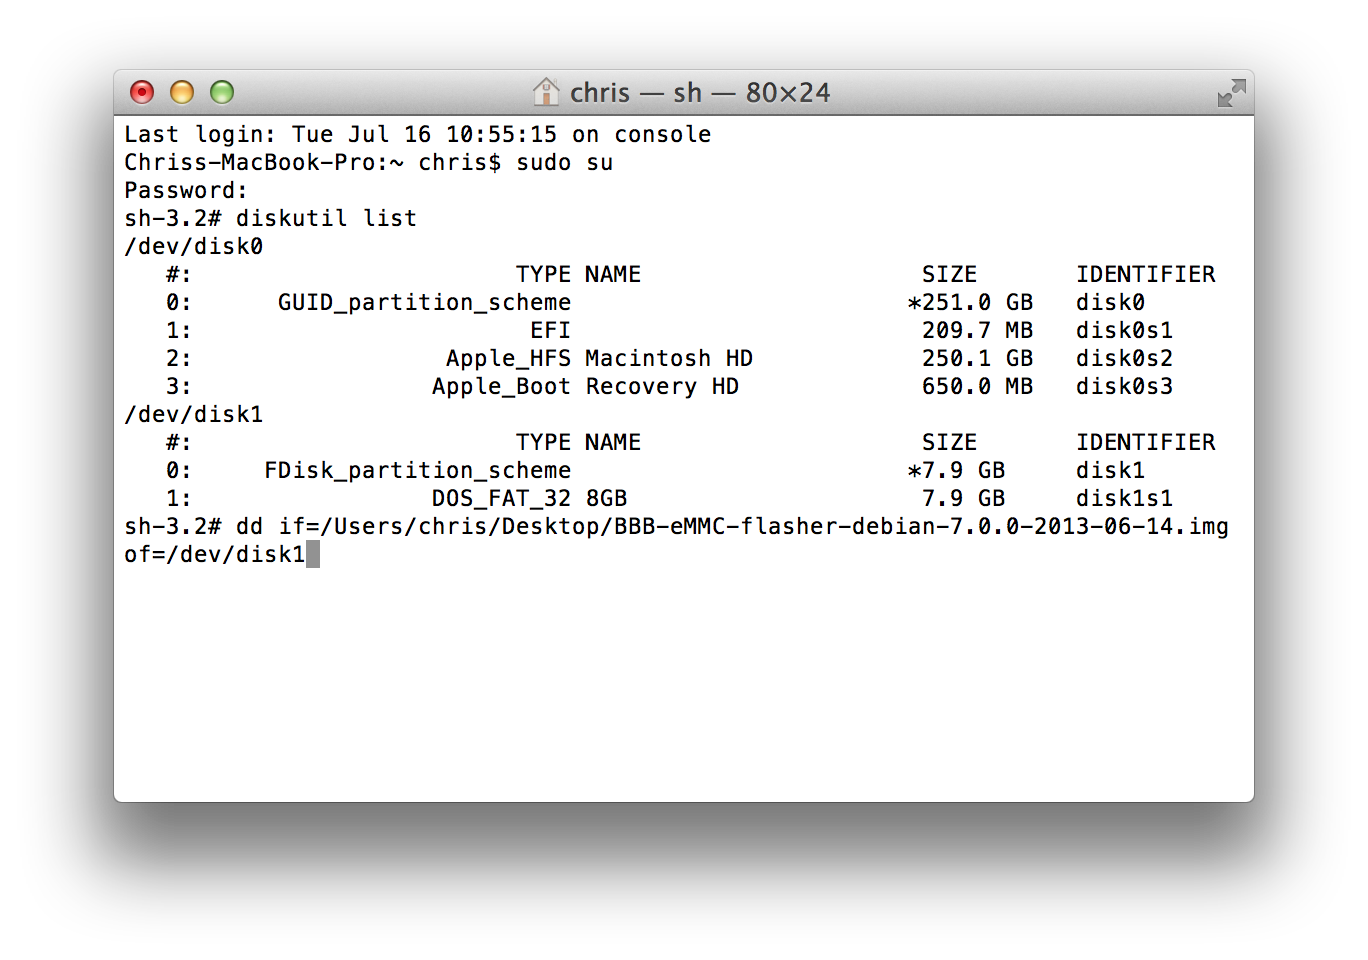 ).
).
- Make sure there is a single space after the path to your MicroSD card entered in the previous steps.
- Type -> bs=1m
- The entire line should now look something like this >> dd if=/Users/chris/Desktop/BBB-eMMC-flasher-debian-7.4-2014-03-27.img of=/dev/disk1 bs=1m
- Here is an image of my Terminal (Image Link 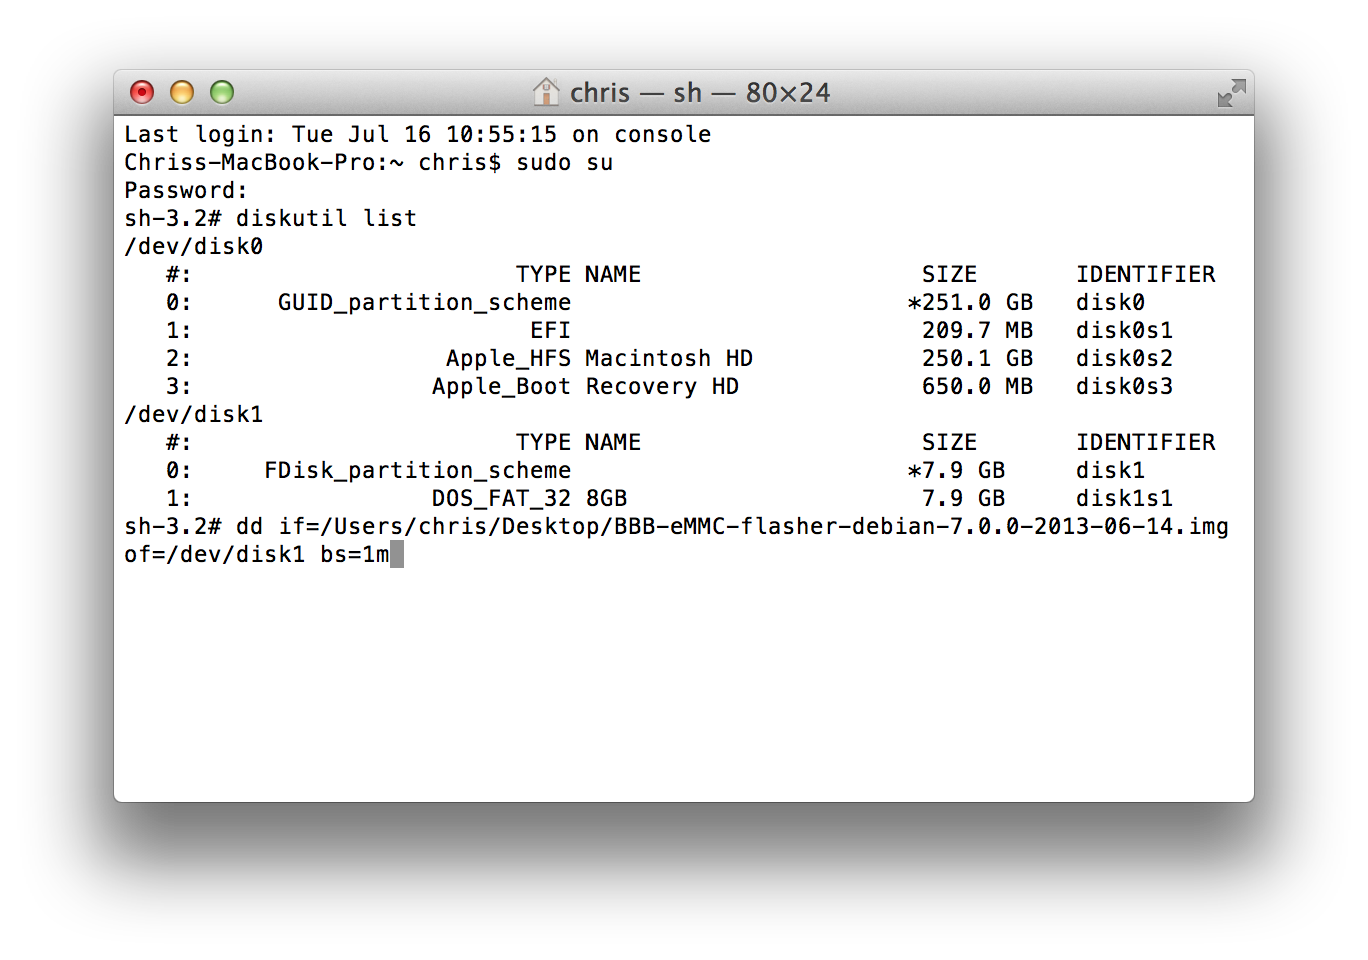 )
)
- Hit Enter on your keyboard and wait for the image to be written to the MicroSD card. This will take several minutes and appear like your computer is stuck. Please wait for the command to finish.
- Once the image has been written to the MicroSD card the Terminal window will list something like this
700+0 records in
700+0 records out
734003200 bytes transferred in 393.606273 secs (1864816 bytes/sec) (Image Link 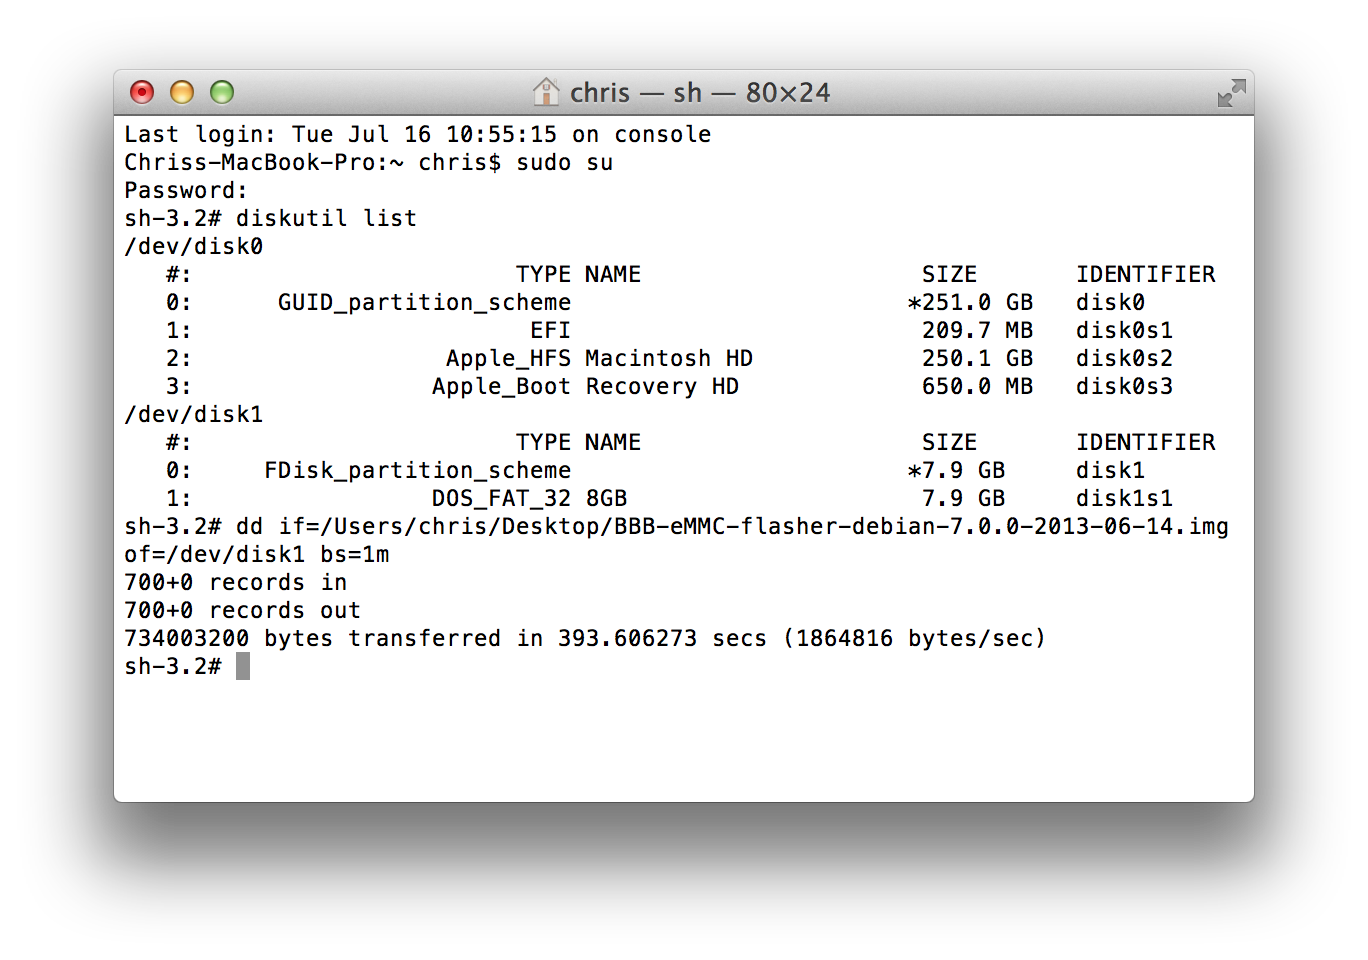 )
)
- If you receive an error message stating "Resource busy" (Image Link 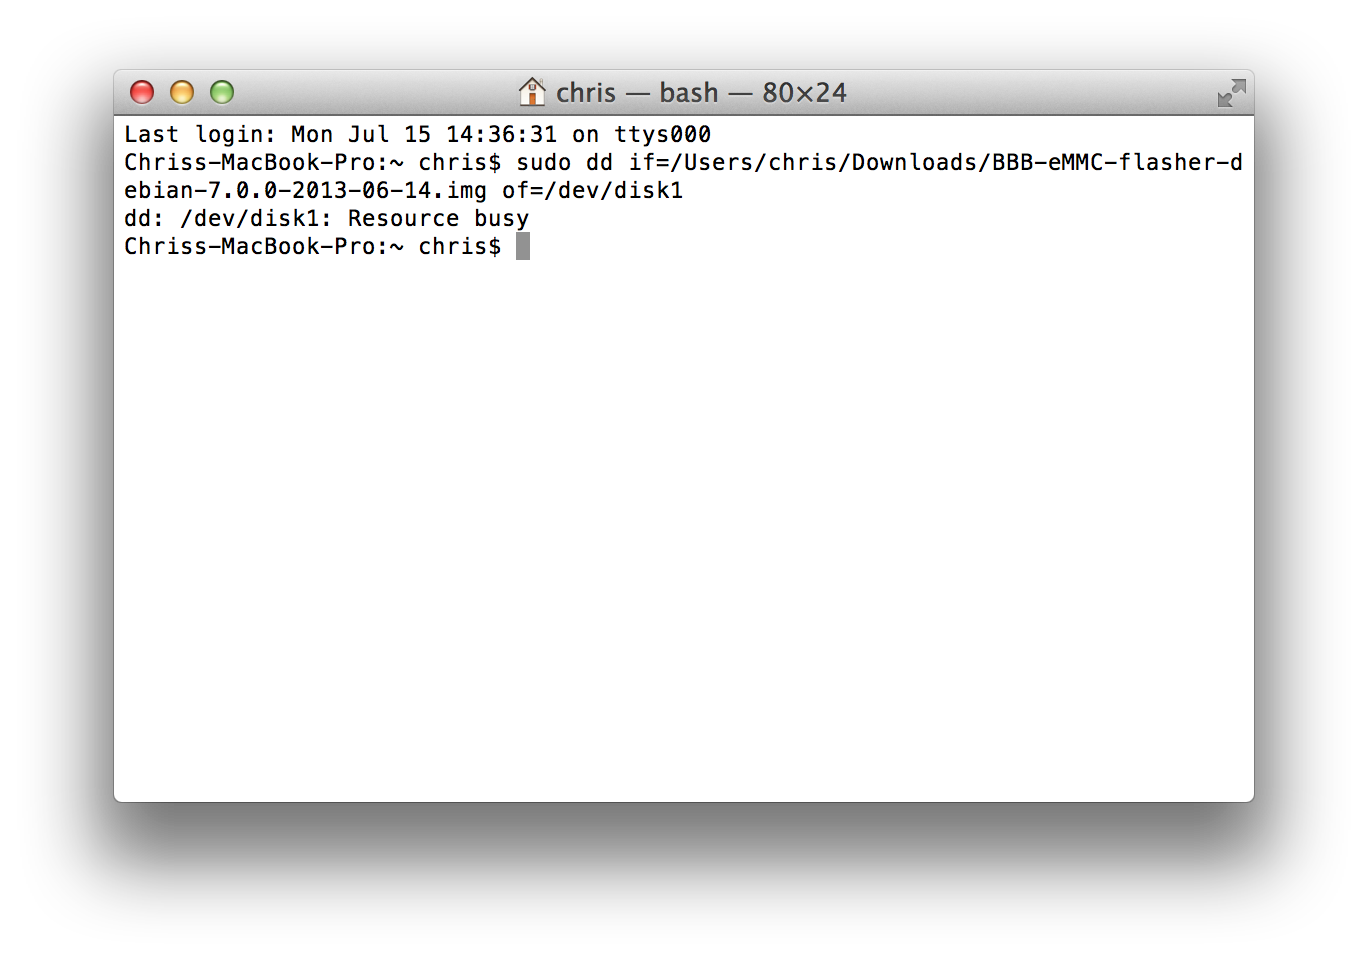 ) you likely skipped step 2. Please unmount the volume and try again.
- Open Disk Utility (Applications > Utilities > Disk Utility), select the MicroSd card, click Eject or Eject Disk via the right-click menu.
- Place the MicroSD card into the BeagleBone Black's MicroSD card slot.
- Hold down the small Boot Switch / Button 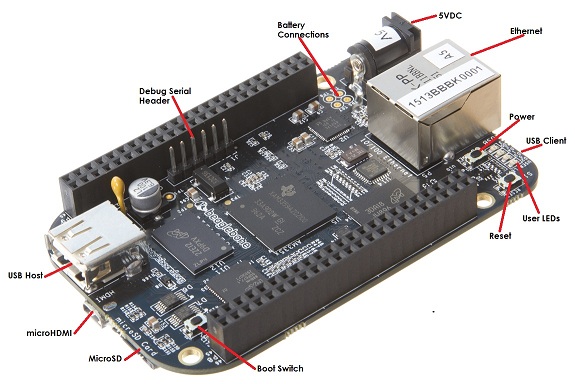 while connecting the power supply to the board.
- As soon as one of the User LEDs illuminates, release the Boot Switch / Button.
- The User LEDs should continue flashing while the MicroSD card image is copied to the on-board eMMC flash memory. The process should take about five minutes.
- When all four User LEDs are illuminated steady, pull the power supply from the board and remove the MicroSD card.
- Connect an Ethernet cable to the board and re-connect the power supply.
- The BeagleBone Black will boot into Debian Linux.
- Install the LanScan application from the App Store Link ![]()
- Open LanScan and click Lan your Scan.
- Once the network scan has completed locate the BeagleBone Black's IP address. The vendor will be listed as Texas Instruments. My BeagleBone Black's IP address is 10.0.1.179 (Image Link 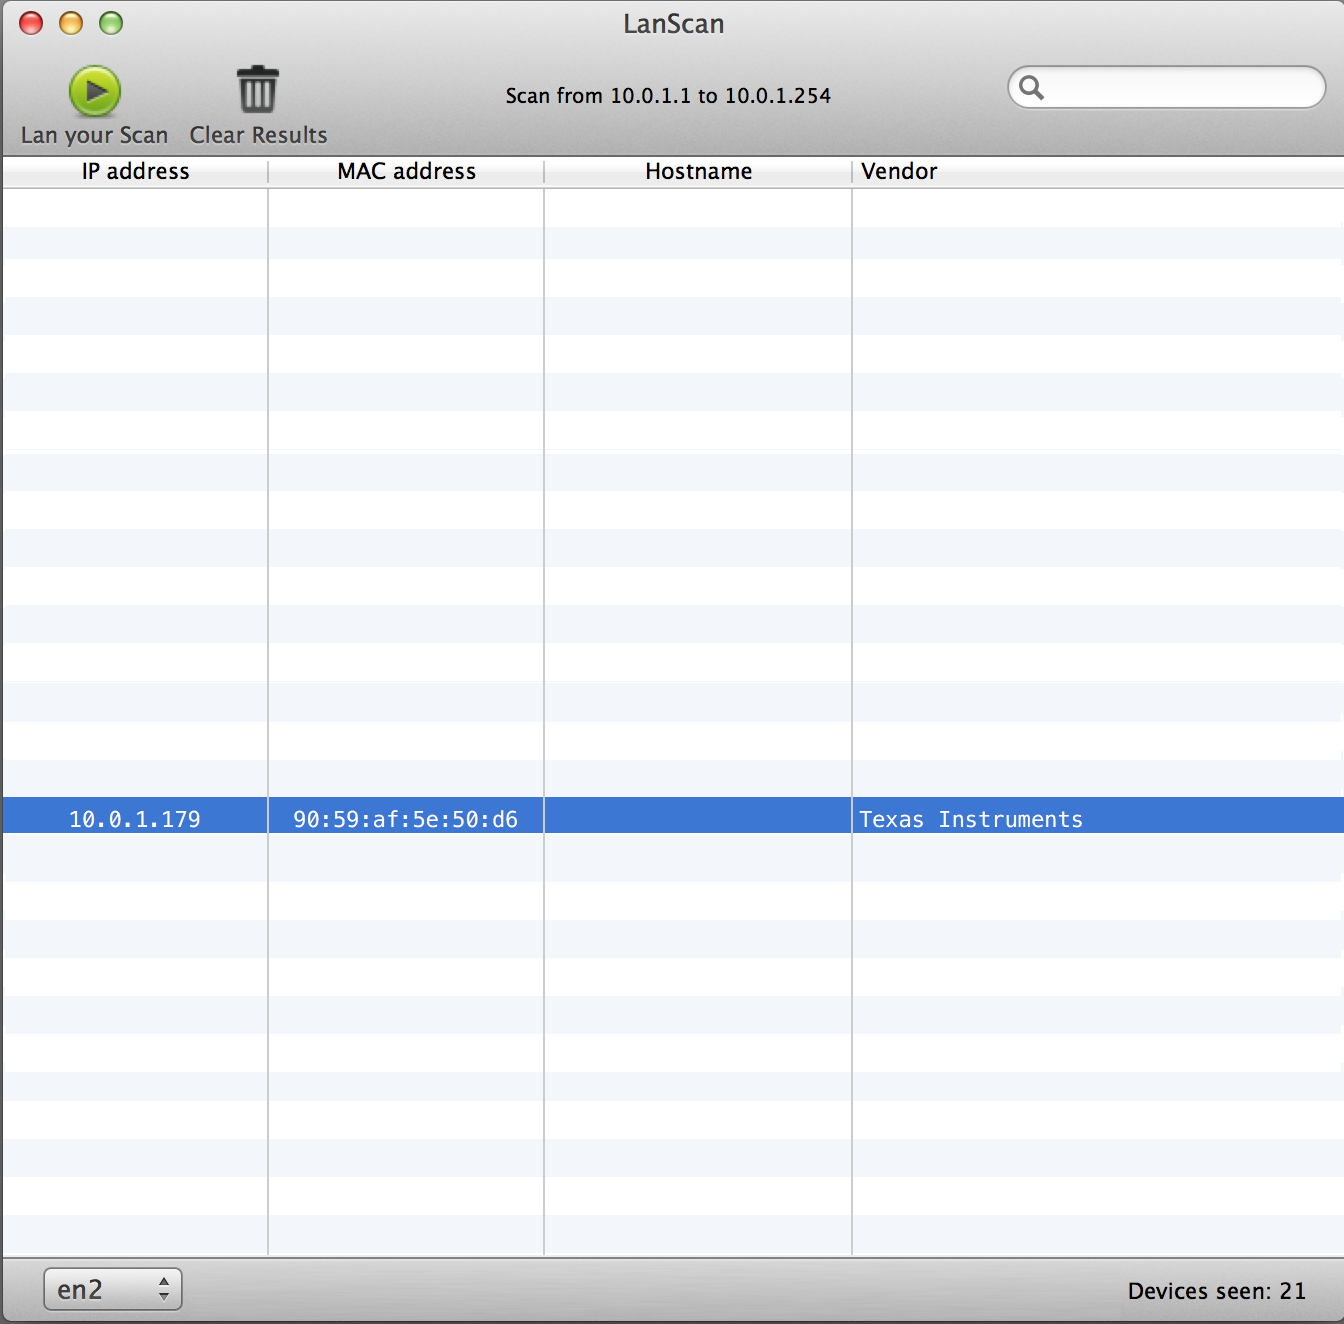 )
)
- Open the Terminal app (Applications > Utilities > Terminal)
- Type -> sudo su
- Enter your password if asked.
- Type -> ssh root@
- After the @ symbol type the IP address of your BeagleBone Black and hit enter. Mine looks like this ssh [email protected] (Image Link  )
)
- You should receive a message about the authenticity of the of and the RSA key fingerprint. Type the entire word YES and hit enter.
- You'll then be asked for the root password to login to the BeagleBone Black. Enter root as the password.
- Here is an image of the entire login sequence (Image Link 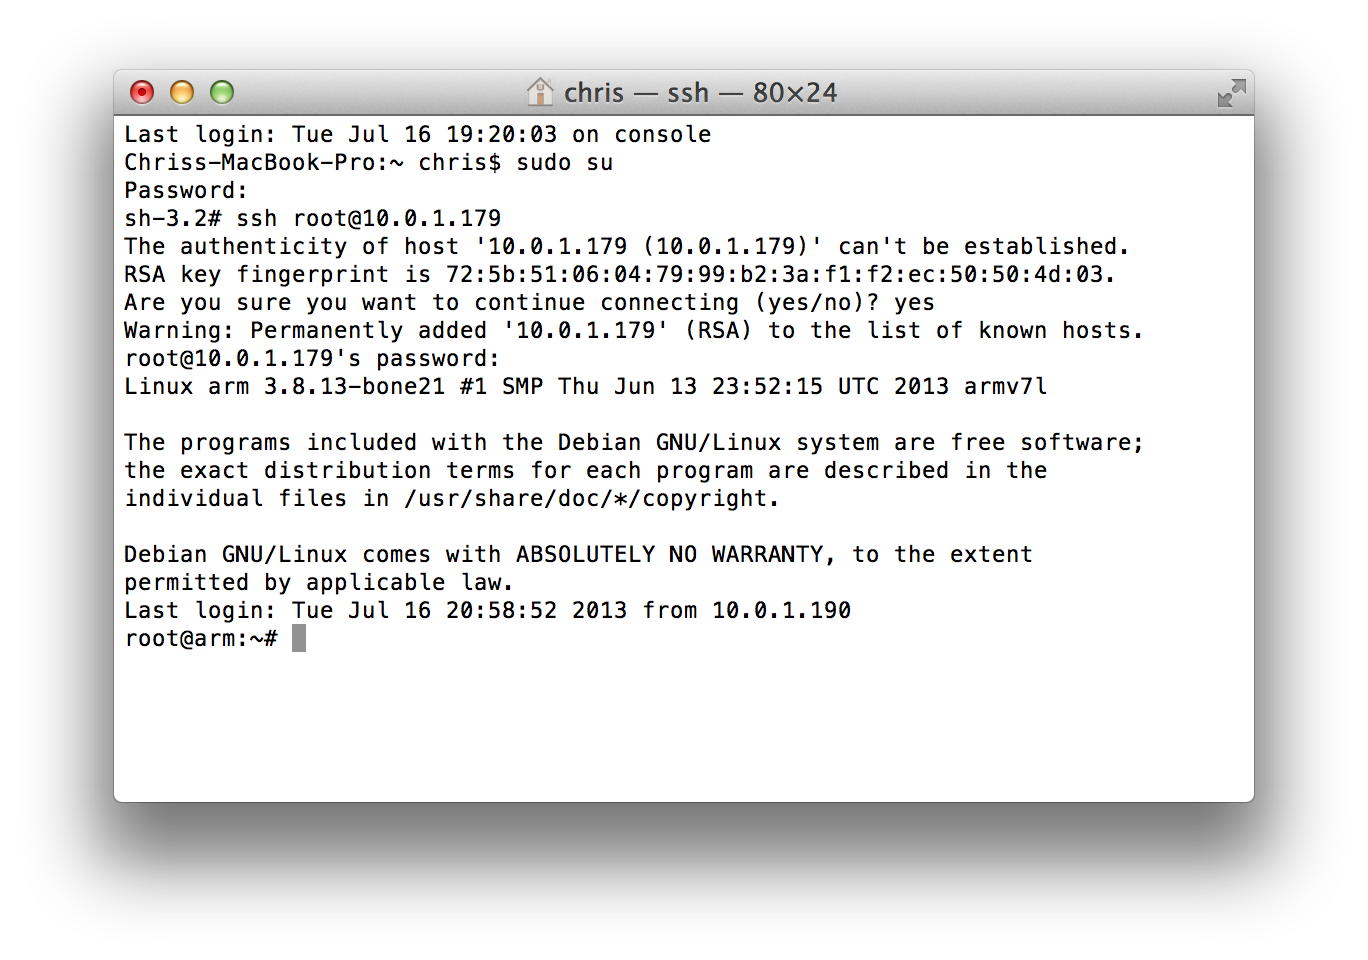 )
)
- From here the Mac OS X and Windows configuration is the same because the work is done on the BeagleBone Black. Skip to the BeagleBone Black OS configuration.
Step By Step Windows
- Connect the MicroSD card using an adapter to a Mac or PC.
- Install 7-Zip Link ![]()
- Install Win32 Disk Image Link ![]()
- Download the Debian Wheezy image (Direct Link ![]() ).
).
- Right-click the downloaded Debian Wheezy image. Select 7-Zip in the right-click menu, then select Extract Here. The file BBB-eMMC-flasher-debian-7.4-2014-03-27 will appear next to the downloaded image when the extraction is complete. (Image Link 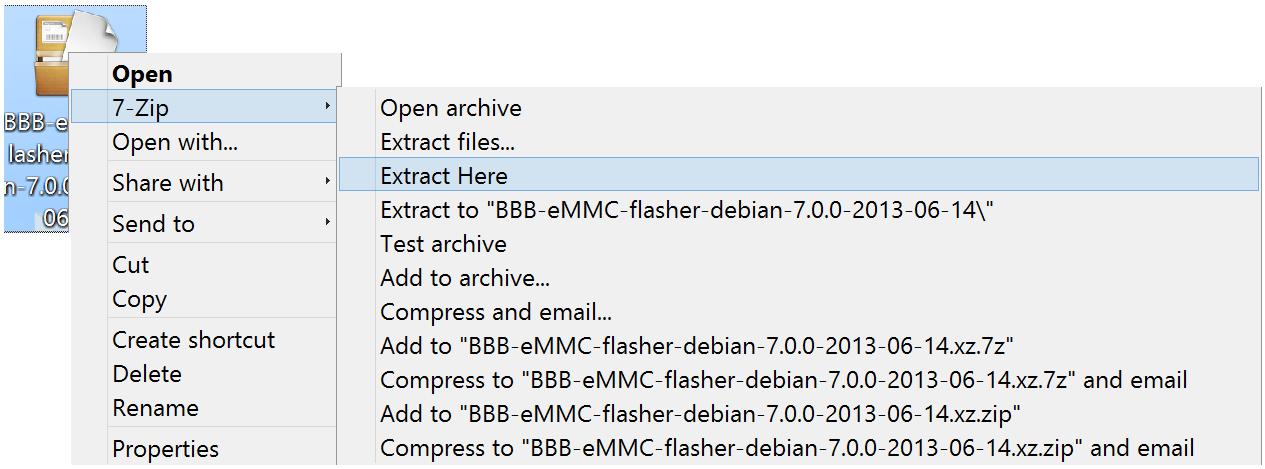 )
)
- Open Win32 Disk Imager
- Make sure the MicroSD card drive letter is selected under Device (Image Link  )
)
- Select the small folder to the left of the Device drive letter and browse to the file extracted using the 7-Zip program. You will need to click the drop-down arrow above the Cancel button (lower right) and select *.* to show all files (Image Link 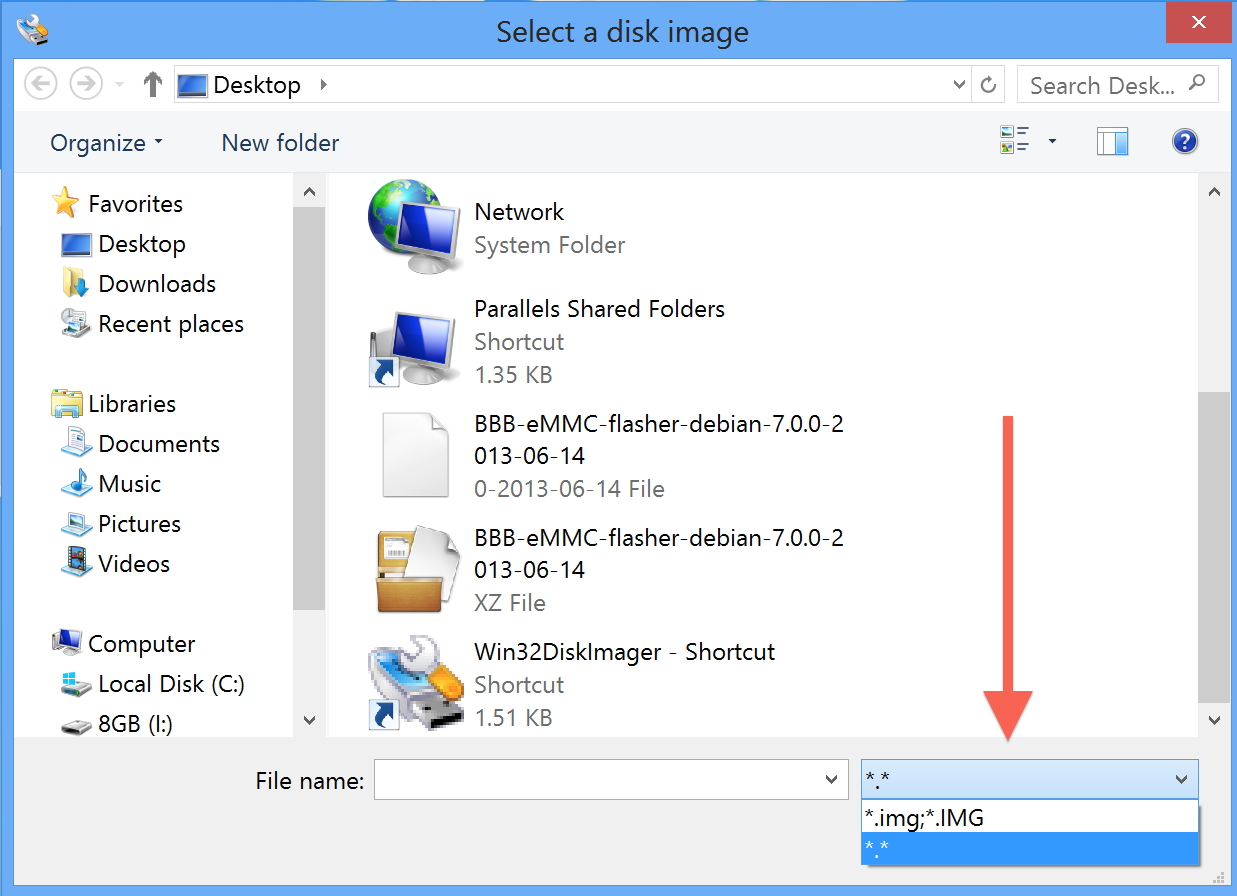 ). (The Debian Wheezy image is extract without the .img file extension). Once *.* is selected you can select the file BBB-eMMC-flasher-debian-7.4-2014-03-27 that was extracted using the 7-Zip program. Don't select the .xz compressed file. (Image Link
  )
)
- Click the Write button and Yes to any popup questions.
- Eject the MicroSd card when Win32 Disk Imager finishes writing the image.
- Place the MicroSD card into the BeagleBone Black's MicroSD card slot.
- Hold down the small Boot Switch / Button while connecting the power supply to the board.
- As soon as one of the User LEDs illuminates, release the Boot Switch / Button.
- The User LEDs should continue flashing while the MicroSD card image is copied to the on-board eMMC flash memory. The process should take about five minutes.
- When all four User LEDs are illuminated steady, pull the power supply from the board and remove the MicroSD card.
- Connect an Ethernet cable to the board and re-connect the power supply.
- The BeagleBone Black will boot into Debian Linux.
- Download the PuTTY application Link ![]()
- Download the Advanced IP Scanner application Link ![]()
- Open Advanced IP Scanner and click the Scan button.
- Once the network scan has completed locate the BeagleBone Black's IP address. The manufacturer will be listed as Texas Instruments. My BeagleBone Black's IP address is 10.0.1.179 (Image Link 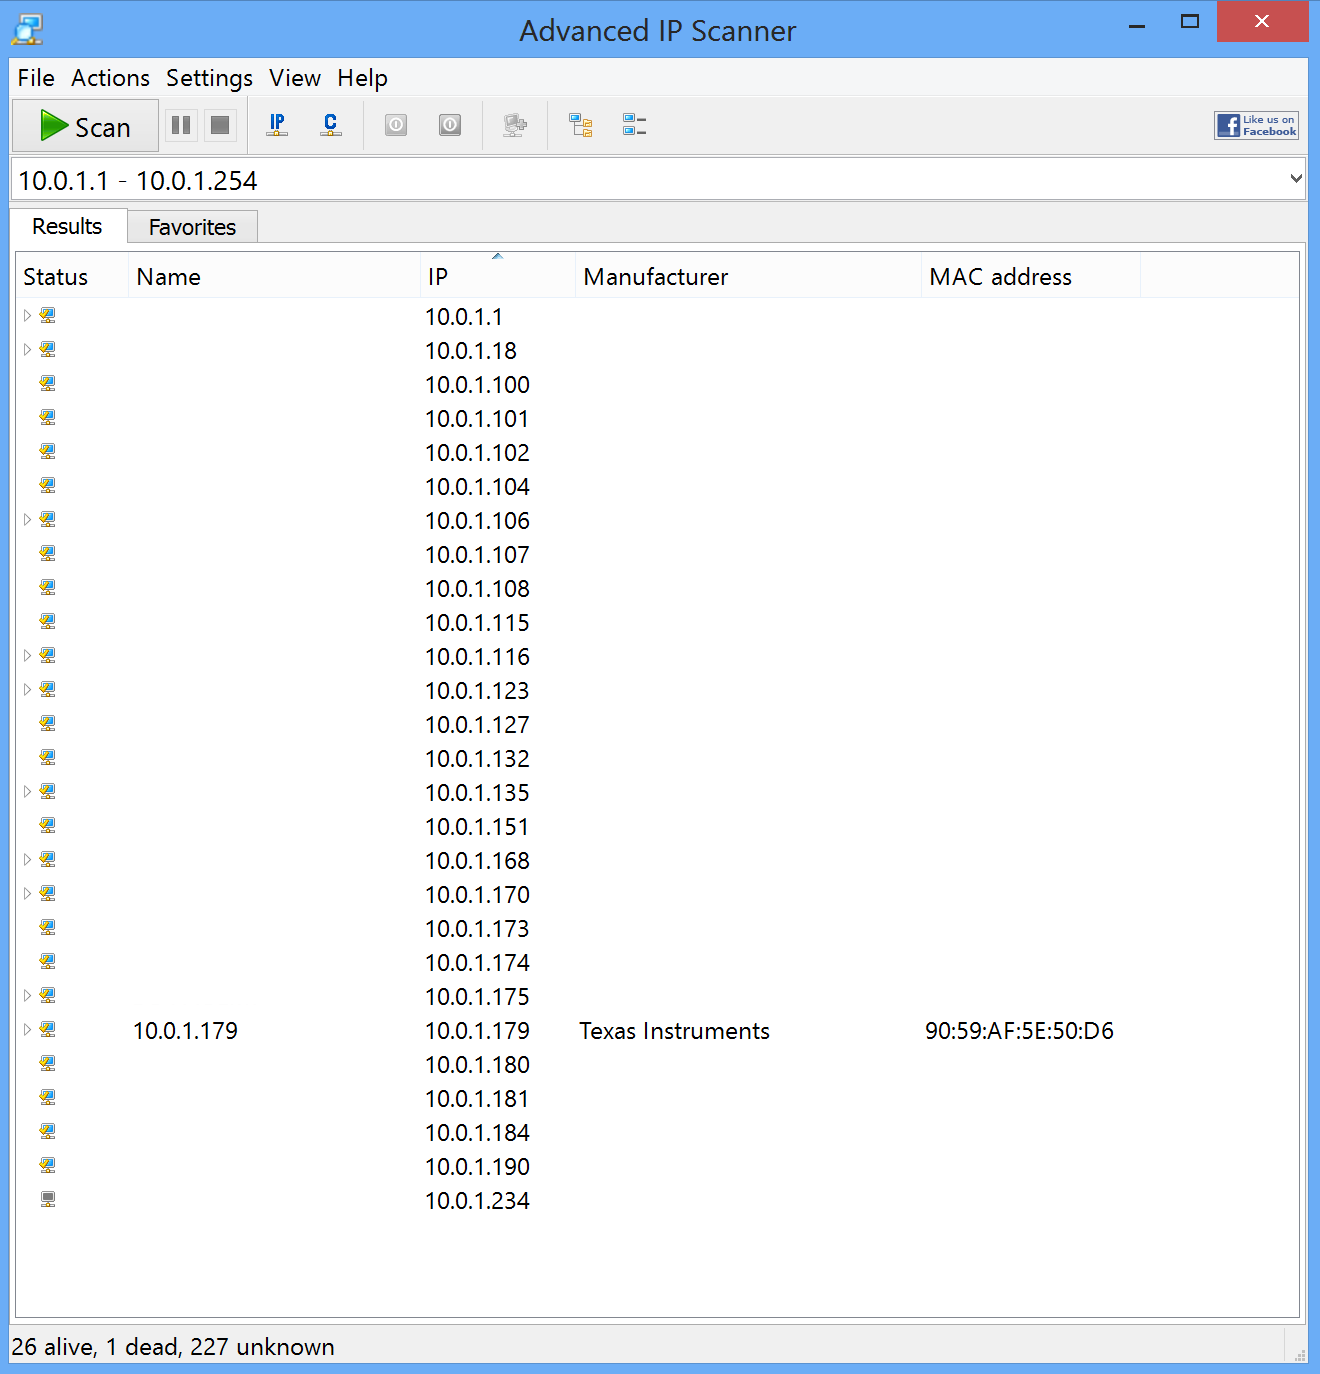 )
)
- Open the PuTTY application and enter the IP address of your BeagleBone Black. I've entered 10.0.1.179 (Image Link  )
)
- Click Open, then click Yes to the PuTTY Security Alert (Image Link 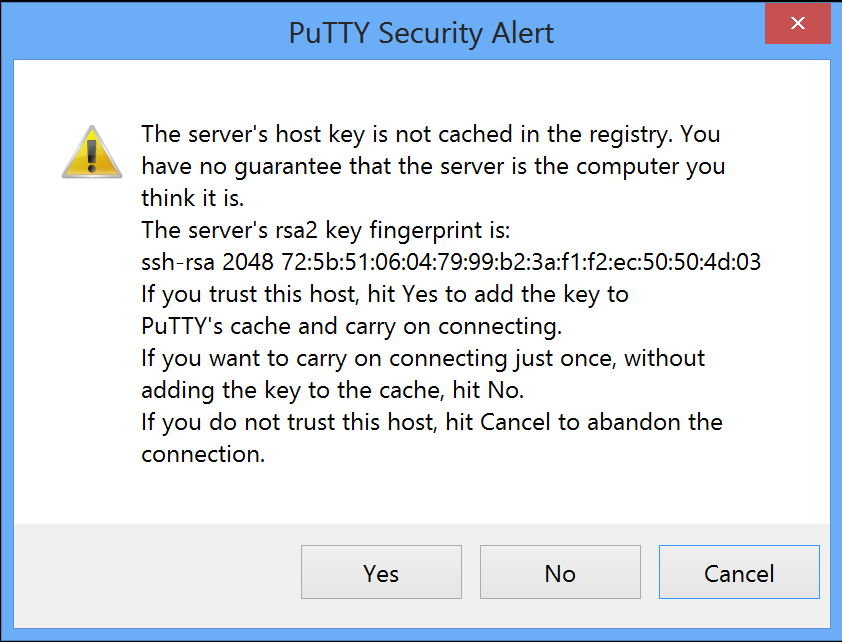 )
)
- Enter root at the login prompt (Image Link 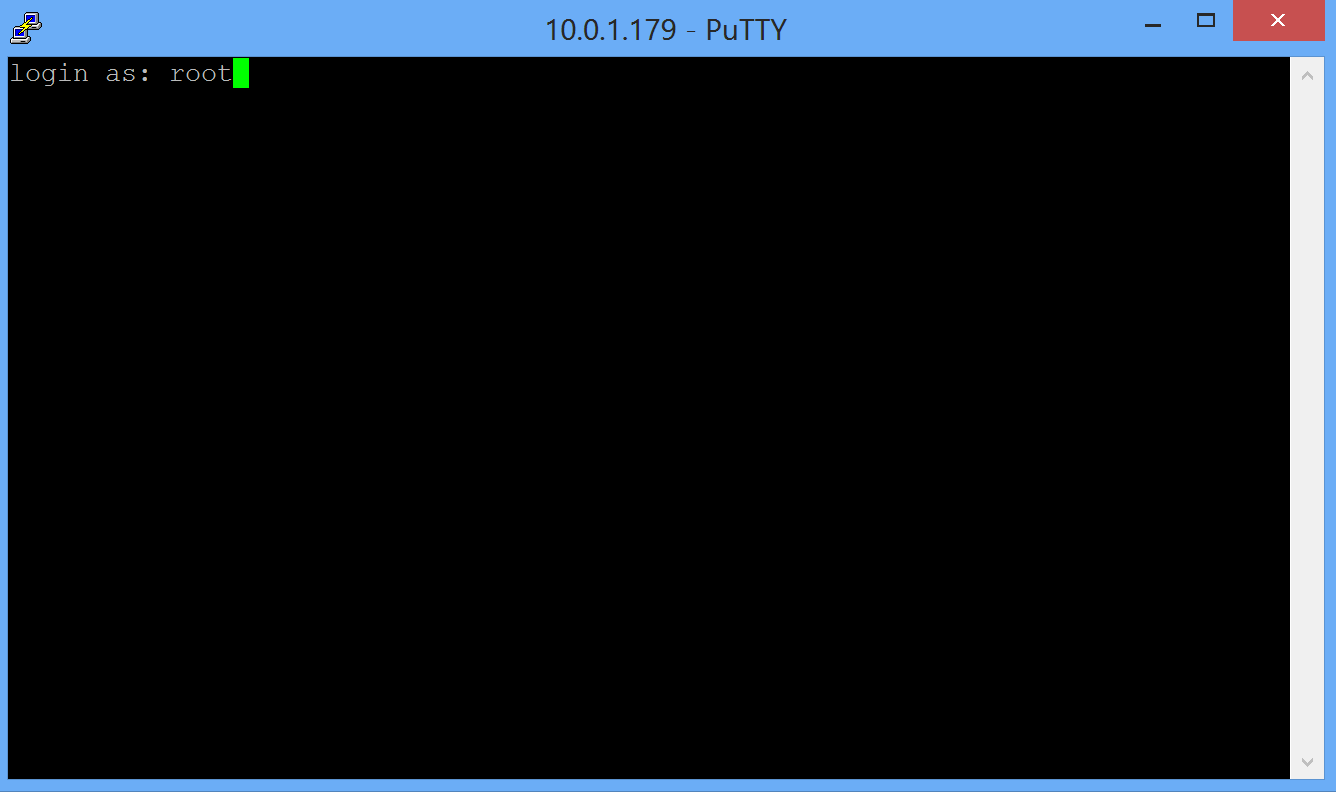 )
)
- Enter root as the password.
- The screen should look like this (Image Link 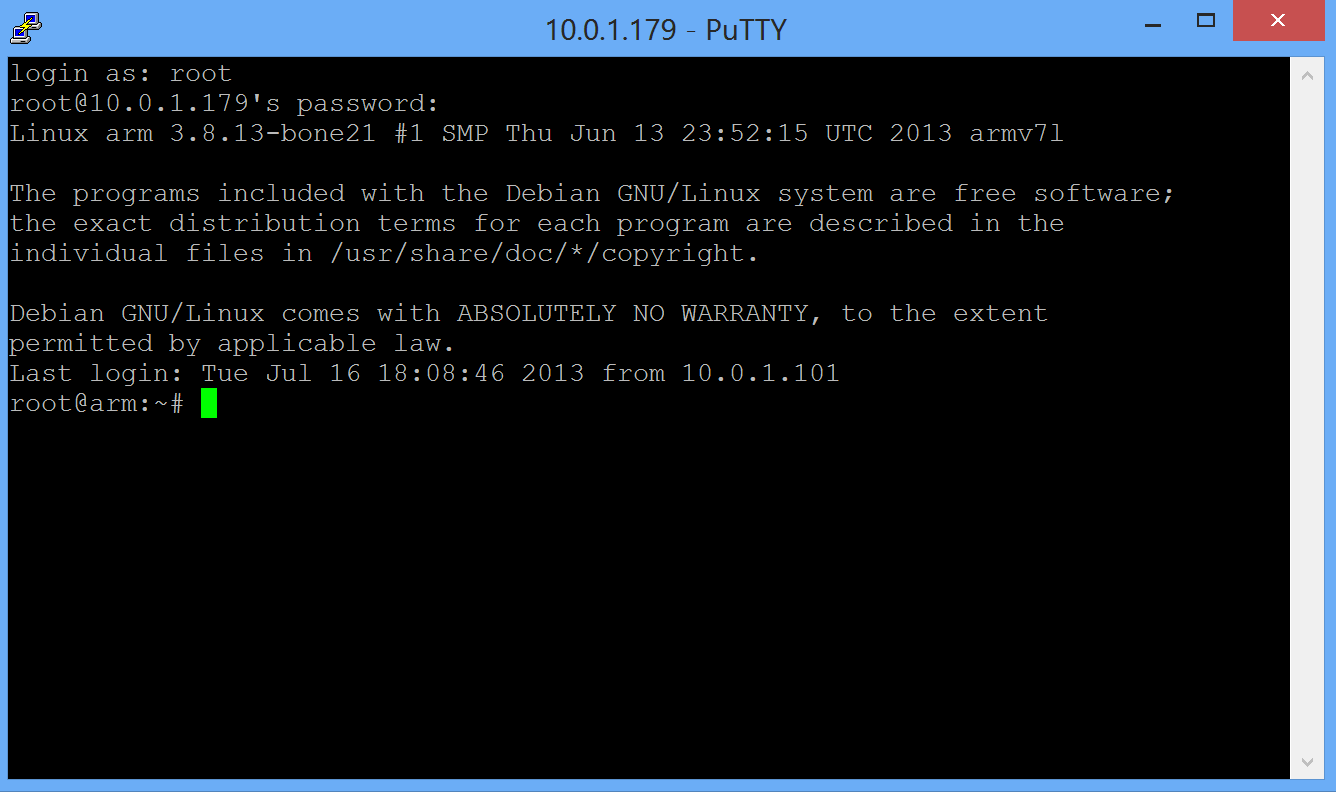 )
)
- From here the Mac OS X and Windows configuration is the same because the work is done on the BeagleBone Black. Skip to the BeagleBone Black OS configuration.
BeagleBone Black OS configuration.
After using PuTTY or the OS X Terminal app to connect via SSH to the BeagleBone Black you'll need to run several commands to update and configure the BBB as an MPD server.
- Type -> apt-get update
- Hit Enter and wait for the update to complete.
- Type -> apt-get upgrade -y
- Hit Enter and wait for the upgrade to complete.
- Type -> reboot
- Hit Enter and wait for the BBB to restart
- Reconnect to the BBB via SSH using PuTTY or OS X Terminal app as described above.
- Type -> apt-get install mpd ncmpc alsa-base cifs-utils -y
- Wait for the installation to complete.
- Type -> apt-get remove apache2 -y
- Wait for the removal to complete.
- Type -> apt-get autoremove -y
- Wait for the removal to complete.
- Type -> mkdir /mnt/music
- Type -> nano /etc/fstab
- Hit the down arrow to the botom of the file that was opened with the previous command.
- You will need the IP address of your NAS drive on which your music collection is stored. Use the aforementioned IP scanning tools if necessary. You will also need the Share name of the folder on your NAS. For example when I connect to my NAS I use the IP address 10.0.1.18 and the Share name is Audio. Audio is just a folder on the NAS.
- Add the following line to the bottom of this opened file (nano /etc/fstab), substituting your NAS IP and Share name rather than using my information. Replace the ********* with the actual password to your NAS Share. Here is an image of my file (Image Link 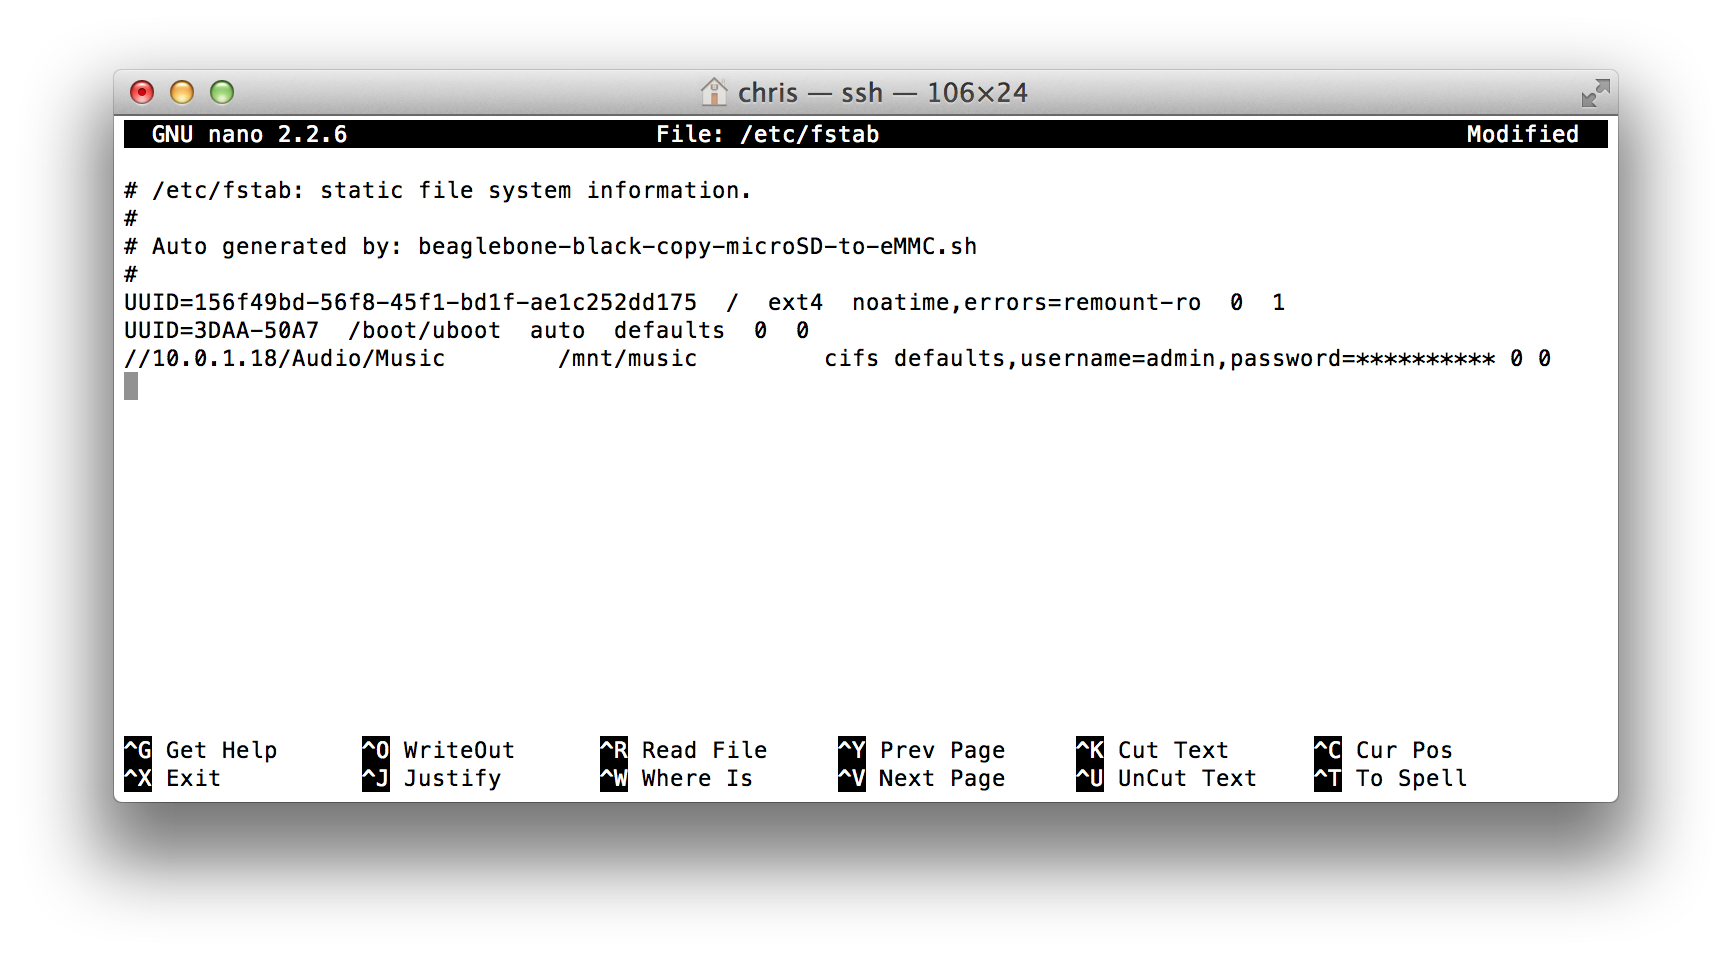 )
)
//10.0.1.18/Audio/Music /mnt/music cifs defaults,username=admin,password=********** 0 0
- After entering this information press Control O (Control key plus the letter O) then his enter to save the file.
- Hit Control X (Control key plus the letter X) to close the file.
- Type -> mount -a
- Type -> nano /etc/mpd.conf
- Make the following changes to the mpd.conf file that was opened with the previous command.
Remove the # symbol in front of the following lines
zeroconf_enabled "yes"
zeroconf_name "BBB Music Player"
mixer_type "hardware"
bind_to_address
Change the line -> bind_to_address "localhost"
to -> bind_to_address "0.0.0.0"
Change the line -> music_directory "/var/lib/mpd/music"
to -> music_directory "/mnt/music"
Find the Alsa Audio Output section and make it look like this, placing # symbols in front of the bottom four options and changing the device to hw:1,0. The name can be changed to USB DAC or anything else if you'd like.
audio_output {
type "alsa"
name "USB DAC"
device "hw:1,0" # optional
# format "44100:16:2" # optional
# mixer_device "default" # optional
# mixer_control "PCM" # optional
# mixer_index "0" # optional
}
- After entering this information press Control O (Control key plus the letter O) then his enter to save the file.
- Hit Control X (Control key plus the letter X) to close the file.
- Type -> nano /etc/modprobe.d/alsa-base.conf
- Arrow to the bottom of the file and add the following text -> options snd-usb-audio nrpacks=1
- After entering this information press Control O (Control key plus the letter O) then his enter to save the file.
- Hit Control X (Control key plus the letter X) to close the file.
- Type -> nano /etc/inittab
- Place the # symbol in fron of the following lines
1:2345:respawn:/sbin/getty 38400 tty1
2:23:respawn:/sbin/getty 38400 tty2
3:23:respawn:/sbin/getty 38400 tty3
4:23:respawn:/sbin/getty 38400 tty4
5:23:respawn:/sbin/getty 38400 tty5
6:23:respawn:/sbin/getty 38400 tty6
- After entering this information press Control O (Control key plus the letter O) then his enter to save the file.
- Hit Control X (Control key plus the letter X) to close the file.
- Type -> nano /etc/default/cpufrequtils
- Add the following text -> GOVERNOR="performance"
- After entering this information press Control O (Control key plus the letter O) then his enter to save the file.
- Hit Control X (Control key plus the letter X) to close the file.
- Type ncmpc
- Once the app opens hit Control U (Control key plus the letter U) to update the MPD database with all the music stored on your NAS. This may take awhile depending on how much music you have and how fast your network and NAS are.
- Hit the letter Q to exit the ncmpc window. The Database update will continue.
- NCMPC can be used to play music, but the interface is pretty crude compared to MPoD on the iPhone or MPaD on the iPad.
Remote Control
- Install MPoD or MPaD from the app store
MPoD Link ![]()
MPaD Link ![]()
If using MPoD, open the app and select the target looking icon in the upper left corner of the Now Playing window. You should see the your server listed. Select the server and tap the Done button. Second, select the gear icon next to the target icon on the Now Playing Screen. Then select Refresh Local Cache to populate the app with the database of music stored on your NAS and available to the server. Now you'll be able to browse through the bottom of the app selecting Artist, Album, Song, and more.
[ATTACH=CONFIG]6521[/ATTACH] [ATTACH=CONFIG]6519[/ATTACH] [ATTACH=CONFIG]6520[/ATTACH]
Please let me know if you find errors in this guide. I will keep it updated as appropriate. Tips, tricks, and tweaks are also encouraged!
![]()
Image Gallery
[ATTACH=CONFIG]6515[/ATTACH][ATTACH=CONFIG]6512[/ATTACH][ATTACH=CONFIG]6509[/ATTACH][ATTACH=CONFIG]6516[/ATTACH][ATTACH=CONFIG]6513[/ATTACH][ATTACH=CONFIG]6510[/ATTACH][ATTACH=CONFIG]6507[/ATTACH][ATTACH=CONFIG]6514[/ATTACH][ATTACH=CONFIG]6511[/ATTACH][ATTACH=CONFIG]6508[/ATTACH][ATTACH=CONFIG]6517[/ATTACH][ATTACH=CONFIG]6518[/ATTACH]
![]()


Recommended Comments