dsnyder
1 Follower

-
Sure. You don't actually need AcourateConvolver, although that makes things a bit easier. To do this without AcourateConvolver, you'll use REW's generator to create two WAV files with the sweep that you want to measure. Create one for each channel and be sure that the timing reference is enabled and matches the channel of the sweep. Make note of sampling rate, length, and beginning and ending frequencies. You'll need all of this when you go to measure. Import the WAV sweep files into Roon. For mine, I converted it to FLAC and added metadata via ID3 tags so that I'd have an easier time finding it in my Roon Library. Start a new measurement in REW. Be sure that all of the parameters match the settings you used to generate the sweep file. Of course, enable an acoustic timing reference. Click start on the sweep and then, in another window or on your phone, play the pre-recorded sweep file. REW will wait until it "hears" the timing reference to begin recording. If you have a room correction filter, make sure it's loaded in Roon's Convolution DSP before you record. This is a great way to test before/after in a true end-to-end test. Let me know if you have more questions.
-

Allo DigiOne Sig support issue - dietpi-update fails
dsnyder replied to RDaneel2's topic in General Forum
Sounds about right. The RPi4 is hot, even with the latest firmware. Stuffing it under a HAT is going (as is done with the new DigiOne Sig) is going to result in poor airflow and temperatures in the 60's for sure…even when it's just idling. -
Here are a couple more audio samples from this system after correction. I recorded these using Sound Professionals binaural mics and a Zoom H4n Pro recorder. They sound significantly better without YouTube compression, but you can get the idea. Muddy Waters: Sara K: Alessandro Galati Trio: Again, headphones are required to hear these as intended.
-
What is the best you've bought so far?
dsnyder replied to erasergate's question in Questions and Answers
Not a thing, per se, but the best investment I've made into sound quality, well, ever, has been engaging @mitchco to help me build optimal room correction filters. He's no stranger in these pages; you probably saw his ad a few times before arriving at this thread. But, if you have not actually worked with him, you owe it to yourself to do so before spending another $500 or more on gear or accessories that, I can almost promise, will not have the same level of impact. https://accuratesound.ca/services -
Help With Audio Solution For My Daughter's School
dsnyder replied to The Computer Audiophile's topic in General Forum
Well, that's an option, but you have to move up to the 705P, which removes "affordable" from the list of features for most people. . Plus AES/EBU is going to be hard to come by on an HDMI breakout. I bought my son a pair of these (or a similar model), and he's been very happy. Not sure how durable they are, but they are similar in size and certainly look nice. https://www.edifier.com/us/en/speakers/s2000pro-bookshelf-speakers-studio-monitors -
Help With Audio Solution For My Daughter's School
dsnyder replied to The Computer Audiophile's topic in General Forum
I'm a fan of the JBL 305P. Do they meet your definition of affordable, small, and transportable? They would need to sit on something. Perhaps a pair of chairs? Looks like $220 for a pair, plus cables. https://www.bhphotovideo.com/c/product/1381116-REG/jbl_305p_mkii_powered.html -
Article: Roon 1.7 With Valence Is Released
dsnyder replied to The Computer Audiophile's topic in Article Comments
Same here. -
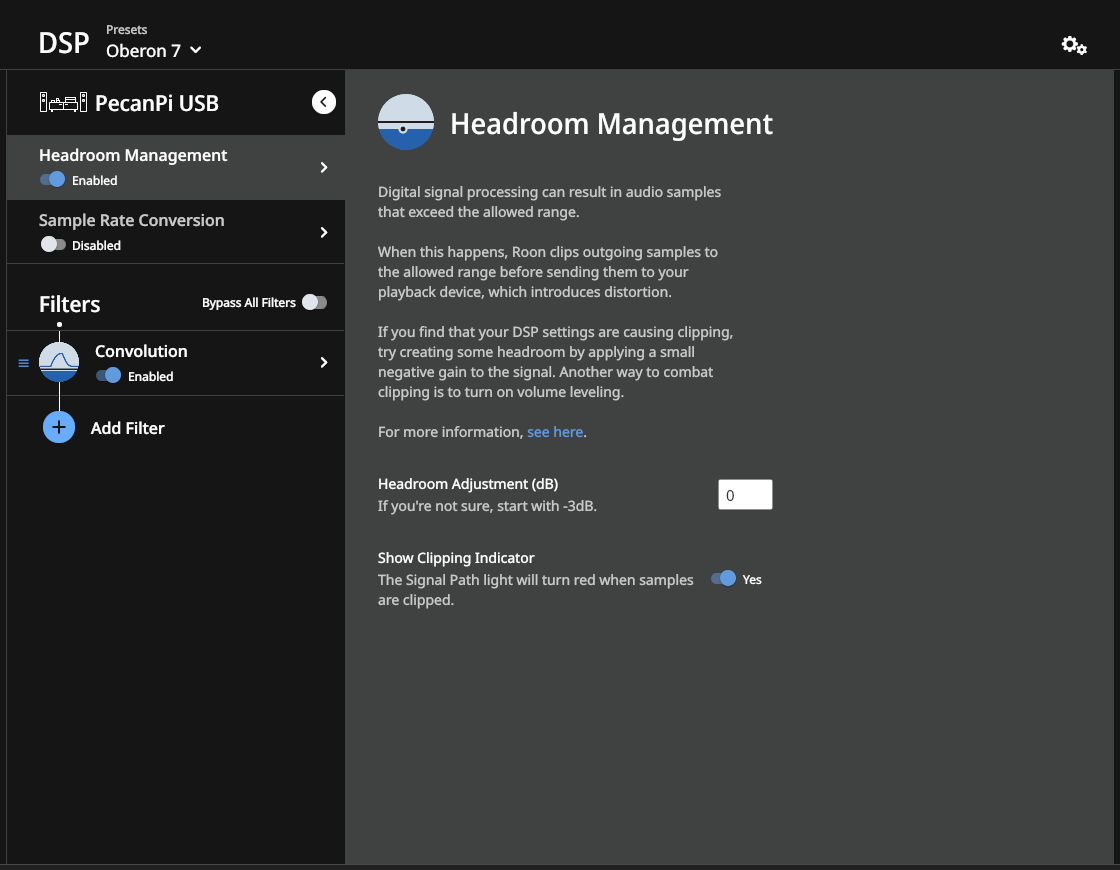
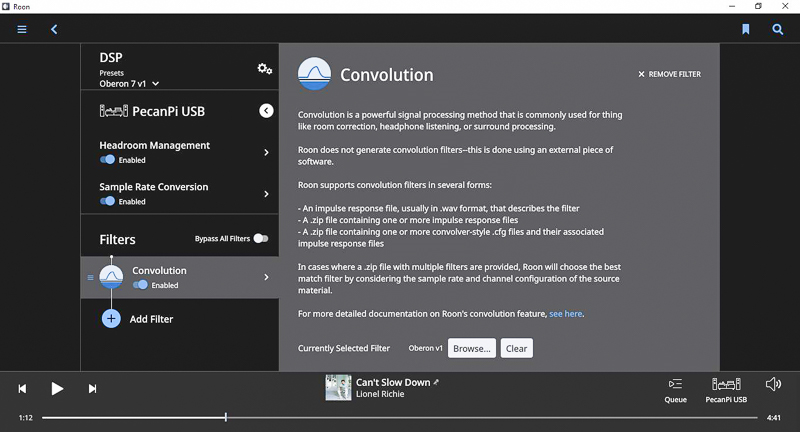
Hi Chris, Good eye! In this case, I have headroom management enabled only so that I can watch out for clipping. I've built FIR filter sets in the past that, under certain circumstances, could result in clipping after convolution. I've not had that problem for a while, but it's something that I continue to keep an eye on as a matter of course.

-
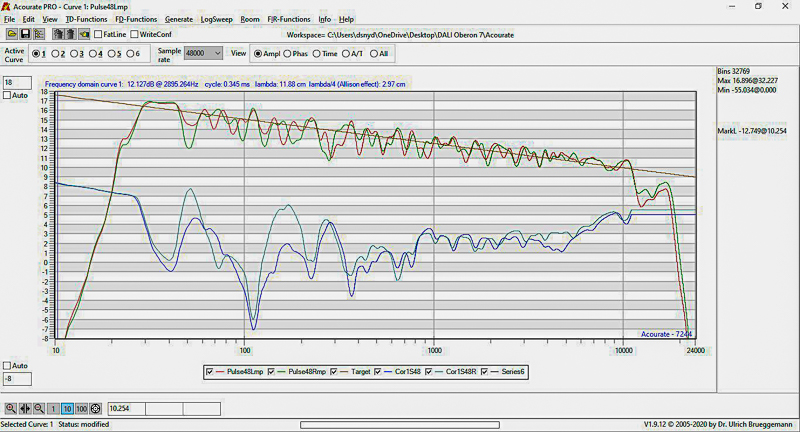
I think it's cool being able to "independently" verify the Acourate results using REW as well. Most DRC systems present a predicted response plot (eg., Dirac), but I'd be surprised if the actual measured response after correction (both amplitude and time) matches as closely as Acourate. I assume Audiolense corrections spot-on as well.
-
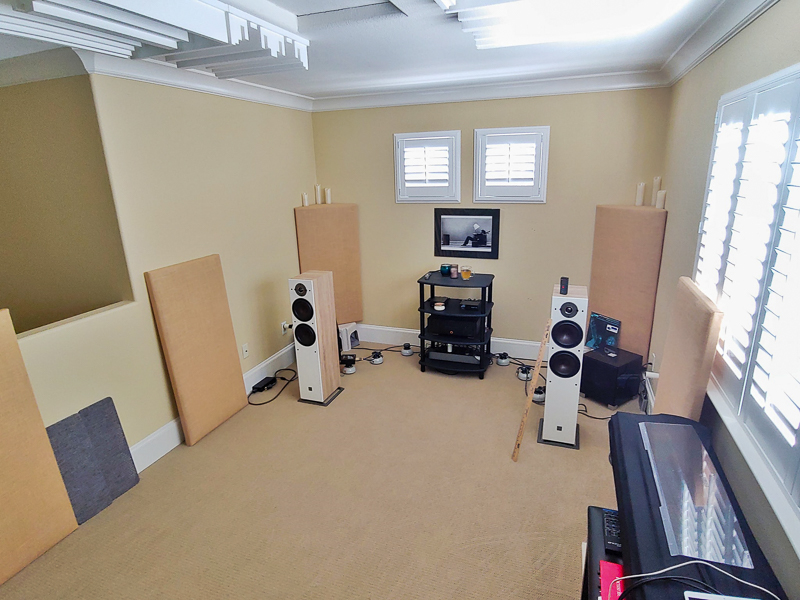
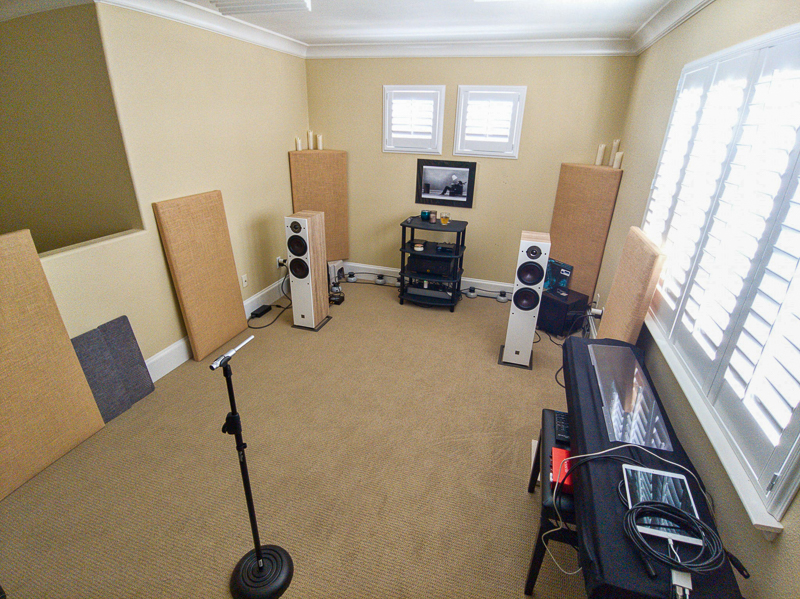
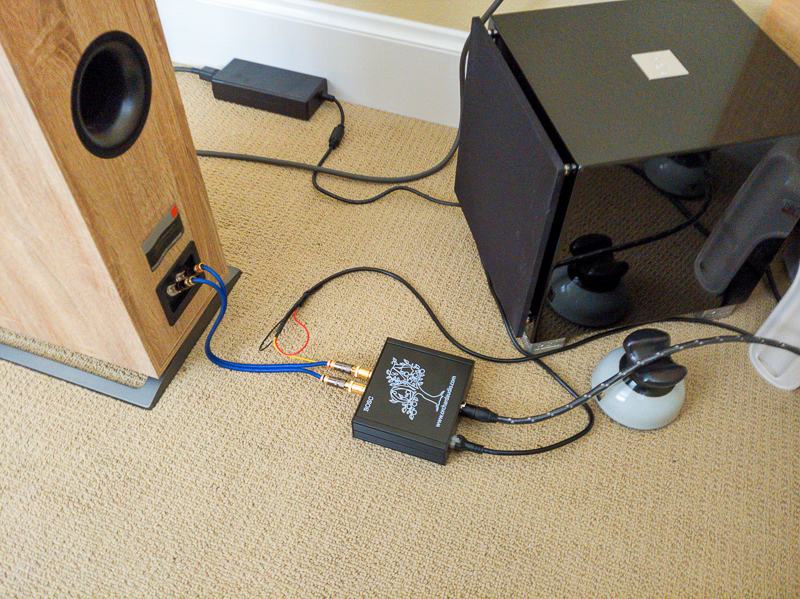
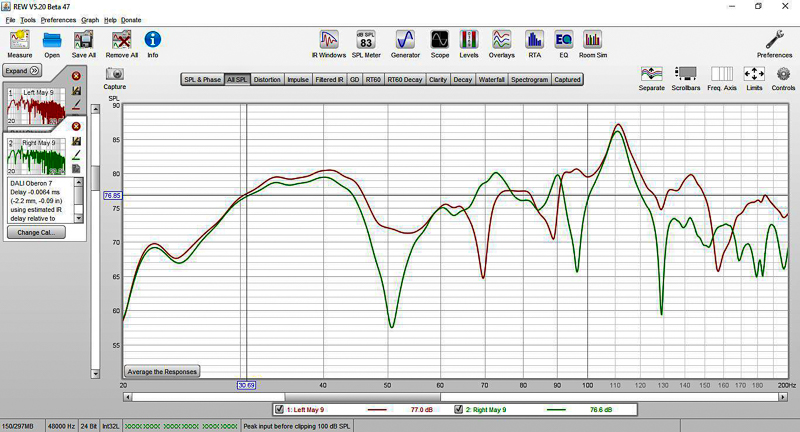
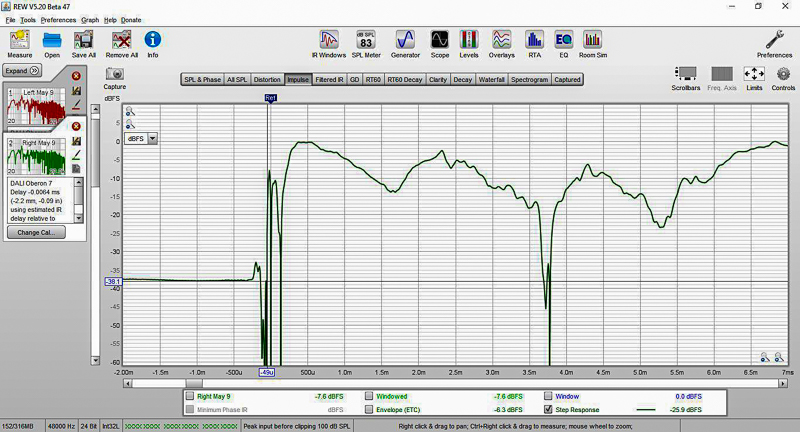
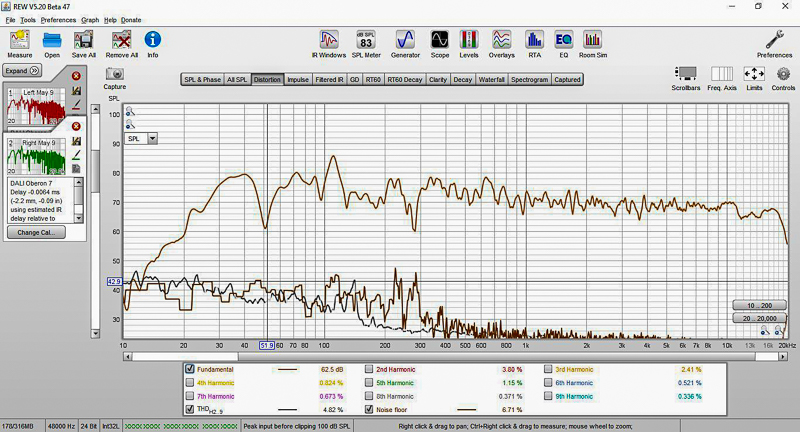
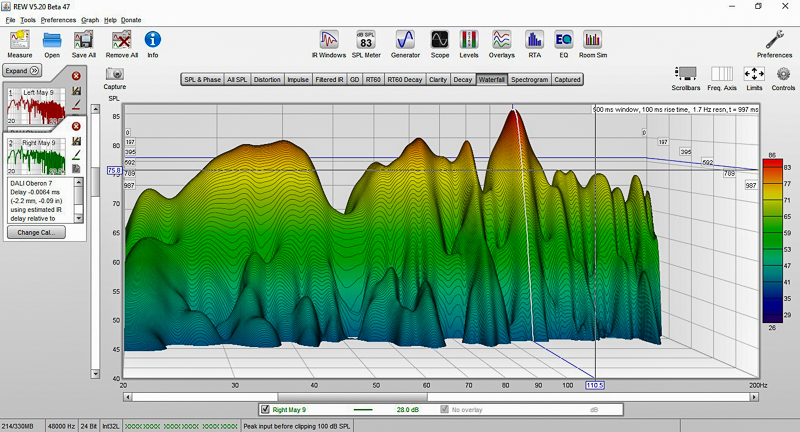
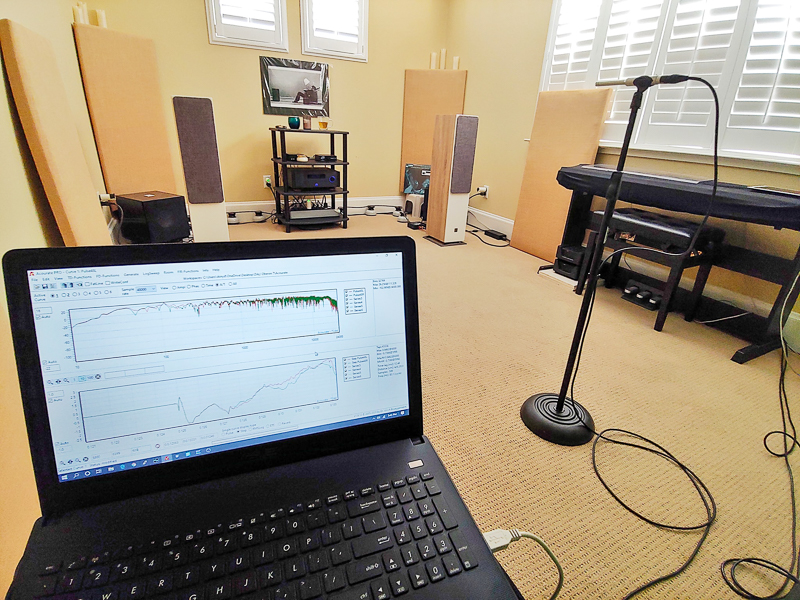
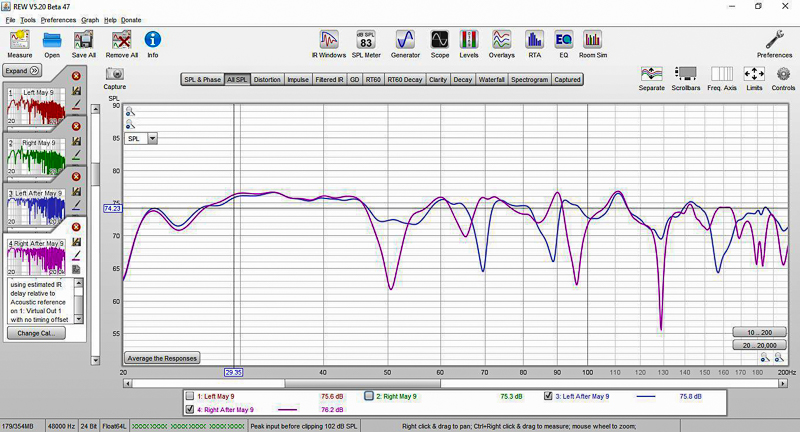
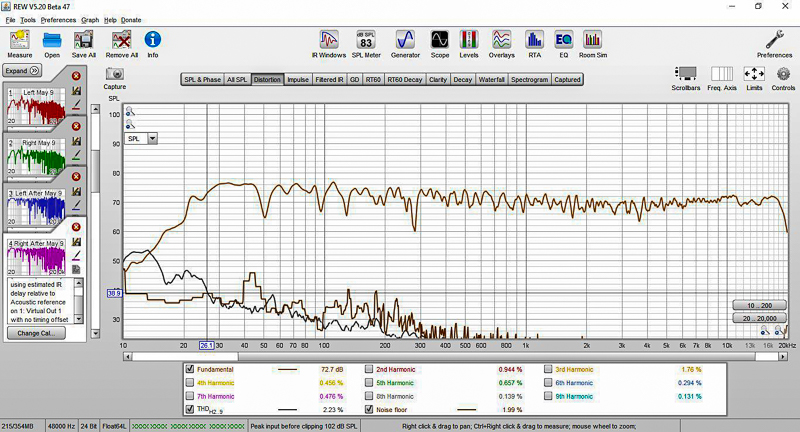
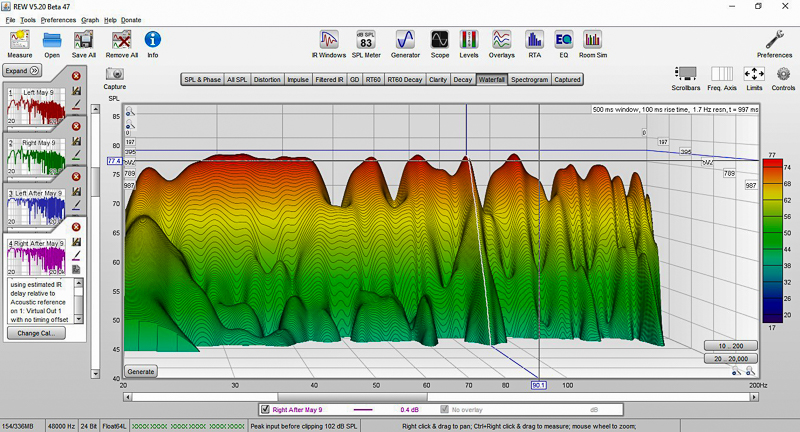
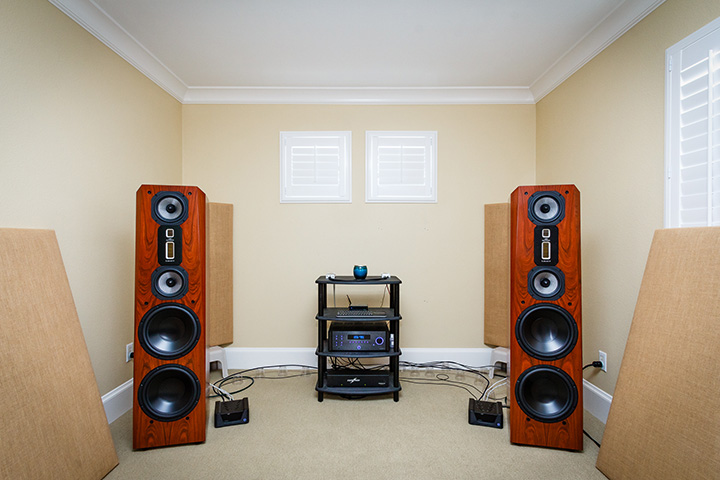
Time for some Spring cleaning in the Loft! Here, through a series of photos and screenshots, I'll chronicle temporary reworking of this room this past weekend for a final listen to the DALI Oberon 7 towers before I ship them back to Lenbrook. You'll laugh. You'll cry. It will be fun for the whole family. Step one: add some loudspeakers. Rough positioning done, based on past measurements. These are designed to fire straight down the length of the room. No toe-in Step two: Left and right distance matched to the room's center-line within 1/16th inch. I always have to pull the left speaker 1/2 inch or so forward. Walls are not true in most houses. Step three: Orchard Audio monoblocks connected and powered up. Mic in place. Ready for acoustic measurements. Note, I'm not using the REL T7i subs in this calibration. Step four: Starting the project with REW to understand our starting point. (the big green screen is tacked to wall-mounted acoustic panels. It's just there because of the shelter-at-home thing. Makes my Zoom videos a little more engaging) Step five: Review un-smoothed response at the listening position below the transition frequency. Welcome to small-room acoustics! 😕 Still, not terrible. I put the -3 dB point in-room at close to 30 Hz. The peak at 112 Hz can use some tamping down, but otherwise, very workable. The suckouts are due to room geometry (15.5 x 10.1 x 8 ft). Could move them around a bit by changing the mic position, and shifting the speakers a little, and I probably would if this was not a temporary setup. Step six: Step response is not the worst I've seen. This should be a lot better with some time-domain correction. Step seven: Distortion at measurement level (~75 dB) are at or below the noise floor. Low distortion is a feature DALI loudspeakers are famous for. Step eight: Reverberation is well-sorted in this room. 300ms is a good target for a room this size. There's probably more I could do with treatments to improve articulation at ~250 Hz, but I'm happy with this overall. Step nine: On the waterfall, that ridge at 110 Hz is going to be fun to work with. I don't recall seeing this as much with other loudspeakers in this room, so this could be a "feature" of the Oberon series' voicing...that punchy mid-bass. Step ten: Now, we get to work. This is not a bad place to start. We can see the late arrival of output from the dual 6.5" woofers in the step response graph at the bottom. Step eleven: After a bit of work with filter design, here's the predicted response after correction. The step response is looking much better (time-domain corrections are amazing). I decided not to correct the dips/suckouts, so I'm only tamping down the peaks. Amplitude chart here is unsmoothed. Step twelve: Let's now go back to REW and check our work by seeing if the measured response matches what Acourate predicted. Here, REW is playing the sweeps into a virtual sound card presented by AcourateConvolver, which is applying the FIR correction filters in real-time. REW then records the corrected response. The suckouts are still there. It's rarely a good idea to EQ these out. Attempting to do so just increases distortion, and our ears are not very sensitive to them anyway. But, the peaks are nicely tamped down in the amplitude response. Oh, and note that our -3 dB point is now easily below 27 Hz. That gets us the lowest note on a grand piano. There's also now usable sub-bass down to just a shade over 20 Hz without adding significantly to distortion. This is full-range response from a $1.5k pair of towers. Not bad. Step thirteen: The step response looks much better. This is a difference you can really hear. Transients, soundstage, localization, everything gets better when timing is good. Step fourteen: Looking at the distortion plot is a good place to to spot over-corrections. THD is below the noise floor above 26 Hz. Our ears are not sensitive to low-level distortion at low frequencies. We can see that, overall, distortion levels are lower after correction. Step fifteen: In the waterfall plot, we still have a bit of an unsightly ridge at ~90 Hz, but life looks much better at 110 Hz. Overall, bass should be very articulate and resolving with this correction. Step sixteen: Filters are loaded into a DSP Preset in Roon. Note that the REL T7i subs are not part of this correction. I'll leave them off for my evaluation, but if the Oberon 7's were sticking around, I'd definitely take time to integrate the REL's. I have yet to encounter a loudspeaker that could not benefit from a good sub-bass system. BTW, I was able to verify the corrections through Roon's convolution by saving the REW logsweep to a WAV file and then playing it back through Roon while measuring in REW. Amplitude response was identical. Step response was slightly different, but that could be due to the technique I used to play the files in Roon while trying to record in REW. Step seventeen: One last plot to illustrate a point. In this room, I usually do full-range corrections, with relatively large filter windows below the transition frequency so that lows get precise correction. Corrections to the highs are very gentle. However, even so, it's easy to end up over-correcting if you're not careful. The Fritz Carrera 7 BE loudspeakers that I usually have in here work best with a fair amount of toe-in, and I don't even have grills for them. Per the manufacturer, the DALI's want to fire straight down the length of the room with their grills on. I probably should have removed the grills for my measurements, but since I did not, I found that I had to limit the band of my amplitude corrections to 11 kHz on the top end. Frequencies above that were getting over-corrected (boosted, effectively), which is not good. Lesson learned. Here's a plot that shows how the response drops off fairly substantially above 11 kHz. I'm not sure if this is due to the grills or lack of toe-in, but they sound more balanced now with frequencies above 11 kHz (later, lowered to 6 kHz) not corrected. I'm always learning new things about this stuff. In case it's not obvious, the top lines are the amplitude response of both channels after correction relative to the target. The bottom lines show the actual inverted amplitude (correction curve) being applied via convolution. Step eighteen: Proof is in the pudding. Here's a little before/after comparison. It's subtle, even on good headphones. The effect is significant in the room and well worth the trouble. The final test: My wife and I had a great listening session last night after I finished my tweaking. I brought her up to the loft to get her opinion on the sound. She was reluctant since she didn't love the sound of the DALI Oberon 7's the last time I had them in the system (without correction). She was blown away by the sound. What started out as just spot checking with a couple of tracks expanded into several hours of exploration of her favorite recordings, including a complete piano concerto (Rach 3) that went on past midnight. 🙂 It's always nice when a bit of setup work and digital room correction pays off with results that are obvious to others. A bit about me: I've been plinking around with Acourate for 3+ years with lots of help from @mitchco's book; however, a few weeks ago, I took advantage of his April sale so that we could work together on a fresh approach to Acourate and DRC for my loft. I learned a ton through the experience, so setting up the DALI's was a fun way to test my what I learned on a different system. Feel free to share comments, suggestions, or similar experiences below. Thanks for having a look, and happy listening. -- David
-
Thanks, @mitchco. I had a great time chatting with you and hope the discussion was helpful to everyone watching. Nothing but positive feedback so far. . I hope we can do something like this again sometime.
-
Apparently, this works in Audirvana Plus 3.x, but you have to rename the files. Goofy, but I'll give it a try this afternoon.
-
Revisiting/updating my server from WS2012+AO+JRiver?
dsnyder replied to LewinskiH01's topic in Software
I understand what you are saying; however, it does not look like the folks at roonlabs are in any big rush to add convolution support that's compatible with Acourate filters. Conversely, if you add your Squeezebox Touch and Raspberry Pi based media players as zones in JRiver, you'll be able to stream your local library to all of them via JRemote and use BubbleUPnP to do the same for TIDAL (two app interfaces instead of one...but not horrible). If the rest of your family would prefer to use the roon client to manage listening outside of the big system, that's easy to accommodate also. You can run both roon and JRiver on your server (looks like it's powerful enough). You would use JRiver + JRemote + BubbleUPnP for playback in the big system and roon client in the rest of the house. My home setup is actually kind of similar...we use JRemote + BubbleUPnP in the Loft system. However, to play music in the rest of the house, we have five SONOS zones, so we use the SONOS mobile app instead. SONOS has access to our local music library on the Synology NAS plus TIDAL (and actually a lot more via Interent radio stations, etc). The SONOS systems sound surprizingly good for what they are and would be easier to setup than Raspberry Pi + powered speakers for your teens' rooms. :-) I'm looking forward to hearing about what you put together! -
Revisiting/updating my server from WS2012+AO+JRiver?
dsnyder replied to LewinskiH01's topic in Software
BTW, I was initially put-off by the notion of using DLNA, but as far as I can tell, there's no lossy compression, re-encoding, or other bit manipulation involved when things are setup correctly. JRiver just gets a FLAC stream from the tablet via the TIDAL HiFi service. In my configuration, this stream is uncompressed to PCM in RAM by JRiver before playback begins. I don't have an easy way to verify it, but the contents in memory should be identical to local FLAC file playback. Pretty cool.